Worm Bin Wonders: Turn Kitchen Scraps into Garden Gold
Are you tired of overflowing trash cans and feeling guilty about all the food scraps you're throwing away? Do you dream of a more sustainable lifestyle where waste becomes a valuable resource? I felt the same way! I was throwing out nearly a bag of food scraps a week, and the guilt was piling up along with the garbage. That’s when I discovered the magic of vermicomposting – worm composting.
Imagine transforming your kitchen scraps into a nutrient-rich elixir for your garden, all thanks to the tireless work of a wriggling army. Vermicomposting, or worm composting, is a natural and incredibly efficient way to recycle food waste into the most amazing, nutrient-rich compost imaginable. It's called "worm castings," and it will make your plants sing! In this guide, I'll walk you through everything you need to know to build and maintain your own worm bin, even if you have limited space or experience. Get ready to reduce waste, enrich your soil, reduce your reliance on synthetic fertilizers, and embrace a truly sustainable lifestyle.

Section 1: Why Worms are a Gardener's Best Friend
Many people are familiar with traditional composting, but vermicomposting takes it a step further. While both methods break down organic matter, vermicomposting utilizes the digestive power of worms to create a unique and highly beneficial end product. The resulting worm castings are an incredible soil amendment. They improve drainage, retain moisture, and provide essential nutrients in a form that plants can easily absorb. It’s like giving your garden a super-powered vitamin boost!
So, what kind of worms are we talking about? The rockstars of vermicomposting are red wigglers (Eisenia fetida). These surface-dwelling worms are voracious eaters and thrive in the moist environment of a worm bin. Don't confuse them with earthworms (nightcrawlers). Nightcrawlers prefer to burrow deep in the soil and are not well-suited for the confined space of a worm bin. I tried using earthworms once, and let’s just say it was a messy escape attempt that ended with me rescuing confused worms from my kitchen floor! Red wigglers, on the other hand, are perfectly content munching away in their bin.
But the benefits of vermicomposting extend far beyond just creating great compost. By diverting food waste from landfills, you're helping to reduce methane emissions, a potent greenhouse gas. Plus, you're creating nutrient-rich soil naturally, reducing the need for chemical fertilizers that can harm the environment. Vermicomposting really is a win-win for your garden and the planet. It’s an accessible method to divert food waste from landfills, right in your own home.
![close-up of red wiggler worms in compost]
Section 2: Building Your Worm Bin: A Step-by-Step Guide
Ready to get started? Building your own worm bin is surprisingly simple and affordable. All you need are a few basic materials:
- Two plastic storage bins (one to nest inside the other)
- A drill
- Newspaper or cardboard
- Red wiggler worms
Here's how to do it:
- Prepare the Bins: Drill several drainage holes in the bottom of one of the bins. This will allow excess moisture to drain out. Drill ventilation holes in the lid and around the upper sides of both bins. Proper drainage and ventilation are crucial for creating a healthy environment for your worms.
- Nest the Bins: Place the bin with the drainage holes inside the other bin. This outer bin will catch any excess liquid, often referred to as "worm tea," which is another valuable fertilizer.
- Create the Bedding: Shred newspaper or cardboard into small pieces and moisten it thoroughly. This will serve as the worms' bedding and food source. Aim for the consistency of a wrung-out sponge.
- Add the Worms: Gently introduce your red wiggler worms to their new home.
- Start Feeding! Bury small amounts of food scraps under the bedding.
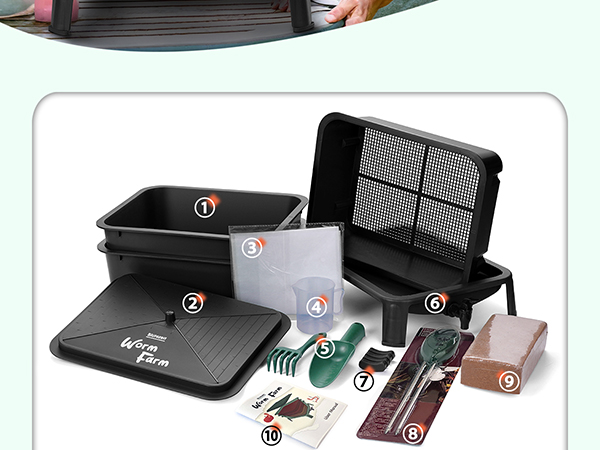
Alternatively, if you prefer a ready-made solution, there are many excellent store-bought worm bins available. These often feature tiered systems or stackable bins that make harvesting compost easier. Just be sure to choose one with adequate drainage and ventilation. A quick online search will reveal trustworthy suppliers.
No matter which route you choose, sourcing your worms from a reputable dealer is crucial. This ensures you're getting healthy red wigglers and avoids the risk of introducing invasive species to your garden.
![person drilling holes in a plastic storage bin to create a worm bin]
Section 3: Feeding Your Worms: What to Give and What to Avoid
Think of your worms as tiny, composting machines with specific dietary needs. A balanced diet is key to a happy and healthy worm colony. Here's a list of suitable food scraps:
- Vegetable scraps: Carrot peels, lettuce leaves, potato skins (avoiding large quantities of nightshades like tomatoes or potatoes)
- Fruit scraps: Apple cores, banana peels, melon rinds
- Coffee grounds and tea bags: (Remove any staples or plastic tags from tea bags.)
- Crushed eggshells: Provide calcium and grit, which aids in the worms' digestion.
It’s important to maintain a balance of "greens" (nitrogen-rich materials like vegetable and fruit scraps) and "browns" (carbon-rich materials like shredded newspaper and cardboard). A good ratio is roughly 2 parts browns to 1 part greens.
Now, let's talk about what to avoid feeding your worms:
- Meat and dairy: These attract pests and create foul odors.
- Oily foods: These can suffocate the worms and disrupt the composting process.
- Citrus (in large quantities): While a little citrus is okay, too much can make the bin acidic.
- Onions and garlic (in large quantities): These can also be harmful to worms in large amounts.
Burying food scraps under the bedding is essential to prevent fruit flies and other pests from moving in. I learned this the hard way when I left some banana peels on the surface and woke up to a fruit fly infestation! Chopping food scraps into smaller pieces also helps them decompose faster, making it easier for the worms to digest.
If you notice a sour smell or soggy bedding, you're likely overfeeding your worms. On the other hand, if the worms are trying to escape, they may be underfed. Adjust the amount of food you're providing accordingly.
![hand adding vegetable scraps to a worm bin with visible worms]
Section 4: Maintaining Your Worm Bin: Troubleshooting and Tips
Like any living system, your worm bin may encounter a few challenges along the way. Here's how to troubleshoot common problems:
- Fruit flies: As mentioned above, bury food scraps completely. You can also use fruit fly traps to control the population.
- Foul odors: This usually indicates overfeeding or a lack of ventilation. Reduce the amount of food you're providing and ensure the bin has adequate airflow.
- Slow decomposition: The bin may be too dry. Add more moistened bedding or lightly spray the contents with water.
- Worm die-off: This could be due to extreme temperatures, overfeeding, or exposure to harmful substances. Check the temperature, adjust the feeding, and ensure you're only adding safe food scraps.
Maintaining the correct moisture balance is crucial. The bedding should be moist but not soggy. Think of it like a wrung-out sponge. You should also monitor the temperature. Worms thrive in temperatures between 55°F and 77°F. Protect them from extreme heat or cold by moving the bin indoors or insulating it.
Harvesting worm castings is the rewarding culmination of your vermicomposting efforts. There are several methods you can use:
- Dumping and sorting: Dump the contents of the bin onto a tarp and carefully sort out the worms from the castings.
- Migration method: Place fresh bedding and food on one side of the bin. The worms will migrate to the new food source, leaving the castings behind.
- Tiered bin systems: These systems have multiple trays. When one tray is full, you start feeding the worms in the next tray. The worms will eventually migrate upwards, leaving the castings behind in the lower tray.
Section 5: Using Worm Castings in Your Garden: Liquid Gold
Worm castings are a true powerhouse for your garden. They improve soil structure, enhance nutrient availability, promote plant growth, and suppress plant diseases. You can use them in a variety of ways:
- Top dressing: Sprinkle worm castings around the base of your plants.
- Side dressing: Mix worm castings into the soil along the sides of your plants.
- Mixing into potting soil: Add worm castings to your potting mix when planting seedlings or repotting plants.
- Making worm tea: Soak worm castings in water to create a nutrient-rich liquid fertilizer.
To make worm tea, simply add a handful of worm castings to a bucket of water (about a 1:10 ratio). Let it steep for 24-48 hours, stirring occasionally. Strain the mixture and use it to water your plants or as a foliar spray. Worm tea is fantastic for foliar feeding and soil drenching, providing plants with easily accessible nutrients. I’ve personally seen a huge difference in the health and yield of my tomatoes and peppers after using worm castings and worm tea. My herbs are noticeably more vibrant and flavorful, too!
![person spreading worm castings around the base of a vegetable plant]
Conclusion:
Vermicomposting is more than just a way to get rid of food scraps; it's a gateway to a more sustainable and rewarding lifestyle. By harnessing the power of worms, you can create a thriving garden, reduce your environmental impact, and connect with nature in a meaningful way. It’s a simple and rewarding way to reduce waste and create a more sustainable lifestyle. Even small-scale vermicomposting can make a big difference.

Spring and Fall are the perfect times to start your worm bins, when temperatures are moderate and worms are most active.
Call to Action:
Now it's your turn! Share your own vermicomposting experiences, tips, and questions in the comments below. What are your favorite foods to feed your worms? What kind of results have you seen in your garden?
If you found this post helpful, please share it with your friends and family who might be interested in vermicomposting.
And don't forget to subscribe to our newsletter for more gardening tips, DIY projects, and sustainable living ideas! As a bonus, you'll receive a free downloadable guide to troubleshooting common worm bin problems! Happy composting!