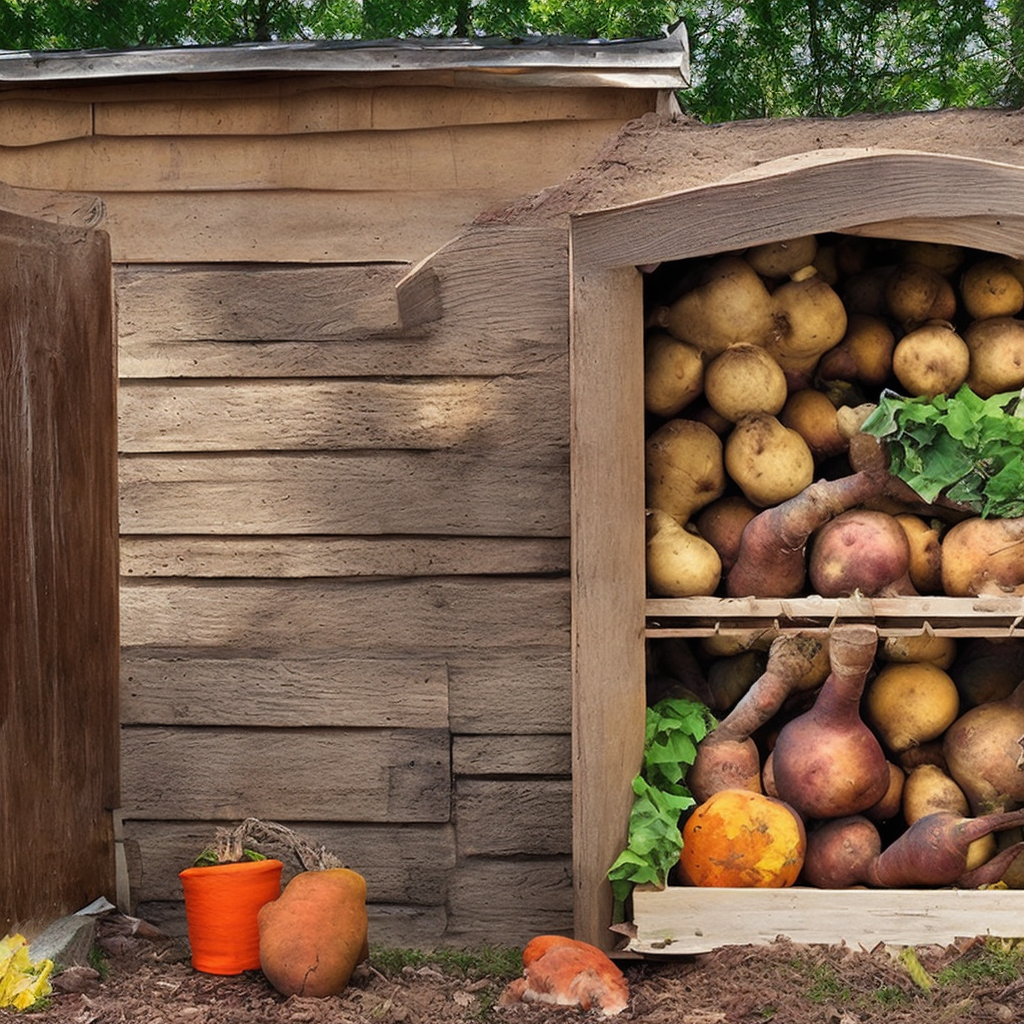
Unlock the Secrets of Winter Storage: Building Your Own DIY Root Cellar
Imagine biting into a crisp apple in January, or enjoying perfectly stored potatoes from your own garden all winter long. Sounds idyllic, right? With a root cellar, this dream can become a reality. At Better Homes and Harvests, we're passionate about self-sufficiency and sustainable living. That's why we're thrilled to guide you through building your own DIY root cellar, a time-tested method for preserving the bounty of your harvest. Get ready to roll up your sleeves and embark on this rewarding project!

Why Build a Root Cellar? The Benefits of Earth's Refrigerator
Before we dive into the construction, let's talk about why a root cellar is an invaluable addition to any homestead.
- Food Preservation: Extends the shelf life of root vegetables, fruits, and even some canned goods without the need for electricity.
- Cost Savings: Reduces your grocery bills significantly, especially during the off-season.
- Improved Flavor: Properly stored produce often develops richer, more complex flavors.
- Self-Sufficiency: Increases your independence and connection to your food source.
- Environmental Impact: Reduces reliance on energy-intensive refrigeration.
Planning Your Root Cellar: Size, Location, and Design
Our root cellar design will be approximately 8ft long x 6ft wide x 7ft high. This size provides ample storage for a family's winter needs.
Location is Key: Choose a location that is naturally cool and shaded, preferably on the north side of your home or a hill. Good drainage is essential to prevent flooding. Dig a test pit to assess soil conditions and water table levels.
Design Considerations: We'll be constructing a sturdy, partially subterranean root cellar with poured concrete block walls, a reinforced concrete floor, and an insulated wooden door. This design balances ease of construction with durability and effectiveness.

Step-by-Step Guide: Building Your Root Cellar
Now, let's get our hands dirty! This is an intermediate-level DIY project, so be prepared to dedicate time and effort. Safety is paramount, so always wear appropriate protective gear.
Phase 1: Excavation and Foundation
- Excavate the Site: Dig a hole slightly larger than your planned root cellar dimensions (8ft x 6ft). The depth should be around 5-6 feet, leaving about a foot of the structure above ground for better temperature regulation and ventilation.

- Pour the Concrete Floor: Prepare a level base and pour a 4-inch thick reinforced concrete floor. Use rebar or wire mesh for added strength. Ensure the floor is perfectly level for proper drainage. Let the concrete cure for at least 7 days before proceeding.
Phase 2: Building the Concrete Block Walls
- Lay the First Course: Begin laying the concrete blocks, ensuring they are level and square. Use mortar to bind the blocks together. A staggered joint pattern will add strength to the walls.

- Continue Building the Walls: Continue laying courses of concrete blocks until you reach the desired height (approximately 7 feet from the floor). Periodically check for level and plumb.
- Backfill and Drainage: After the mortar has cured, backfill around the outside of the walls with gravel for drainage. Install a perforated drain pipe around the perimeter of the foundation, leading to a suitable drainage area. This prevents water from accumulating against the walls.
- Waterproofing: Apply a waterproof sealant to the exterior of the concrete block walls to further protect against moisture.
Phase 3: The Roof and Entrance
- Framing the Roof: Construct a sturdy wooden frame for the roof. Use pressure-treated lumber for durability. The roof should have a slight slope to allow for water runoff.
- Roofing Material: Cover the roof frame with plywood sheathing and then apply a waterproof roofing material, such as roofing felt and shingles or a rubber membrane.
- Building the Doorway: Frame the doorway opening with pressure-treated lumber. Ensure the opening is properly sized for your insulated door.
Phase 4: Insulation and Ventilation
- Insulating the Walls: Line the interior walls with 4-inch rigid foam insulation board. Secure the insulation with construction adhesive and/or mechanical fasteners. Seal all seams and joints with foil tape to create an airtight barrier.
- Insulating the Roof: Insulate the underside of the roof with the same 4-inch rigid foam insulation board.
- Ventilation: Install two ventilation pipes: one near the floor and one near the ceiling. These pipes will allow for air circulation and help regulate temperature and humidity. Consider using adjustable dampers to control airflow. Proper ventilation is crucial for preventing mold and rot.
- Building the Insulated Door: Construct a sturdy wooden door and insulate it with rigid foam insulation. Install weather stripping around the doorframe to create an airtight seal. A well-insulated door is essential for maintaining a consistent temperature inside the root cellar.
Phase 5: Finishing Touches and Interior Design
- Install Shelving: Build wooden shelving to store your produce. Use untreated lumber to avoid contaminating your food. Ensure the shelves are sturdy enough to support the weight of your stored items.
- Lighting: Install a low-wattage light fixture for occasional use. Avoid leaving the light on for extended periods, as it can raise the temperature inside the cellar.
- Humidity Control: Monitor the humidity levels inside the root cellar. Aim for a humidity level of around 85-95%. You can increase humidity by placing containers of water inside the cellar or by sprinkling the floor with water. You can decrease humidity by opening the ventilation dampers or by using a dehumidifier.
Materials List:
Here’s a comprehensive list to get you started. Adjust quantities based on your specific needs.
- Concrete Blocks (approximately 250)
- Concrete Mix (for floor and mortar – estimate based on cubic footage)
- Rebar or Wire Mesh (for concrete floor reinforcement)
- Mortar Mix (approximately 20 bags)
- Gravel (for drainage – approximately 5 cubic yards)
- Perforated Drain Pipe (approximately 20 feet)
- Waterproof Sealant (for exterior walls – 5 gallons)
- Pressure-Treated Lumber (for roof framing and doorway)
- Plywood Sheathing (for roof – 10 sheets)
- Roofing Material (shingles or rubber membrane – estimate based on roof area)
- 4-inch Rigid Foam Insulation Board (approximately 20 sheets)
- Construction Adhesive
- Foil Tape
- Wooden Door (insulated)
- Weather Stripping
- Ventilation Pipes (2 – 4-inch diameter)
- Adjustable Dampers (for ventilation pipes)
- Untreated Lumber (for shelving)
- Low-Wattage Light Fixture
- Hardware (nails, screws, etc.)

Storing Your Harvest for Success: Tips and Tricks
- Harvest at Peak Ripeness: Choose produce that is fully mature but not overripe.
- Handle with Care: Avoid bruising or damaging the produce during harvest and storage.
- Cure Properly: Some vegetables, such as onions and garlic, require curing before storage.
- Sort and Cull Regularly: Check your stored produce regularly and remove any items that show signs of spoilage.
- Maintain Proper Temperature and Humidity: Monitor the temperature and humidity inside the root cellar and adjust as needed.
- Store Different Vegetables Separately: Some vegetables, such as apples, emit ethylene gas, which can cause other vegetables to spoil more quickly.

Conclusion: Embrace the Rewards of Root Cellar Living
Building a root cellar is a significant undertaking, but the rewards are well worth the effort. By following these steps, you can create a sustainable and cost-effective way to preserve your harvest and enjoy fresh, flavorful produce all winter long. So, gather your tools, enlist some help, and get ready to unlock the secrets of winter storage. Happy homesteading!