Turning Trash into Treasure: Building a Self-Watering Garden Bed from Upcycled Materials
Are you tired of sky-high grocery bills and feeling reliant on a food system that seems increasingly fragile? Do you dream of fresh, homegrown vegetables but lack the time or consistent rainfall for traditional gardening? Then, homesteaders, this project is for you. We're diving into the world of upcycling to build a self-watering garden bed that will boost your self-sufficiency, enhance your sustainable living practices, and put some serious savings back in your pocket. This DIY raised garden bed project is designed to be affordable and accessible, even if you're new to the world of DIY. Get ready to turn trash into treasure and cultivate a thriving garden with minimal effort!
The Problem: Traditional Gardening Challenges
Traditional gardening, while rewarding, comes with its own set of challenges. Constant watering, especially during hot summer months, can be time-consuming and wasteful. Weeding is a never-ending battle, and soil quality can be a constant concern. For those of us in drier climates, like here in Zone 7b, water conservation is paramount. And let's be honest, the cost of building materials for a garden can quickly add up.
The Solution: A Self-Watering, Upcycled Oasis
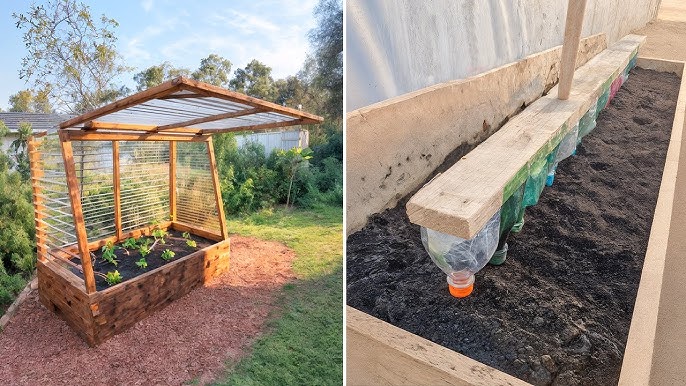
A self-watering garden bed solves many of these issues. This innovative system uses a reservoir of water at the bottom of the bed, allowing plants to draw moisture as needed through a process called wicking. This drastically reduces the need for manual watering, saving you time and conserving precious water resources. By using upcycled materials, we can build this garden bed on a budget, making it an accessible project for all homesteaders looking to increase their self-sufficiency and engage in sustainable gardening. This project focuses on using readily available materials, minimizing our carbon footprint and saving money! It’s a win-win-win!
How It Works: The Magic of Wicking
The wicking bed design works by creating a water reservoir at the bottom of the container. This reservoir is separated from the soil above by a layer of gravel or similar material. A wicking material, such as soil, draws water up from the reservoir into the root zone of your plants. This allows the plants to self-regulate their water intake, resulting in healthier, more robust growth and reduced water waste.
Step-by-Step Guide: Building Your Upcycled Self-Watering Garden Bed
Here’s how to build your own self-watering garden bed using upcycled materials. This guide is designed for beginners, so don't worry if you're not a seasoned DIY expert.
1. Gathering Your Materials:
The key to this project is sourcing affordable, upcycled materials. Here’s a list of what you'll need:
- Container: The most important piece!
- Option 1 (Recommended): IBC Tote (Intermediate Bulk Container) cut in half. These can often be found for free or very cheap from local businesses that use them (farms, food processing plants, construction sites). Check Craigslist, Facebook Marketplace, or local classifieds. Estimated Cost: $0-$30
- Option 2: Old tires. (Be aware of possible leeching issues.) Stack 3-4 tires to create a decent bed depth. Estimated Cost: $0-$20
- Option 3: Pallets. Disassemble pallets and use the wood to build a rectangular or square frame. Estimated Cost: $0-$15
- Pond Liner or Heavy-Duty Plastic Sheeting: To create a waterproof barrier inside your container (if needed, depending on your container choice). Estimated Cost: $10-$20 (depending on size)
- Gravel or Crushed Rock: For the reservoir base. Estimated Cost: $5-$10 (if you need to buy it. Often available for free locally.)
- PVC Pipe (4-inch diameter): For the fill pipe. This allows you to easily add water to the reservoir. Estimated Cost: $5-$10
- PVC Pipe (Smaller Diameter, e.g. 1-inch): For overflow pipe. This prevents overfilling the reservoir. Estimated Cost: $3-$5
- Landscaping Fabric or Weed Barrier: To separate the gravel reservoir from the soil. Estimated Cost: $5-$10
- Soil: A good quality potting mix or a blend of compost, topsoil, and other amendments. Estimated Cost: $15-$30
- Basic Tools: Shovel, drill, saw (if using pallets or needing to cut PVC), measuring tape, gloves, safety glasses.
2. Preparing Your Container:
- IBC Tote: If using an IBC tote, carefully cut it in half horizontally using a saw. Be sure to wear safety glasses! Clean the inside thoroughly.
- Tires: If using tires, clean them thoroughly. You may want to line the inside with plastic sheeting to prevent any potential leaching of chemicals into the soil.
- Pallets: If using pallets, carefully disassemble them, removing nails and staples. Cut the wood to the desired length to create a rectangular or square frame. Assemble the frame using screws or nails.
3. Lining Your Container (If Necessary):
If your container isn't naturally waterproof (like a pallet frame), line it with pond liner or heavy-duty plastic sheeting. Secure the liner to the frame with staples or tacks, ensuring there are no leaks.
4. Creating the Reservoir:
- Add a layer of gravel or crushed rock to the bottom of your container, about 6-8 inches deep. This will serve as the water reservoir.
5. Installing the Fill Pipe:
- Cut a length of 4-inch PVC pipe that extends from the bottom of the gravel layer to a few inches above the top of the container.
- Position the fill pipe in one corner of the container and secure it in place. This will be used to fill the water reservoir.
6. Installing the Overflow Pipe:
- Drill a hole in the side of the container, just below the top of the gravel layer.
- Insert a length of smaller diameter PVC pipe into the hole, extending outwards. This will act as an overflow, preventing the reservoir from becoming too full.
7. Separating the Reservoir from the Soil:
- Cover the gravel layer with landscaping fabric or weed barrier. This will prevent the soil from mixing with the gravel and clogging the reservoir.
8. Filling with Soil:
- Fill the remainder of the container with a good quality potting mix or a blend of compost, topsoil, and other amendments. Leave a few inches of space at the top.
9. Planting Your Garden:
- Plant your desired vegetables, herbs, or flowers in the soil. Be sure to choose plants that are well-suited to container gardening.
10. Watering and Maintaining:
- Initially, water the plants from the top, as you would with a traditional garden. This will help establish the roots.
- Once the plants are established, fill the water reservoir through the fill pipe. Water should start draining out of the overflow pipe when the reservoir is full.
- Check the reservoir level periodically and refill as needed. The frequency of refilling will depend on the weather and the type of plants you are growing.
Personal Experience and Tips:
I built my first self-watering garden bed using a repurposed IBC tote, and it was a game-changer for my homestead. I was amazed at how much less I had to water, even during the hottest summer months. One challenge I encountered was finding the right balance of soil. Too much clay, and the water wouldn't wick properly. Too much sand, and the soil dried out too quickly. Experiment with different soil mixes until you find what works best for your climate and plants. Also, make sure your overflow pipe is properly positioned to prevent waterlogging. Start with plants that require consistent moisture.
Another tip is to consider the placement of your garden bed. Ensure it receives adequate sunlight for the plants you are growing. You might also want to add mulch to the top of the soil to help retain moisture and suppress weeds. I also suggest adding worms to the soil for natural composting.
Don't be afraid to experiment with different container sizes and materials. The possibilities are endless!
Addressing SEO: Homesteading, DIY, and Sustainable Living
This blog post is optimized for search engines with keywords relevant to homesteaders looking for DIY self-watering garden bed solutions. We’ve incorporated terms like "upcycled garden bed," "sustainable gardening," "frugal gardening," and "self-sufficiency gardening" throughout the text. We've also addressed common questions, like "How do I build a self-watering garden bed?" and "What are the best upcycled materials for a garden bed?" to ensure this post reaches the right audience. For those in arid regions, we address drought-resistant gardening with our suggestion on planting drought-tolerant plants and the reduced watering requirements. Likewise, for those in cold climates, these beds can be brought into a greenhouse for extended growing seasons.
Cost Breakdown:
This project is designed to be budget-friendly. Here's an estimated cost breakdown:
- Container: $0-$30
- Liner (if needed): $10-$20
- Gravel: $5-$10
- PVC Pipe: $8-$15
- Landscaping Fabric: $5-$10
- Soil: $15-$30
Total Estimated Cost: $43 - $115
As you can see, the cost can vary depending on the materials you are able to source for free or at a discount.
Conclusion: Take Control of Your Food Supply
Building a self-watering garden bed from upcycled materials is a rewarding project that can significantly increase your self-sufficiency, reduce your reliance on the grocery store, and save you money on your water bill. It's a simple yet effective way to embrace sustainable living and take control of your food supply. So, gather your materials, roll up your sleeves, and get ready to transform trash into a thriving garden!
Call to Action: Share Your Success!
Now it's your turn! We encourage you to try this project and share your results in the comments below. What materials did you use? What challenges did you encounter? What other similar projects would you like to see covered on Better Homes and Harvests? Let's build a community of resourceful homesteaders who are passionate about sustainable living and self-sufficiency!