
Summer's Bounty: Heirloom Tomato Galette, Cob Oven Dreams, and Sustainable Watering
The sun dips low, painting the garden in golden hues. The air smells of sun-baked earth, sweet basil, and the promise of a meal crafted entirely from the land. It’s a symphony of scents that speaks of slow living, mindful choices, and the deep satisfaction that comes from nurturing our little corner of the world.
Few things capture the essence of summer quite like an Heirloom Tomato and Basil Galette. It's a dish that's as beautiful as it is delicious, showcasing the vibrant flavors of the season in every flaky bite. It's the kind of recipe that begs to be shared, passed down through generations, and adapted to suit the unique bounty of each garden.
Today, we're not just baking; we're embracing the homesteading spirit, from the garden to the oven—a cob oven we're building ourselves! And because every drop counts, we're also exploring the magic of greywater recycling to keep our garden lush and thriving. Come along on this journey of flavors, craftsmanship, and sustainability!

The Galette: A Taste of Summer
A galette is a free-form tart, a rustic cousin to the more structured pie. It's forgiving, adaptable, and utterly delicious. Unlike a pie, there's no need for fancy crimping or perfect edges. The beauty of a galette lies in its simplicity – its charm is found in the perfectly imperfect folds of the crust, revealing the colorful filling within. It's a celebration of fresh, seasonal ingredients, allowed to shine without pretense.
Ingredients From the Garden & Pantry
Here’s what you'll need to create this summer masterpiece:
- 1 ½ cups all-purpose flour
- ½ teaspoon salt
- ½ cup (1 stick) cold unsalted butter, cubed
- ¼ cup ice water
- 1 ½ pounds assorted heirloom tomatoes, sliced
- 1 cup fresh basil leaves, roughly chopped
- 4 ounces fresh goat cheese, crumbled
- 2 cloves garlic, minced
- 2 tablespoons olive oil
- Salt and pepper to taste
- 2 tablespoons balsamic glaze
Steps to Galette Perfection
Follow these steps, and you’ll have a stunning and delicious galette in no time.
- Prepare the crust: In a large bowl, whisk together the flour and salt. Cut in the cold butter using a pastry blender or your fingers until the mixture resembles coarse crumbs. Gradually add the ice water, mixing until the dough just comes together. Flatten into a disc, wrap in plastic wrap, and refrigerate for at least 30 minutes.
- Assemble the galette: Preheat oven to 400°F (200°C). On a lightly floured surface, roll out the dough into a 12-inch circle. Transfer to a baking sheet lined with parchment paper.

- Layer the ingredients: Spread the crumbled goat cheese evenly over the dough, leaving a 2-inch border. Arrange the sliced heirloom tomatoes over the cheese, alternating colors and sizes. Sprinkle with fresh basil and minced garlic. Drizzle with olive oil, and season with salt and pepper.

- Fold and bake: Fold the edges of the dough over the tomatoes, pleating as needed. Bake for 30-35 minutes, or until the crust is golden brown and the tomatoes are tender.
- Finishing Touch: Drizzle with balsamic glaze before serving. Enjoy warm!
I remember the first time I made this galette, I accidentally used too much salt, but even then, the freshness of the tomatoes shone through. It's a recipe that welcomes imperfection! Don't be afraid to experiment with different types of tomatoes, cheeses, and herbs to create your own signature galette.
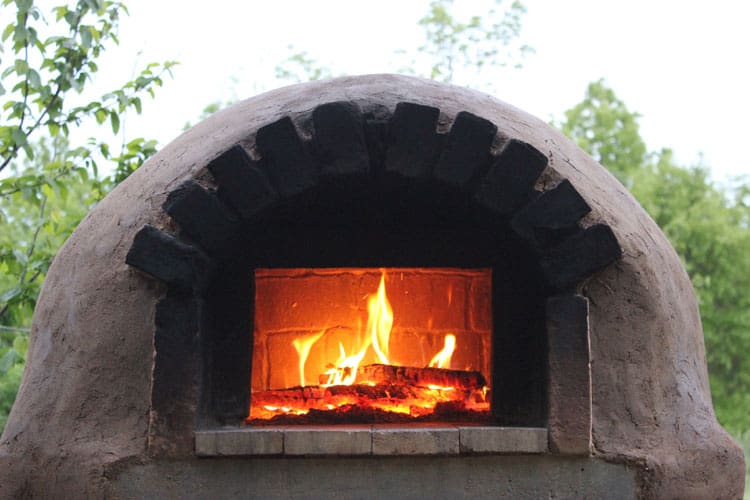
The Cob Oven: Back to Our Roots
A cob oven is more than just an oven; it's a connection to the past, a way to bake with the earth itself. Building one is an act of creation, a testament to the beauty of natural materials and the power of community. It's also an incredibly efficient way to bake, producing food with a depth of flavor that's hard to replicate in a conventional oven.

Materials & Considerations
Cob, the mixture of clay, sand, and straw that forms the oven, can often be found or sourced locally. This makes cob ovens an incredibly sustainable choice. Consider the oven's placement carefully - near the garden for convenient meal prep but away from any flammable buildings. Also consider the prevailing wind direction to optimize smoke flow.
Building Your Dream Oven
Here's a simplified overview of the cob oven building process:
- Foundation: Start with a sturdy base of gravel and stone. A good foundation is crucial for stability and longevity.
- Thermal Mass Layer: Create a layer of sand and glass bottles for insulation. This layer helps retain heat for longer periods.
- Cob Mix: Mix clay, sand, and straw with water to form a pliable cob mixture. Experiment with the ratios to find the perfect consistency.
- Oven Construction: Layer the cob around a sand form, creating the dome shape. Patience and attention to detail are key here.
- Door Arch: Cut a front facing arch of stone or reclaimed brick and use an iron pipe to create a smoke chimney, these can be embedded into the cob. This will help create the opening for your oven.
- Curing: Allow the oven to dry slowly, preventing cracks. This can take several weeks, depending on the climate.
We built our oven over a weekend with friends, turning it into a community project. The laughter, the shared effort—it all added to the oven's magic. It’s an experience we’ll cherish forever.
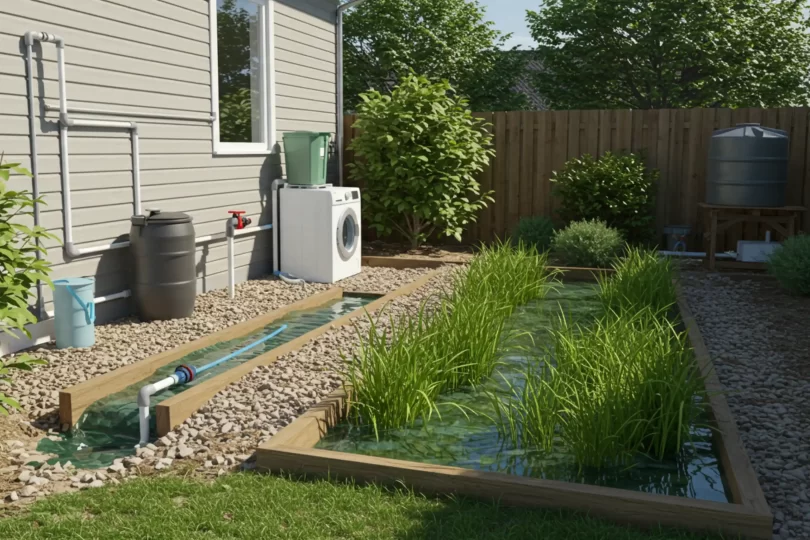
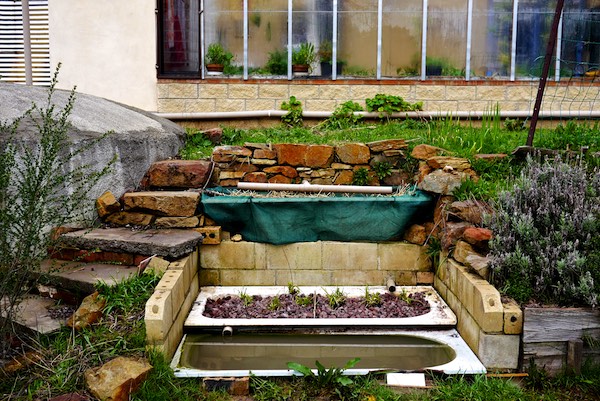
Greywater: Conserving Water, Nourishing Our Garden
In a world facing water scarcity, every drop counts. Greywater recycling is a practical way to conserve water and reduce our environmental impact. By diverting water from showers, sinks, and washing machines (excluding toilet water), we can irrigate our gardens and reduce our reliance on municipal water sources.

Design Considerations
Careful planning is essential for a successful greywater system.
- Source: Identify sources of greywater, such as showers, sinks, and washing machines (excluding toilet water).
- Filtration: Use a simple filtration system (sand, gravel, mulch) to remove debris.
- Storage: Store greywater in a covered container to prevent algae growth and odors.
- Distribution: Use a drip irrigation system to deliver water directly to plant roots.
- Regulations: Check local regulations regarding greywater recycling.
Sustainability Reminder: Remember, greywater is not potable and should only be used for irrigation, and only if it doesn't contain any harmful chemicals. Use only natural, biodegradable soaps and detergents to avoid harming your plants and soil.
We invite you to share your own homesteading adventures, whether it's a favorite recipe, a backyard project, or a sustainability tip. Let's learn from each other and build a community of like-minded individuals who are passionate about creating a more sustainable and fulfilling life.
As summer fades into fall, take advantage of the harvest. Preserve the flavors of the season, and prepare your garden for the coming months. Plant cover crops, amend the soil, and dream of next year's bounty.
Embrace the simple joys of homesteading, connect with nature, and create a home that is both beautiful and sustainable. With every step, big or small, you’re building a life deeply rooted in the earth.
Keywords: organic gardening, seasonal harvest, homegrown, compost, sustainable home, cozy living, backyard projects, farmhouse life, heirloom tomato galette recipe, cob oven building, diy greywater system, homesteading, self-sufficiency. easy heirloom tomato galette recipe, cob oven building step by step, diy greywater system for small garden, best tasting heirloom tomatoes for galette, water conservation techniques for homestead.