Share Your Homesteading Win: Transform Your Home with a DIY Pallet Chicken Coop & Inspire the Better Homes and Harvests Community!
Here at Better Homes and Harvests, we believe that even the smallest steps toward self-sufficiency can make a huge difference. For us, that journey started with chickens! We were tired of relying on grocery store eggs, unsure of their source and quality. We dreamed of fresh, golden-yolked eggs from happy hens roaming our backyard. But chicken coops can be expensive! That's when we decided to tackle a DIY pallet chicken coop. This project not only saved us money but also gave us a huge sense of accomplishment and a closer connection to our food source. It's a cornerstone of our self sufficient homestead!
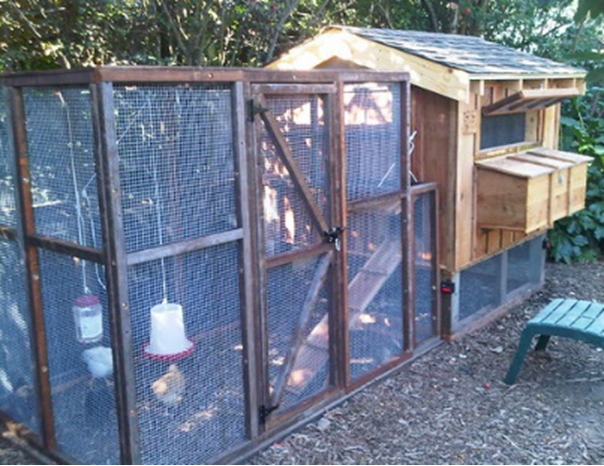
Building a chicken coop might seem daunting, but with a little elbow grease and readily available (and often free!) pallets, it’s entirely achievable. This tutorial is geared towards beginners, offering step-by-step instructions to create a safe, comfortable, and stylish home for your feathered friends. Get ready to roll up your sleeves and build your own DIY chicken coop!
Skill Level: Beginner
Estimated Cost: $50 - $150 (depending on pallet availability and roofing material)
Project Time: Weekend Project (2-3 days)
Why a Pallet Chicken Coop? The Benefits of Upcycling
Besides the obvious cost savings (pallets are often free!), building a pallet chicken coop offers several advantages:
- Sustainability: Repurposing pallets reduces waste and gives discarded materials a new life. It aligns perfectly with homesteading values.
- Customization: Pallets can be easily adapted to create a coop of any size or design. You can tailor it to your specific needs and available space.
- Durability: Pallets are surprisingly sturdy and can withstand various weather conditions when properly treated.
- Budget Friendly: Perfect for homesteading projects to save money.
Step-by-Step Guide: Building Your DIY Pallet Chicken Coop
Materials List:
- 6-8 Pallets (untreated, heat-treated (HT) is generally considered safe, but avoid those marked with "MB" for methyl bromide, a harmful fumigant)
- Roofing Material (shingles, metal roofing, tarps – your choice!)
- Chicken Wire (sufficient to enclose the run)
- Wood Screws (various sizes)
- Nails
- Hinges (for the door and nesting box lid)
- Latch (for the door)
- Wood Preservative or Paint (optional, but recommended for longevity)
- Hardware cloth (for predator proofing the bottom if needed.)

Tools Required:
- Hammer
- Drill
- Saw (circular saw or hand saw)
- Measuring Tape
- Level
- Staple Gun (for attaching chicken wire)
- Safety Glasses
- Gloves
- Pencil
- Crowbar or Pallet Buster (for disassembling pallets if needed)
Step 1: Pallet Preparation and Design
- Source Your Pallets: Check with local businesses (grocery stores, construction sites, landscaping companies) for free pallets. Always ask permission before taking them.
- Inspect the Pallets: Carefully examine each pallet for damage (broken boards, protruding nails) and signs of chemical treatment (look for the "MB" stamp). Avoid using damaged or chemically treated pallets.
- Design Your Coop: Decide on the size and layout of your coop. Consider the number of chickens you plan to keep and the available space in your yard. A general rule of thumb is 4 square feet per chicken inside the coop and 8-10 square feet per chicken in the run. Sketch out your design to visualize the final product.
Step 2: Building the Coop Frame
- Assemble the Walls: Arrange the pallets to form the walls of your coop. Use wood screws to securely connect the pallets at the corners. Ensure the frame is square and level.
- Create an Opening for the Door: Determine the location of the door and cut out an opening in one of the pallet walls using a saw.
- Construct the Roof Frame: Depending on your design, you may need to build a separate frame for the roof. You can use additional pallet wood or other lumber for this. Ensure the roof is slightly sloped to allow for water runoff.
Step 3: Adding the Roof
- Attach Roofing Material: Secure your chosen roofing material to the roof frame using nails or screws. Overlap the material to prevent leaks. For extra protection, consider adding a layer of roofing felt underneath.
Step 4: Constructing the Chicken Run
- Enclose the Run: Attach chicken wire to the outside of the coop frame and extend it to create an enclosed run. Use a staple gun to securely fasten the chicken wire to the pallets.
- Bury the Wire (Optional but Recommended): Bury the bottom of the chicken wire a few inches into the ground to prevent predators from digging under the fence. You can also use hardware cloth along the bottom for extra protection.
Step 5: Building the Door and Nesting Box
- Build the Door: Construct a simple door frame from pallet wood or other lumber. Attach hinges to the door and the coop frame. Install a latch to keep the door securely closed.
- Create the Nesting Box: Build a nesting box from pallet wood or scrap lumber. A good size is approximately 12" x 12" x 12". Attach the nesting box to one of the inside walls of the coop, making sure it is easily accessible for your chickens. You may want to build the nesting box so that the eggs can be collected from outside the coop to minimize disturbance to the hens.
Step 6: Adding Finishing Touches
- Install a Roost: Provide a roost for your chickens to sleep on. A simple wooden perch is all you need.
- Add Bedding: Line the floor of the coop with bedding material such as straw, wood shavings, or shredded newspaper.
- Apply Wood Preservative or Paint (Optional): Applying a wood preservative or paint will help protect the coop from the elements and extend its lifespan. Be sure to use a non-toxic product that is safe for chickens.
Step 7: Chicken-Friendly Environment
- Ventilation: Ensure adequate ventilation inside the coop to prevent moisture buildup. You can create vents by leaving small gaps between the pallets or by installing dedicated vents.
- Sunlight: Position the coop in a location that receives partial sunlight. Sunlight helps to keep the coop dry and provides essential Vitamin D for your chickens.
- Dust Bathing Area: Chickens need a place to dust bathe to keep their feathers clean and healthy. Provide a designated area in the run filled with sand or dirt.
Challenges We Faced (and How We Overcame Them!)
Finding pallets that were the same size proved to be a bit of a challenge. We ended up using a pallet buster (a real lifesaver!) to disassemble some pallets and rearrange the wood to create more uniform sizes for the walls. We also underestimated the amount of chicken wire needed for the run, so be sure to measure carefully!
The Result: Happy Chickens, Happy Homesteaders!
Building our own pallet chicken coop was an incredibly rewarding experience. Not only did we save money, but we also created a safe and comfortable home for our chickens. And the best part? Fresh, delicious eggs every day! We significantly improved our self sufficient home with this project.

Tips for Success:
- Safety First: Always wear safety glasses and gloves when working with tools and pallets.
- Plan Ahead: Sketch out your design and gather all the necessary materials before you start building.
- Enlist Help: Building a chicken coop is easier with a friend or family member.
- Don't Be Afraid to Get Creative: There are endless possibilities for designing and customizing your pallet chicken coop. Let your imagination run wild!
- Consider the climate: If you live in an area with harsh winters, make sure to insulate your coop well.
Extending Your Homesteading Journey
Now that you've successfully built your pallet chicken coop, why not explore other DIY projects to enhance your homestead? Consider building a raised garden bed using scrap wood, creating a compost bin from pallets, or installing a rain barrel to collect rainwater for your garden. The possibilities are endless! You may also consider reading more about DIY composting methods for permaculture.
Conclusion:
Embarking on a DIY pallet chicken coop project is more than just constructing a shelter; it's about embracing the resourceful spirit of homesteading, promoting sustainability, and connecting with your food source. This beginner-friendly project not only saves you money but also provides a sense of accomplishment and enhances the self-sufficiency of your homestead. So, gather your tools, find some pallets, and start building your own chicken paradise today! Share your homesteading win with the Better Homes and Harvests community and inspire others to take the leap towards a more sustainable and fulfilling lifestyle. Your feathered friends (and your breakfast table) will thank you! This is a perfect project to show how to improve your home's energy efficiency on a homestead.

