Seed Paper Ornaments: A Gift to Nature, a Gift to Remember
What if your holiday decorations could bloom into wildflowers? Imagine adorning your tree with beautiful ornaments that, after the celebrations, can be planted to bring life and color to your garden. This year, let’s slow down and reconnect with the heart of the holidays by creating a sustainable and meaningful tradition: making seed paper ornaments. These aren't just pretty decorations; they are a gift to the earth, a family-friendly project, and a beautiful way to celebrate the season of giving. We'll use recycled paper, promote native wildflowers, and connect to the cycle of seasons. Let's dive into creating these beautiful, earth-friendly decorations!

Gathering Your Supplies - Nature's Bounty and Reclaimed Treasures
The first step to creating these unique ornaments is gathering your supplies. And the best part? We'll be focusing on using what we already have or can source ethically and sustainably.
Here’s what you’ll need:
- Recycled Paper: This is the heart of your seed paper! Newspaper, junk mail, craft paper scraps – anything goes. The more colors and textures you have, the more interesting your ornaments will be.
- Seeds: Opt for a native wildflower mix. Native wildflowers are perfectly adapted to your local climate, providing essential food and habitat for pollinators like bees and butterflies. Check with your local agricultural extension office or native plant society to ensure you're choosing seeds that are beneficial and non-invasive.
- Blender: A blender will help you create a pulp from the recycled paper.
- Water: To soak and blend the paper.
- Cookie Cutters: Use these to shape your ornaments. Holiday-themed shapes like stars, hearts, and trees are perfect, but any shape will work.
- Sponge and Old Towels: These will help you remove excess water from the paper pulp.
- Natural Food Coloring (Optional): If you want to add a pop of color, use natural food coloring. Beet juice, spinach juice, and turmeric powder can create beautiful hues.
- Twine or Ribbon: For hanging your ornaments. Natural twine adds a rustic touch.

Sourcing Tip: Try to source all your materials locally. Check out your local farmers market for wildflowers and your recycling bin for your other ingredients!
Dealing with No Blender:
If you don't have a blender, don't worry! You can still make seed paper. Simply tear the paper into very small pieces and soak it in water for a longer period, like overnight. Then, use a mortar and pestle or your hands to break down the paper into a pulp. It will take more time and effort, but it's definitely doable.
Gathering these supplies is more than just preparation; it’s an opportunity to be mindful of the resources we use and embrace sustainability. By choosing recycled materials and native wildflowers, we're making a conscious effort to reduce our impact on the environment.
Crafting Your Seed Paper Ornaments - A Step-by-Step Guide
Now for the fun part: crafting your seed paper ornaments! Follow these step-by-step instructions to create your own unique and earth-friendly decorations.
Prepare the Paper: Tear the recycled paper into small pieces (about 1-inch squares). The smaller the pieces, the easier it will be to blend.
Soak the Paper: Place the paper pieces in a bowl and cover them with water. Let them soak for at least 30 minutes, or even overnight, to soften.
Blend the Paper: Transfer the soaked paper and water to a blender. Blend until you have a smooth pulp. You may need to add more water to achieve the desired consistency.
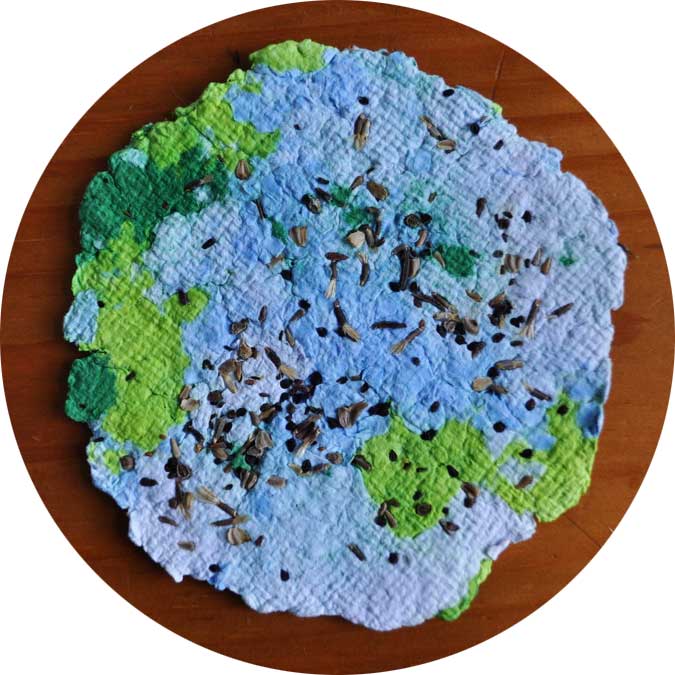
Add Seeds: Pour the paper pulp into a bowl and add your wildflower seeds. Mix well, ensuring the seeds are evenly distributed throughout the pulp.
(Optional) Add Natural Food Coloring: If you want to tint the pulp, add a few drops of natural food coloring and mix until you achieve the desired color.
Shape the Ornaments: Place a sponge on a flat surface and cover it with an old towel. Place your cookie cutters on top of the towel. Spoon the paper pulp into the cookie cutters, pressing down gently to remove excess water.
Dry the Ornaments: Carefully remove the ornaments from the cookie cutters and place them on a clean towel to dry. This may take several days, depending on the humidity. You can speed up the drying process by placing them in a warm, well-ventilated area.
Create a Hanger: Once the ornaments are completely dry, use a needle or small hole punch to create a small hole near the top for hanging.
Thread the Hanger: Thread twine or ribbon through the hole to create a hanger.

Troubleshooting Tips:
- If the paper pulp is too thick: Add more water to the blender.
- If the paper pulp is too thin: Add more paper.
- If the ornaments are cracking as they dry: Make sure they are drying slowly and evenly.
Variations:
- Add dried flowers or herbs to the pulp for extra texture and fragrance.
- Create different shapes by using different cookie cutters or freehand cutting the paper.
Remember, the process of crafting the ornaments is just as important as the finished product. Take your time, enjoy the process, and involve your family in the fun.
Decorating and Gifting - Spreading Joy and Growing Kindness
Once your seed paper ornaments are dry, it's time to decorate and prepare them for gifting. Here are a few ideas to get you started:
- Natural Twine: Use natural twine to hang your ornaments for a rustic look.
- Biodegradable Glitter: Add a touch of sparkle with biodegradable glitter.
- Pressed Flowers: Glue pressed flowers onto the ornaments for a delicate and beautiful touch.
- Hand-Painted Details: Use non-toxic paints to add small hand-painted details.
When gifting your seed paper ornaments, consider these thoughtful touches:
- Planting Instructions: Attach a small card with planting instructions, explaining how to plant the ornament and care for the wildflowers.
- Recycled Packaging: Package the ornaments in a recycled paper bag or fabric scrap.
- Meaningful Message: Include a message explaining the meaning behind the gift – a symbol of growth, hope, and environmental stewardship.
These ornaments are more than just decorations; they're gifts that give back to the earth. By gifting them, you're spreading joy, promoting sustainability, and encouraging others to connect with nature. Encourage recipients to plant their ornaments in the spring and share photos of their blooming wildflowers.

From Holiday Tree to Blooming Garden - Planting Instructions and Seasonal Connection
Completing the cycle by planting the ornaments connects us to the rhythm of nature. Here’s what you need to know to turn your ornaments into a blooming garden:
- Timing: The best time to plant your seed paper ornaments is in the spring or fall, depending on your climate. Check with your local agricultural extension office to determine the best planting time for your region.
- Location: Choose a sunny spot with well-drained soil.
- Planting Depth: Lightly cover the ornament with soil. You don't need to bury it deep.
- Watering: Keep the soil moist until the seeds germinate.
Planting Tip: Consider planting these in remembrance of a loved one, or as a family planting tradition!
The holidays are a time of reflection, gratitude, and connection. By planting our seed paper ornaments, we're not just creating a beautiful garden; we're also connecting to the cycle of seasons and the promise of new life. Take time to observe the wildflowers as they grow, appreciate their beauty, and reflect on the importance of protecting our environment.

Conclusion
Seed paper ornaments offer a simple yet profound way to celebrate the holidays with a focus on sustainability, nature, and connection. By creating these ornaments with recycled materials and native wildflower seeds, we're not only adorning our trees but also contributing to a healthier planet. The best holiday traditions are those that connect us to nature, family, and the spirit of giving. As we look forward to the new year, let's commit to creating a more sustainable and mindful future, one seed paper ornament at a time.
What are your favorite sustainable holiday traditions? Share your ideas in the comments below! Loved this project? Share it with your friends and family using the hashtags #SustainableHolidays and #BetterHomesandHarvests! And for more tips and ideas for living a simpler, more meaningful life, sign up for our newsletter. Let's all create a holiday season that's both joyful and gentle on our planet.