Rocket Stove Magic: Build a Fuel-Efficient Cooker for Your Homestead
Picture this: the power's out, the wind is howling, but you're outside, happily stirring a pot of hearty stew, the fragrant steam rising to meet the crisp autumn air. You didn't fire up a noisy generator; you didn't even need to drag out the propane tank. Instead, a small handful of twigs is fueling a surprisingly powerful fire in a device you built yourself: a rocket stove.
For homesteaders, self-sufficiency isn't just a goal; it's a way of life. That means finding creative solutions for everyday needs, especially when resources are limited. Enter the rocket stove: a simple, efficient, and environmentally friendly cooking appliance that's perfect for off-grid living, emergency preparedness, or simply enjoying a delicious meal outdoors. This project is accessible to beginner homesteaders and can be built with relatively inexpensive and often repurposed materials. Today, we'll guide you through building your own, unlocking a world of flavorful, fuel-efficient cooking. Get ready to slash your wood bill and enjoy the unique taste of cooking over an open flame (without the smoke!).

Understanding Rocket Stove Basics (and Why They’re Awesome)
So, what's the magic behind these seemingly simple contraptions? Rocket stoves operate on a principle of efficient combustion. Unlike open fires, which lose a lot of heat to the atmosphere, rocket stoves are designed to concentrate and direct heat upwards toward the cooking surface. This is achieved through a well-insulated combustion chamber, a vertical chimney (also called a heat riser), and a carefully designed air intake.
The process begins with fuel (usually small pieces of wood) being fed into the combustion chamber. As the wood burns, the heat rises rapidly through the chimney, creating a powerful draft that pulls in air. This draft ensures complete combustion, reducing smoke and maximizing the amount of heat produced. The insulation surrounding the combustion chamber further enhances efficiency by preventing heat loss, forcing the heat upwards. The result? A hot, concentrated flame that's ideal for cooking with minimal fuel consumption.
Compared to open fires or traditional wood stoves, rocket stoves offer several key advantages:
- Fuel Efficiency: They use significantly less wood to achieve the same cooking temperatures.
- Cleaner Burning: More complete combustion means less smoke and air pollution.
- Portability: Simple designs can be easily moved around the homestead.
- Cost-Effectiveness: They can be built from readily available and often recycled materials.
While there are more advanced rocket stove designs, the one we'll be building today is a great introductory project, perfect for understanding the basic principles and getting you started on your rocket stove journey.

Gathering Your Materials & Tools
The beauty of this project lies in its simplicity and accessibility. You likely have many of the necessary materials lying around your property already! Here’s a comprehensive list:
Materials:
- Bricks: Approximately 20-30 standard-sized bricks (reclaimed bricks work great!). Aim for solid bricks, not hollow core.
- Metal Can (Optional): A large metal can (like a 5-gallon paint can) can be used to create the combustion chamber. This is optional; bricks alone will also work.
- Insulation: Perlite or vermiculite is ideal. Alternatively, you can use a mixture of clay and sand. Approximately 1-2 cubic feet will be needed.
- Gravel or Sand: To level the ground and create a stable base (approximately 1/2 cubic foot).
- Metal Grid or Rebar: For the cooking surface – something strong enough to support a pot or pan.
- Affiliate Links: Consider linking to local hardware stores or Amazon for bricks, insulation, and metal grids.
Tools:
- Shovel: For leveling the ground.
- Tape Measure: For accurate measurements.
- Level: To ensure a stable base and vertical chimney.
- Mixing Container: If using clay and sand for insulation.
- Trowel: For applying clay-based insulation.
- Gloves: To protect your hands.
- Eye Protection: Safety glasses are always a good idea.
Cost-Cutting Tips:
- Reclaimed Bricks: Check local classifieds or demolition sites for free or inexpensive reclaimed bricks.
- Repurposed Metal: Use an old metal bucket or even sections of stovepipe for the combustion chamber or chimney.
- Clay-Based Insulation: If you have access to clay soil, you can create your own insulation by mixing it with sand and straw.

Step-by-Step Construction: Building Your Rocket Stove
Now for the fun part! Follow these steps to build your own fuel-efficient rocket stove:
Laying the Foundation: Choose a level spot on your property, away from flammable materials. Clear the area and spread a layer of gravel or sand to create a stable base. Use a level to ensure the surface is even.
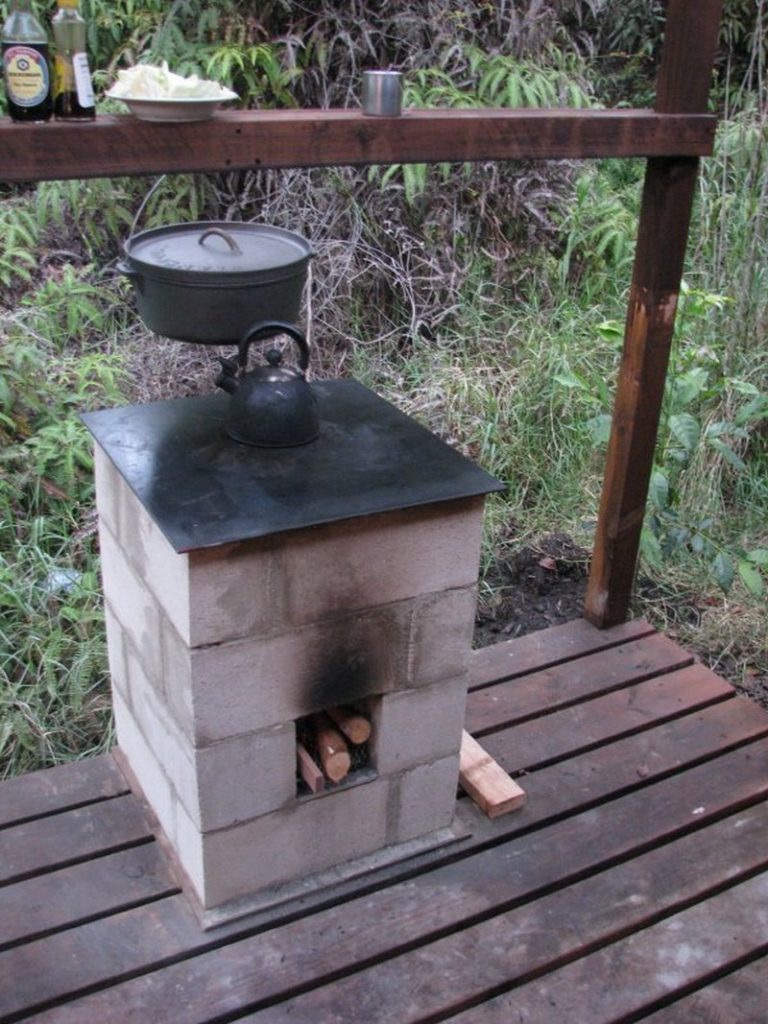
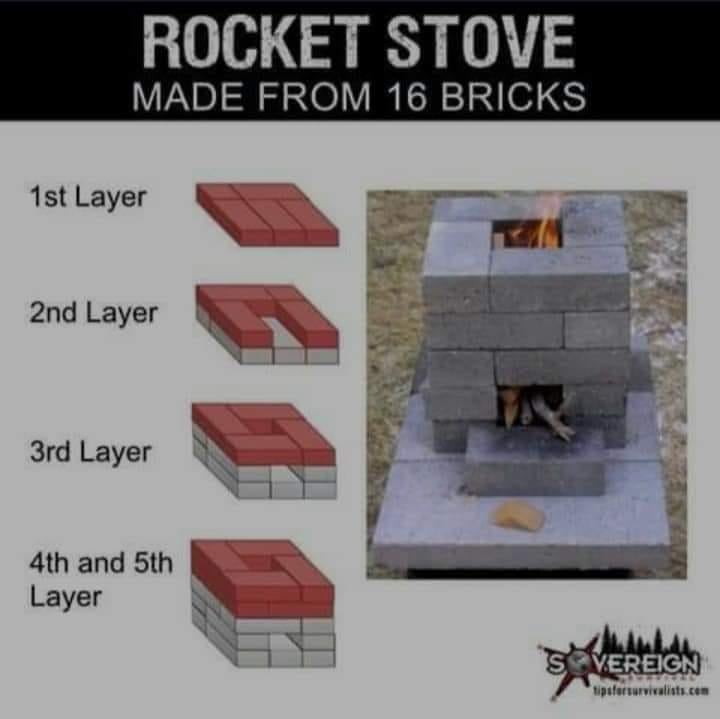
Building the Combustion Chamber: This is where the magic happens. If using a metal can, place it open-end up on the foundation. Alternatively, use bricks to create a rectangular or square enclosure, leaving an opening at the front for the fuel feed. The dimensions should be roughly 6-8 inches wide, 8-10 inches deep, and 10-12 inches high.

Insulating the Chamber: This is crucial for efficient combustion. Pack the insulation material (perlite, vermiculite, or clay slip) around the outside of the combustion chamber, filling the space between the chamber and the outer layer of bricks. If using clay slip, apply it in layers, allowing each layer to dry before adding the next.

Creating the Chimney/Heat Riser: The chimney is a vertical section that draws heat upwards. Build it directly on top of the combustion chamber, using bricks to create a flue that is approximately 4-6 inches in diameter and 12-18 inches tall. Ensure the chimney is straight and stable.

Building the Fuel Feed: The fuel feed is the opening where you insert the wood. It should be located at the front of the combustion chamber, angled slightly upwards. Ensure the opening is large enough to easily feed small pieces of wood.

Creating the Cooking Surface: Finally, create a stable surface for cooking pots and pans above the chimney. This can be achieved by placing a metal grid or rebar across the top of the chimney opening. Make sure the surface is level and secure.

Troubleshooting Tips:
- Smoke Issues: If the stove is producing excessive smoke, ensure the wood is dry and the airflow is adequate. You may need to adjust the size of the fuel feed opening.
- Poor Draft: A weak draft can be caused by a short chimney or inadequate insulation. Try extending the chimney or adding more insulation.
- Unstable Structure: Use mortar or clay slip to secure the bricks and create a more stable structure.

Testing and Using Your Rocket Stove
Before you start cooking, it's important to test your rocket stove and get familiar with its operation:
- Lighting the Stove: Start by placing small pieces of dry kindling in the fuel feed opening. Light the kindling and gently feed more wood into the chamber as it catches.
- Regulating Heat: Control the heat by adjusting the amount of wood you feed into the chamber. Smaller pieces of wood will burn hotter and faster, while larger pieces will provide a more sustained heat.
- Safety Considerations: Always supervise the stove while it's in use. Keep flammable materials away from the stove and have a fire extinguisher or water nearby.
Cooking Tips:
- Dry Wood: Use dry, seasoned wood for optimal combustion and minimal smoke.
- Small Pieces: Small pieces of wood will burn more efficiently than large logs.
- Airflow: Ensure adequate airflow by keeping the fuel feed opening clear.

Maintaining and Improving Your Rocket Stove
With proper care, your rocket stove can provide years of reliable service. Here are a few tips for maintenance and improvements:
- Cleaning: Regularly clean the combustion chamber and chimney to remove ash and soot. This will improve airflow and combustion efficiency.
- Insulation: Inspect the insulation regularly and repair any cracks or damage.
- Windscreen: Build a simple windscreen around the stove to protect it from wind and improve heat retention.
- Damper: Adding a damper to the chimney can help regulate the airflow and control the heat more precisely.

Embrace the Rocket Stove Advantage
Building a rocket stove is more than just a DIY project; it's an investment in self-sufficiency, sustainability, and resilience. You'll reduce your reliance on conventional fuel sources, minimize your environmental impact, and gain a deeper appreciation for the power of simple, elegant design. So gather your materials, fire up your creativity, and experience the magic of cooking with a rocket stove. Your homestead – and your taste buds – will thank you.
Build yours today!

Share your rocket stove builds with us in the comments below! What materials did you use? Got any questions about rocket stove construction? Ask us in the comments! Check out our other DIY homesteading projects for more ways to become self-sufficient!
