Preserve Your Harvest: Build a Simple Root Cellar on a Budget
For homesteaders, the rhythm of the seasons dictates the pace of life. The abundance of summer gives way to the preparations for winter, and nothing feels quite as satisfying as harvesting the fruits (and vegetables!) of your labor. But what to do with all that bounty? Sure, canning and freezing are options, but there's an older, simpler method that deserves a comeback: the root cellar. Imagine biting into a crisp apple in January, or whipping up a potato soup with vegetables you harvested months ago, all naturally preserved and bursting with flavor. Beyond the deliciousness, a root cellar offers energy savings compared to constantly running a refrigerator, and brings a tangible sense of resilience to your homestead.
I’ve always dreamed of having a root cellar. My grandmother had one, and I remember the cool, earthy smell and the rows of colorful jars lining the shelves. I wanted that connection to the past, that self-sufficiency, and that taste of summer in the dead of winter. I was tired of relying on the grocery store for out-of-season produce, and I wanted to reduce our reliance on energy-hogging appliances. So, I embarked on a journey to build my own root cellar, on a budget, and I’m here to share my experience with you! Don't be intimidated – this guide is for beginners, using readily available and often free materials. Let's get started!

Why a Root Cellar? More Than Just Food Preservation
Before we dive into construction, let's solidify why you'd want a root cellar for your homesteading efforts:
- Natural Food Preservation: Root cellars rely on cool temperatures and controlled humidity to keep your produce fresh. No electricity needed! This is true food preservation, the way our ancestors did it.
- Delicious, Naturally Preserved Food: Foods stored in a root cellar retain more of their natural flavor and nutrients compared to freezing or canning. Imagine the difference in taste!
- Energy Savings: Reduce your reliance on refrigerators and freezers, saving energy and lowering your electricity bill. This contributes to a more sustainable lifestyle.
- Homesteading Resilience: A root cellar provides a backup food supply, increasing your self-sufficiency and resilience in times of uncertainty. Knowing you have food stored away is incredibly empowering.
- Reduced Food Waste: By properly storing your harvest, you can significantly reduce food waste. Less waste, more savings!
Site Selection: Location, Location, Location!
Choosing the right location for your root cellar is crucial for its effectiveness. Here are some factors to consider:
- Cool and Shady: The ideal location is on the north side of your house or a building, where it’s shaded from the sun, especially during the hottest part of the day.
- Good Drainage: Avoid areas prone to flooding or standing water. Water is the enemy of long-term storage. You want well-drained soil.
- Accessibility: Consider how easy it will be to access the root cellar in all types of weather, including snow and ice.
- Proximity to Garden: The closer your root cellar is to your garden, the easier it will be to transport your harvest.
- Existing Structure (Optional): If you have a basement, consider converting a portion of it into a root cellar. This can save you time and effort.
For my root cellar, I chose a spot on the north side of our garage, which gets plenty of shade and has good drainage. It's also relatively close to our garden, making it convenient to move produce.
Material Gathering: Repurposing Treasures on a Budget
One of the best things about building a DIY root cellar is that you can do it on a budget by repurposing materials. Get creative and think outside the box! Here are some ideas:
- Old Tires: Tires can be stacked and filled with dirt to create sturdy walls. This is a great way to recycle old tires and create a thermally stable structure.

- Pallets: Pallets can be used to build walls, shelves, and even the roof of your root cellar. Look for pallets that are heat-treated (HT) rather than chemically treated (MB).
- Concrete Blocks: Concrete blocks are durable and easy to work with. They can be used to build walls and floors.
- Wood: Use reclaimed lumber for framing and shelves. Check with local construction sites or demolition companies for affordable options.
- Metal Roofing: Salvaged metal roofing can provide a durable and weather-resistant roof.
- Dirt and Sod: Dirt and sod are excellent insulators. Use them to cover the roof and walls of your root cellar.
- Doors and Windows: Reclaimed doors and windows can add character and functionality to your root cellar.
I was lucky enough to find a stack of old tires at a local tire shop for free. I also sourced some pallets from a nearby business that was throwing them away. With a little scavenging, I was able to gather most of the materials I needed for free!
Construction: Step-by-Step Building Instructions
Okay, let's get building! Remember, safety first. Wear appropriate safety gear, including gloves, eye protection, and a dust mask.
Step 1: Excavation
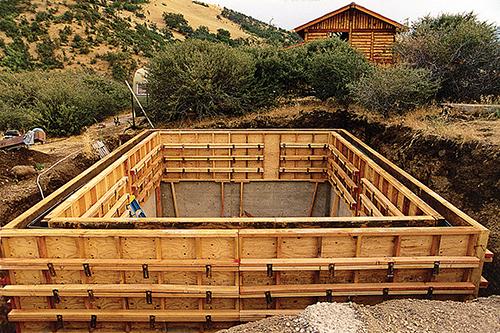
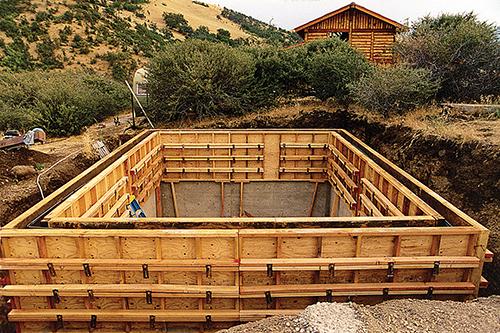
- Dig a hole to the desired size and depth. The size will depend on how much storage space you need. A depth of 4-6 feet is generally recommended to maintain a consistent temperature.
- Ensure the bottom of the hole is level and compact the soil.
Step 2: Building the Walls (Tire Method)
- Stack the tires in a circular or rectangular pattern, depending on your desired shape.
- Fill the tires with dirt, compacting it as you go. This will add stability and insulation.
- Continue stacking tires until you reach the desired wall height.
Step 3: Building the Walls (Pallet Method)
- Construct a simple frame using lumber.
- Attach the pallets to the frame, creating walls.
- Insulate the walls with straw, hay, or other natural materials.
Step 4: Building the Roof
- Construct a frame for the roof, ensuring it is strong enough to support the weight of the dirt and sod.
- Cover the frame with plywood or metal roofing.
- Add a layer of plastic to waterproof the roof.
- Cover the roof with a thick layer of dirt and sod. This will provide excellent insulation.
Step 5: Building the Entrance
- Construct a door frame using lumber.
- Install a reclaimed door.
- Build a small entryway to help insulate the root cellar.
Step 6: Ventilation
- Install a ventilation pipe to allow for airflow. This will help prevent moisture buildup.
- The ventilation pipe should extend above the roof of the root cellar.
Step 7: Shelving
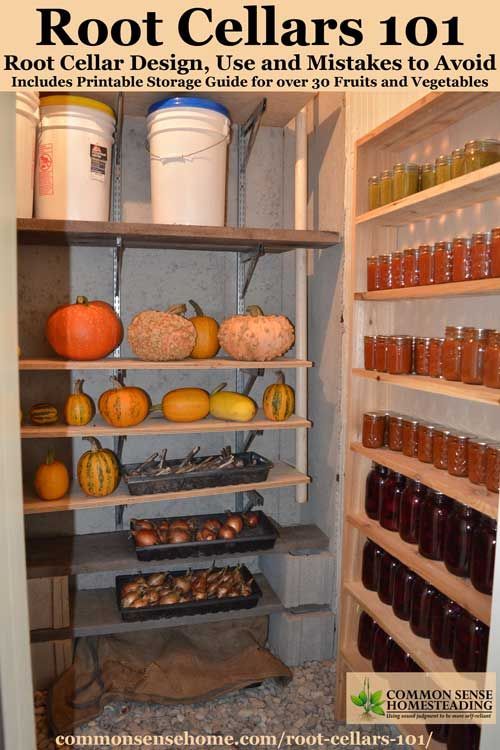
- Build shelves using reclaimed lumber or pallets.
- Arrange the shelves to maximize storage space.

Step 8: Finishing Touches
- Add a layer of gravel to the floor to improve drainage.
- Decorate the entrance to make it more aesthetically pleasing.
A Note on Tools: You'll likely need basic tools like a shovel, wheelbarrow, level, saw, hammer, drill, and measuring tape. Borrow from friends or neighbors to save money!
Temperature and Humidity Control: The Key to Success
Maintaining the right temperature and humidity is essential for keeping your produce fresh in your root cellar.
- Temperature: The ideal temperature for a root cellar is between 32°F and 40°F (0°C and 4°C). Use a thermometer to monitor the temperature regularly.
- Humidity: The ideal humidity level is between 85% and 95%. Use a hygrometer to monitor the humidity.
- Ventilation: Adjust the ventilation to control the temperature and humidity. Open the ventilation pipe to increase airflow and lower the temperature and humidity. Close the ventilation pipe to decrease airflow and raise the temperature and humidity.
- Moisture: If the air is too dry, add a container of water to increase the humidity. If the air is too moist, add a desiccant, such as calcium chloride.
I've found that opening the vent on cooler nights and closing it during the warmer parts of the day helps maintain a stable temperature. Experiment to find what works best for your climate!
Common Problems & Solutions: Troubleshooting Your Root Cellar
Even with careful planning, you may encounter some problems along the way. Here are some common issues and how to fix them:
- Mold: Mold can grow in root cellars with high humidity. Increase ventilation and remove any affected produce.
- Freezing: If the temperature drops too low, your produce may freeze. Add insulation or use a small heater to prevent freezing.
- Rodents: Rodents can be attracted to root cellars. Seal any cracks or openings and use traps to control rodent populations.
- Sprouting: Some vegetables, such as potatoes, may sprout in storage. Remove the sprouts to prolong the shelf life of the vegetables.
- Rotting: Rotting can occur if produce is damaged or not stored properly. Inspect your produce regularly and remove any signs of rot.
When I first built my root cellar, I had a problem with condensation. I added more ventilation, and the problem was solved! Don't be afraid to experiment and learn from your mistakes.
Start Building Your Food Security Today!
Building a root cellar is a rewarding and empowering experience. It's a tangible way to connect with the past, reduce your reliance on the modern food system, and increase your homesteading resilience. Don't be afraid to get your hands dirty and try something new. Even a small DIY root cellar can make a big difference in your food preservation efforts. Remember to do your research, gather your repurposed materials, and follow these steps to build your own budget-friendly food storage solution.
For more information on food storage techniques, check out this article on the Better Homes and Harvests website: [Link to article on food storage] (This is a placeholder, insert your own link)
And for tips on maximizing your garden yield for long-term storage, see our guide to succession planting: [Link to article on gardening techniques] (This is a placeholder, insert your own link)
Now, I want to hear from you! Have you ever built a root cellar? What tips would you share? What challenges did you face? Share your experiences in the comments below, or ask any questions you have. Let's learn from each other and build a more resilient future together!