Harvest the Sky: Build a Rainwater Irrigation System for Your Homestead
Did you know that the average American household uses up to 300 gallons of water per day, and a significant portion of that goes directly to watering lawns and gardens? With increasingly frequent droughts and rising water costs impacting homesteads nationwide, finding sustainable and cost-effective irrigation solutions is more critical than ever. Relying solely on well water can deplete aquifers, while municipal water bills can quickly eat into your homesteading budget.
But there's a solution as old as time itself: rainwater harvesting. This simple yet powerful practice allows you to capture the free water falling from the sky and use it to nourish your garden, reducing your reliance on external sources and significantly boosting your homestead's self-sufficiency. This isn't just about saving money; it's about creating a more resilient and sustainable lifestyle.
In this post, we'll guide you through building a simple, adaptable rainwater harvesting system perfect for irrigating your homestead garden. This project is designed to be budget-friendly and beginner-friendly, using readily available materials and straightforward techniques. Let’s turn that runoff into abundance!

Section 1: Assessing Your Needs and Resources
Before diving into the construction, let's assess your garden's water needs and the resources available to you. This crucial step ensures you build a system that's perfectly tailored to your homestead.
Calculating Your Garden's Water Needs: Every garden is different. A patch of thirsty tomatoes will require significantly more water than a bed of drought-tolerant herbs. A good starting point is to research the average water requirements for your specific plants. Many online resources and local nurseries can provide evapotranspiration rates (the amount of water lost from the soil through evaporation and plant transpiration) for common garden vegetables and fruits. As a general rule, vegetables like tomatoes, cucumbers, and peppers need about 1-2 inches of water per week, while herbs and leafy greens may require less.
Evaluating Your Roof Area: Your roof is your rainwater collection surface. To determine the collection area, measure the length and width of the sections of your roof that will drain into your gutters. Multiply these dimensions to calculate the square footage. Only include the area of the roof that contributes to the gutter system you'll be connecting to your collection tank.
Estimating Rainfall: Research the average rainfall in your area. You can find this information from the National Oceanic and Atmospheric Administration (NOAA) website (weather.gov) or your local weather station. Look for monthly or annual rainfall averages to get a good sense of your area's precipitation patterns. Remember that rainfall varies from year to year, so consider using a long-term average for a more accurate estimate.
Determining Storage Capacity: This is where everything comes together. Based on your garden's water needs, roof area, and average rainfall, you can calculate the necessary storage capacity for your rainwater harvesting system. A good rule of thumb is to assume that 0.6 gallons of water can be collected per square foot of roof area for every inch of rainfall.
Here's a simple formula:
Storage Capacity (Gallons) = Roof Area (sq ft) x Rainfall (inches) x 0.6For example, if you have a 500 sq ft roof and your average monthly rainfall is 3 inches, you could potentially collect 900 gallons of water (500 x 3 x 0.6). However, it's always better to err on the side of caution and oversize your storage capacity. This ensures you have enough water during drier periods and can handle unexpected heavy rainfall events. Consider adding extra tanks to increase your storage.
VISUAL: homesteader measuring roof area rainwater harvesting
Section 2: Materials and Tools
Now that you have a good understanding of your needs, let's gather the necessary materials and tools. The beauty of this project is that you can often find many of these items used or recycled, saving you money and reducing waste.
Materials:
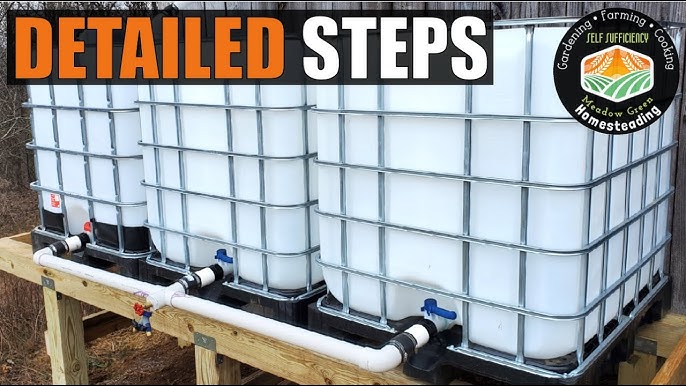
- IBC Tote(s): (275 or 330-gallon) - These are your primary storage containers. Look for food-grade IBC totes that have been previously used for transporting non-toxic materials. Clean them thoroughly before use. Used IBC totes can often be found online marketplaces or from local businesses that receive bulk shipments.
- Fittings:
- Hose Adapters: To connect your garden hose to the IBC tote.
- Spigot: For easy access to the stored water. Choose a durable spigot made of brass or plastic.
- Bulkhead Fittings: To connect multiple tanks together.
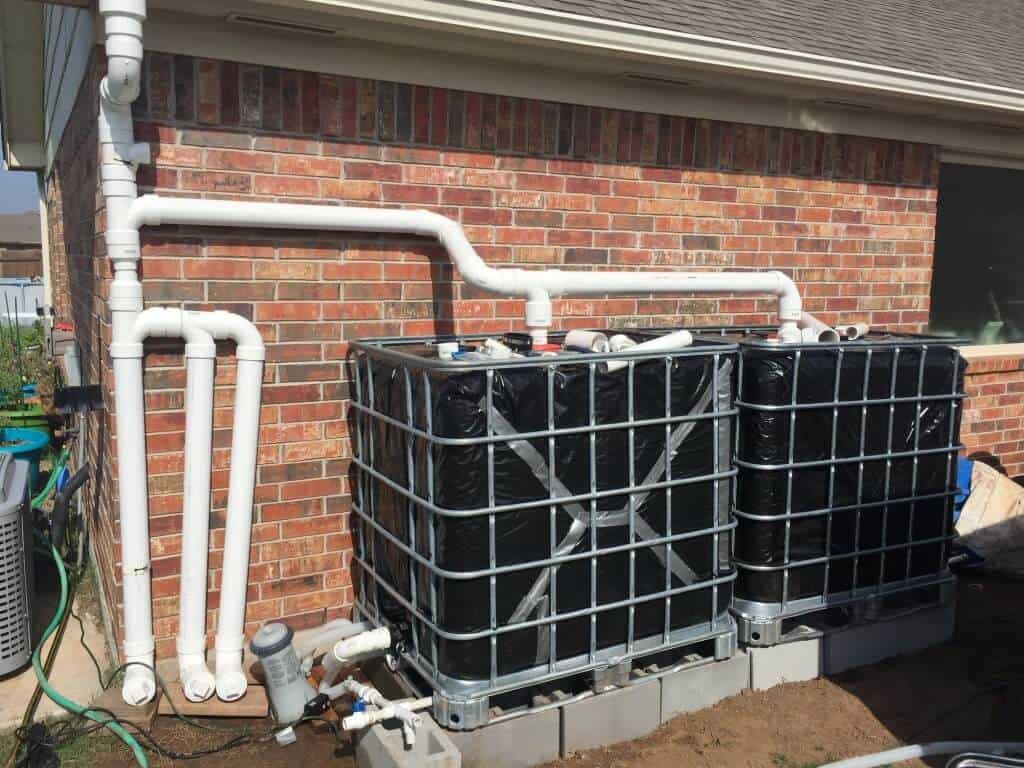
- PVC Pipes and Fittings: To connect the downspout to the IBC tote. The size will depend on the size of your existing downspout.
- Screening: For gutters and tank inlets to prevent debris from entering the system. Use fine mesh hardware cloth or specialized gutter guards.
- Submersible Pump (Optional): If you want to automate your irrigation system, you'll need a submersible pump to deliver water from the IBC tote to your garden. Choose a pump with sufficient flow rate and pressure for your needs.
- Soaker Hoses or Drip Irrigation Tubing (Optional): For efficient and targeted watering.
Tools:
- Drill
- Hole Saw (size depending on the fittings you'll be using)
- Measuring Tape
- PVC Cutter
- Wrenches
- Safety Glasses
- Gloves
VISUAL: collection rainwater harvesting materials organized display
Section 3: Building the Rainwater Harvesting System
Now for the fun part! Follow these step-by-step instructions to build your rainwater harvesting system.
Step 1: Cleaning and Preparing the IBC Tote(s): This is essential, especially if you're using a recycled tote. Thoroughly clean the inside and outside of the tote with a food-grade cleaner and rinse it several times with clean water. Inspect the tote for any leaks or damage. If you find any small cracks or holes, you can often repair them with a plastic welding kit or a durable sealant.
Step 2: Installing the Inlet: Cut an opening in the top of the tote using a hole saw. The size of the opening will depend on the size of your inlet fitting. Install a screened inlet to filter out debris. You can make a simple screened inlet by attaching hardware cloth to a PVC pipe fitting.
Step 3: Connecting the Gutter System: This is where you connect your downspout to the IBC tote. Use PVC pipes and fittings to create a connection that directs the water flow into the screened inlet. Ensure that the connection is secure and watertight. It's crucial to screen your gutters to prevent leaves and other debris from clogging the system. Install gutter guards or regularly clean your gutters to maintain optimal performance.
Overflow Prevention: An overflow mechanism is essential to prevent the IBC tote from overflowing during heavy rainfall. You can create an overflow by installing an overflow pipe near the top of the tote that directs excess water away from your foundation. Alternatively, connect multiple tanks together to increase your storage capacity.
Step 4: Installing a Spigot: Install a spigot at the bottom of the tote for easy access to water. Use a hole saw to create an opening and attach the spigot using the appropriate fittings. Make sure the connection is watertight.
Step 5: Setting up the Irrigation System: You have several options for irrigating your garden. The simplest is to connect a hose to the spigot for manual watering. For a more automated system, install a submersible pump inside the IBC tote and connect it to soaker hoses or drip irrigation tubing. This allows you to water your garden efficiently and consistently. Consider using a timer to automate the irrigation process.
[VISUAL: hands installing inlet rainwater harvesting tote]
[VISUAL: pvc pipe connecting gutter rainwater harvesting]
[VISUAL: installed rainwater barrel spigot with hose]
Section 4: Maintaining Your Rainwater Harvesting System
Regular maintenance is crucial for ensuring the long-term functionality of your rainwater harvesting system.
Regular Inspections: Regularly inspect the gutters for debris and clogs. Clean the screen on the inlet to prevent blockage.
Periodic Cleaning: Periodically drain and clean the IBC tote(s) to remove sediment and prevent algae growth.
Winterizing: In cold climates, disconnect hoses, drain the tote (if necessary), and protect pumps from freezing temperatures.
Water Quality Testing (Optional): If you're using the rainwater for sensitive plants or are concerned about water quality, consider testing the water periodically.
[VISUAL: homesteader cleaning gutter rainwater harvesting]
Section 5: Adapting the System to Your Homestead
The beauty of a DIY system is its adaptability. Here's how to tailor it to your specific needs:
Adapting to Different Roof Sizes: For smaller roofs, one IBC tote might be sufficient. For larger roofs, connect multiple tanks together to increase your storage capacity.
Adapting to Varying Rainfall Patterns: In areas with heavy rainfall, focus on maximizing storage and ensuring proper overflow management. In drier areas, consider using a larger storage tank and implementing water conservation techniques in your garden.
Considerations for Different Climates: In arid climates, minimize evaporation by covering the IBC tote with a lid or painting it a light color. In wet climates, ensure proper drainage and overflow management to prevent flooding.
Integrating with Other Homesteading Practices: Use rainwater to fill your animal water troughs, clean tools, or supplement your composting process.
[VISUAL: multiple rainwater barrels connected system]
[VISUAL: arid homestead garden waterwise irrigation]
Conclusion:
Building a rainwater harvesting system is a tangible step towards creating a more self-sufficient and resilient homestead. Not only does it reduce your reliance on external water sources and lower your water bill, but it also provides your plants with naturally soft, chlorine-free water.
Here's a look at the difference rainwater harvesting can make:
Before: Relying solely on well water, with rising costs and environmental concerns.
After: A thriving garden watered by a sustainable rainwater harvesting system, reducing water bills and promoting water conservation.
Don't just read about it; do it! Take the first step towards a more sustainable future by building your own rainwater harvesting system today.

Call to Action:
Ready to start harvesting the sky? Share your rainwater harvesting experiences and questions in the comments below! What challenges have you faced, and what solutions have you found? Let's build a community of resourceful homesteaders! Download our free rainwater harvesting planning worksheet to get started, and subscribe to our newsletter for more homesteading tips and DIY projects. And don't forget to share this post with your friends who are passionate about sustainable living! Let's turn runoff into abundance, together!