Harvest the Sky: Build a Beginner-Friendly Rain Barrel System for a Bountiful Garden
Welcome, fellow homesteading enthusiasts! If you're anything like me, you're always looking for ways to become more self-sufficient and connected to the land. One of the simplest and most rewarding projects you can undertake is building your own rain barrel system. It's a fantastic way to conserve water, reduce your reliance on municipal water sources, and provide your vegetable garden with the best possible nourishment. This guide is designed for complete beginners, so don't worry if you've never handled plumbing before. We'll walk through each step together, making it easy, affordable, and fun!
Why Rainwater Harvesting? A Homesteading Philosophy
Before we dive into the how-to, let's talk about the why. Homesteading is about more than just growing your own food; it's about creating a resilient and sustainable lifestyle. Rainwater harvesting embodies this philosophy perfectly.
- Water Conservation: Rainwater is a precious resource. By collecting it, we reduce our demand on treated water, which saves energy and benefits the environment.
- Plant Health: Rainwater is naturally soft and free of chemicals like chlorine and fluoride, which can be harmful to plants. Your vegetables will thank you!
- Self-Sufficiency: Relying less on external resources gives you a sense of independence and security, especially during dry spells.
- Cost Savings: Over time, you'll save money on your water bill.
This project will help you take a step toward a more sustainable and self-sufficient homestead.
Project Overview: A Simple Rain Barrel System
Our goal is to build a basic, single-barrel system connected to a downspout, providing gravity-fed irrigation for a small vegetable garden. We'll focus on using readily available materials and straightforward techniques, keeping the cost down and the process manageable.
Step 1: Gathering Your Materials
Here's a list of what you'll need. You can find these at your local hardware store (like Home Depot or Lowe's) or online retailers like Amazon. Prices are approximate and may vary.
55-Gallon Plastic Barrel (Food-Grade Recommended): ($50-$80) Look for used barrels that previously held food products. Avoid barrels that contained chemicals. Check local classifieds (Facebook Marketplace, Craigslist) for deals.

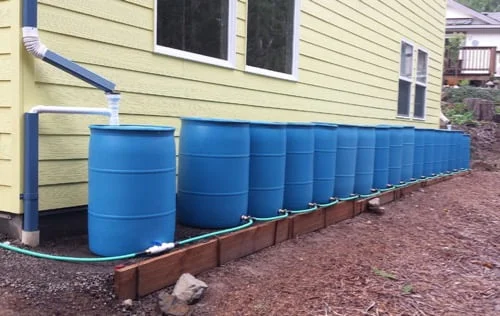
- This image shows blue plastic rain barrels connected to a house.
Downspout Diverter Kit: ($20-$40) This diverts rainwater from your downspout into the barrel. Several options are available; choose one compatible with your downspout size.
Spigot (¾-inch): ($5-$10) For dispensing water from the barrel.
¾-inch Threaded Nipple: ($2-$5) Connects the spigot to the barrel.
¾-inch Rubber Washer: ($1-$2) For a watertight seal.
Bulkhead Fitting (¾-inch): ($5-$10) This creates a secure, watertight connection through the barrel wall. If your spigot kit comes with one, great!
Drill with Hole Saw Attachment (Size to match Bulkhead Fitting): (Variable - you may already have one, or can borrow from a friend)
Screen Mesh (for the top of the barrel): ($5-$10) Keeps out debris and mosquitoes. You can use fiberglass window screen or hardware cloth.
Zip Ties or Clamps: ($3-$5) To secure the screen mesh.
PVC Pipe (1-2 feet): ($3-$5) For directing overflow water.
PVC Elbow Fitting: ($2-$3) To direct overflow water away from your foundation.
Teflon Tape: ($2-$3) For sealing threaded connections.
Optional: Concrete Blocks or Bricks: ($10-$20) To elevate the barrel for better water pressure.
Total Estimated Cost: $108 - $198 (depending on where you source materials and whether you already own some items)
Step 2: Preparing the Barrel
- Clean the Barrel: Thoroughly wash the inside of the barrel with soap and water. Rinse well to remove any residue.
- Drill the Spigot Hole: Decide where you want the spigot to be (typically near the bottom). Use the hole saw attachment on your drill to create a hole that matches the size of your bulkhead fitting.
- Install the Bulkhead Fitting: Insert the bulkhead fitting into the hole. Ensure a tight seal using the rubber washer.
- Attach the Spigot: Wrap Teflon tape around the threads of the threaded nipple. Screw the nipple into the bulkhead fitting, then attach the spigot to the nipple. Ensure it's snug and watertight.

This image shows a close-up of someone attaching a spigot to a rain barrel.
Step 3: Installing the Downspout Diverter
- Cut the Downspout: Measure and cut a section out of your downspout according to the instructions included with your downspout diverter kit. The height will depend on the height of your barrel.
- Install the Diverter: Install the downspout diverter kit according to the manufacturer's instructions. This usually involves sliding the diverter pieces into the cut ends of the downspout.
- Connect to the Barrel: Connect the diverter hose to the inlet on your rain barrel. Some diverters come with a pre-made hose; others require you to purchase a short length of flexible tubing.
Step 4: Creating the Overflow System
- Drill an Overflow Hole: Drill a hole near the top of the barrel for the overflow. The size of the hole should match the diameter of your PVC pipe.
- Insert PVC Pipe: Insert the PVC pipe into the overflow hole. You may need to use some sealant to ensure a watertight fit.
- Attach Elbow Fitting: Attach the PVC elbow fitting to the end of the PVC pipe to direct the overflow water away from your foundation. This prevents water from pooling around your house.

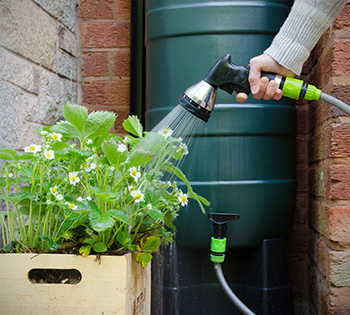
This image shows a rain barrel connected to a garden hose watering vegetables.
Step 5: Mosquito Prevention and Debris Control
- Cover the Barrel Top: Cut a piece of screen mesh slightly larger than the opening of the barrel.
- Secure the Mesh: Secure the mesh tightly over the opening using zip ties or clamps. This prevents mosquitoes from breeding inside the barrel and keeps out leaves and other debris. Regularly inspect the screen and clean off any accumulated debris.
Step 6: Setting Up Your Irrigation System
- Elevate the Barrel (Optional): Place the barrel on concrete blocks or bricks to increase water pressure. This is especially helpful if your garden is located uphill from the barrel.
- Connect Your Hose: Attach a garden hose to the spigot.
- Water Your Garden: Open the spigot and water your plants! Remember that rainwater is best used for watering the soil, not the leaves, to prevent fungal diseases.
Addressing Potential Challenges
- Overflowing: A properly installed overflow system is crucial. Make sure the overflow pipe directs water away from your foundation. During extremely heavy rains, the barrel may still overflow. Consider connecting multiple barrels together to increase your storage capacity.
- Mosquito Breeding: A tight-fitting screen is essential. Inspect it regularly for tears or gaps. You can also add mosquito dunks (Bacillus thuringiensis israelensis or Bti) to the barrel, which are safe for plants and humans but kill mosquito larvae.
- Freezing Temperatures: In cold climates, disconnect the rain barrel from the downspout and drain it completely before freezing temperatures arrive. Store the barrel upside down to prevent water from accumulating and freezing inside.
- Algae Growth: Algae can grow in rain barrels exposed to sunlight. Using a dark-colored barrel helps prevent this. You can also add a small amount of copper sulfate to the barrel, which will kill algae but is safe for plants. However, use caution and research appropriate amounts.
Cost-Effective Alternatives
- Used Barrels: Source used food-grade barrels from local businesses or online marketplaces.
- DIY Diverters: While diverter kits are convenient, you can create your own using PVC pipe and fittings. Search online for DIY rain barrel diverter tutorials.
- Simple Screening: Instead of buying new screen mesh, repurpose old window screens or fabric.
Legal Considerations
Before installing a rain barrel system, check your local regulations. Some areas have restrictions or require permits for rainwater harvesting.
A Step Towards a Resilient Homestead
Congratulations! You've built your own rain barrel system and taken a significant step toward a more sustainable and self-sufficient homestead. Enjoy the satisfaction of knowing that you're conserving water, nourishing your garden with natural rainwater, and reducing your reliance on external resources.
Share Your Experience!
We'd love to hear about your rain barrel project! Share your experiences, ask questions in the comments below, and post photos of your completed rain barrel systems. Let's learn and grow together!