Harnessing the Sun: Build a Passive Solar Root Cellar for Year-Round Storage
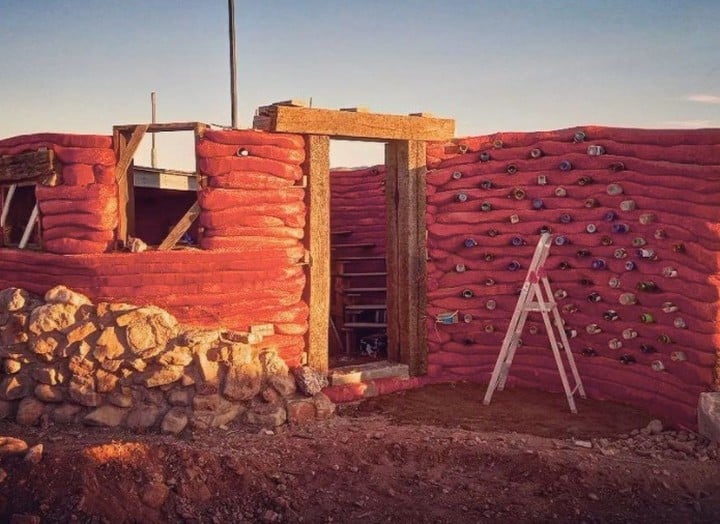
[VISUAL: homestead passive solar root cellar entry way]
"Another July, another battle against the heat. My tomatoes were ripening faster than we could eat them, the squirrels were eyeing my precious squash, and the only cool place in the house was rapidly becoming a squash-and-tomato repository. I longed for the days when fresh, homegrown produce lasted through the winter. That’s when I started seriously researching root cellars."
On a homestead, food storage isn't just about convenience; it's about resilience and self-sufficiency. The fluctuating temperatures of a modern refrigerator can compromise flavor and nutrients, and relying solely on commercially available produce ties you to external supply chains. Enter the passive solar root cellar: a time-honored, low-energy solution that harnesses the power of the sun to maintain consistent temperatures, preventing freezing in the winter and promoting ventilation in the summer.
Imagine a naturally cooled pantry where your harvest remains crisp and delicious for months on end. This blog post will guide you through the step-by-step process of building your own passive solar root cellar, focusing on low-cost materials and sustainable building techniques. We'll unlock extended growing seasons, improve food quality, and boost self-sufficiency, all while reducing our energy footprint. Let's get started!
Section 1: Planning Your Passive Solar Root Cellar
Careful planning is the cornerstone of a successful root cellar. Rushing into construction without considering key factors can lead to disappointing results. Let's explore the essential aspects of planning your passive solar root cellar.
Site Selection: The sun is your ally! A southern exposure is crucial for capturing solar energy during the colder months. Ideally, choose a site with a gentle slope facing south. This allows for good drainage and maximizes sun exposure. Protection from prevailing winds is also desirable; consider using existing trees or a strategic berm to buffer the wind. Proximity to your garden and house will make accessing your stored goods much easier.
Size and Capacity: How much storage space do you really need? Calculate your family's needs and consider your projected yields from your garden. A good rule of thumb is to estimate the volume of produce you typically preserve or purchase in bulk over the winter months. Don’t forget to account for things like potatoes, onions, apples, squash, and canned goods.
Design Considerations:
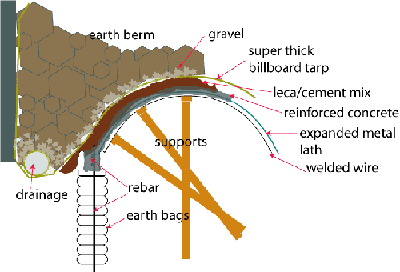
- Above-ground vs. Underground: Underground root cellars offer excellent temperature stability due to the earth's insulating properties. However, they can be more challenging and expensive to build. An earth-bermed design – partially underground – strikes a balance between cost-effectiveness and thermal performance. We'll focus on this design.
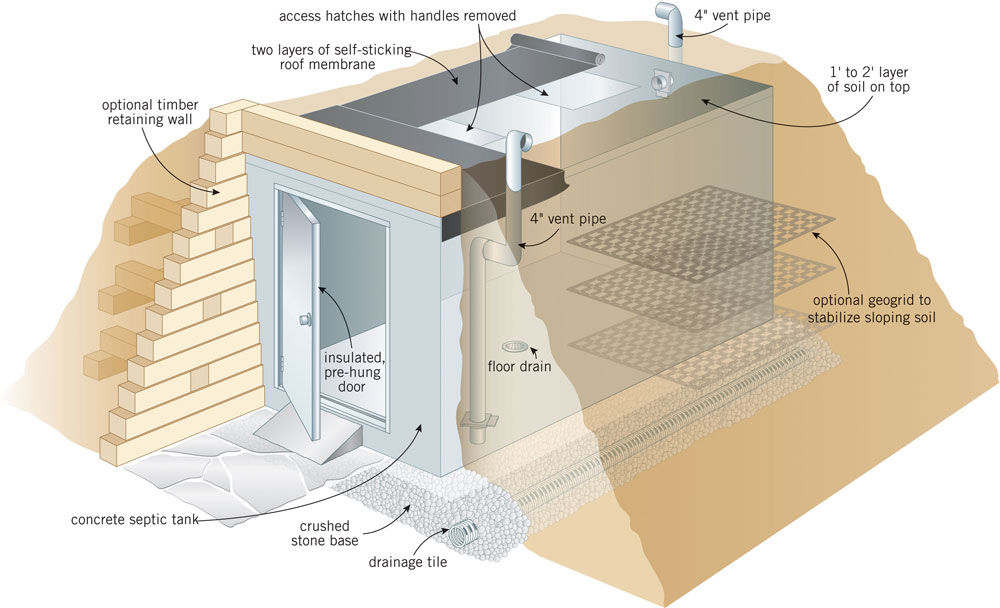
- Ventilation: Proper ventilation is critical for preventing moisture buildup and maintaining optimal temperatures. Passive venting relies on the natural movement of air. Strategically placed vents, one high and one low, create a chimney effect, drawing warm air out and pulling cool air in. Adjustable vents allow you to control airflow based on seasonal conditions.
- Insulation: Earth acts as a fantastic insulator, but you may need additional insulation in colder climates. Consider using foam board, straw bales, or recycled materials.
- Drainage: Preventing water buildup is paramount. Ensure the site has good natural drainage. Install a French drain around the perimeter of the root cellar to divert water away from the structure. A gravel floor can also help with drainage.
- Solar Gain: Maximizing solar gain is essential for preventing freezing in the winter. South-facing glazing (windows or polycarbonate panels) allows sunlight to enter and warm the space. Thermal mass, such as concrete or stone, absorbs and stores this heat, releasing it slowly throughout the night.
Permitting and Regulations: Don't skip this step! Check with your local building department to determine if any permits are required for your root cellar project. Zoning ordinances may also restrict the location or size of structures on your property.
[VISUAL: passive solar root cellar schematics diagram]
Key Takeaways: Careful planning is essential for success. Choose the right location, size, and design to maximize efficiency and minimize potential problems.
Section 2: Materials and Tools
Resourcefulness is a hallmark of homesteading. Using reclaimed materials not only saves money but also reduces your environmental impact. Here's a rundown of the materials and tools you'll need for your passive solar root cellar.
Foundation:
- Options: Concrete, gravel, recycled tires. Concrete provides a solid and durable foundation, but it can be more expensive. Gravel is a cheaper and more sustainable option. Recycled tires can be used to create a foundation with good drainage.
- Considerations: A solid and level foundation is crucial for the stability of the structure. Ensure proper drainage to prevent water from undermining the foundation.
Walls:
- Options: Cinder blocks, reclaimed lumber, earthbags. Cinder blocks are readily available and relatively inexpensive. Reclaimed lumber adds a rustic charm and reduces waste. Earthbags are a sustainable and cost-effective option, especially for curved walls.
- Considerations: Choose materials that are durable, weather-resistant, and locally sourced. Consider the thermal properties of the materials.
Roof:
- Considerations: A durable, waterproof, and insulated roof is essential for protecting your stored goods from the elements. Design the roof with a slight pitch to allow for water runoff.
Glazing:
- Considerations: Select the right type of glazing for solar gain. Double-paned windows or polycarbonate panels provide good insulation and allow sunlight to enter.
Insulation:
- Options: Foam board, straw bales, recycled materials. Foam board is readily available and provides good insulation. Straw bales are a natural and sustainable option. Recycled materials, such as denim insulation, can also be used.
Ventilation:
- Materials: Vents and ductwork for natural airflow. Use durable, weather-resistant materials that won't corrode or rust.
Door:
- Considerations: An insulated and weather-sealed door is crucial for temperature regulation.
Shelving:
- Material: Lumber, metal shelving. Choose sturdy materials that can support the weight of your stored goods.
Tools:
- Shovels, wheelbarrow, level, saw, drill, hammer, measuring tape, safety glasses, work gloves.
[VISUAL: wide angle materials tools construction site]
Key Takeaways: Resourcefulness is key. Use reclaimed materials whenever possible to save money and reduce environmental impact. Emphasize safety when handling tools and materials.
Section 3: Step-by-Step Construction (Earth-Bermed Design)
Let's dive into the actual construction of your earth-bermed passive solar root cellar. Remember, safety is paramount. Always wear appropriate safety gear and follow manufacturer's instructions when using tools and materials.
Step 1: Site Preparation: Clear the area of vegetation, rocks, and debris. Level the ground and mark the dimensions of the root cellar.
Step 2: Foundation Construction: Build the foundation according to your chosen design (concrete, gravel, or recycled tires). Ensure proper drainage is installed.
Step 3: Wall Construction: Lay the foundation block, building the walls, incorporating insulation between the walls (if needed) ensuring a tight fit to prevent heat loss or gain.
Step 4: Roof Construction: Build the roof frame, applying roofing materials (metal, shingles, or a green roof). Install insulation.
Step 5: Glazing Installation: Install the south-facing glazing (windows or polycarbonate panels) to maximize solar gain. Ensure the glazing is properly sealed to prevent air leaks.
Step 6: Ventilation Installation: Install vents at both high and low points for natural airflow. Position the vents so that they can be easily adjusted.
Step 7: Earth Berming: Cover the walls with earth for insulation. Create a gradual slope for water runoff. Compact the earth to prevent erosion.
Step 8: Door Installation: Install an insulated and weather-sealed door. Ensure the door swings freely and closes tightly.
Step 9: Interior Finishing: Build shelving, add a gravel floor for drainage, and organize the space. Consider adding a moisture barrier to the interior walls.
[VISUAL: earth berm root cellar partially built]
Key Takeaways: Emphasize the importance of precise measurements, level surfaces, and proper sealing to prevent moisture problems. Safety precautions should be highlighted throughout the process.
Section 4: Optimizing and Maintaining Your Passive Solar Root Cellar
Building your root cellar is just the first step. Regular monitoring and maintenance are essential for ensuring optimal performance and preventing problems.
Temperature Monitoring: Use a thermometer and hygrometer to monitor the temperature and humidity levels inside the root cellar. Aim for a temperature range of 32-40°F and a humidity level of 85-95%.
Ventilation Adjustment: Adjust the vents seasonally to maintain optimal temperatures. Open the vents wider during warmer months to increase airflow and close them during colder months to retain heat.
Humidity Control: If the humidity is too high, consider adding gravel to the floor or using a small fan to circulate air. If the humidity is too low, add a container of water to increase moisture.
Pest Control: Prevent pests by keeping the root cellar clean and organized. Use natural methods, such as cedar shavings or diatomaceous earth, to deter pests.
Food Placement: Place different types of produce based on their storage needs. Root vegetables, such as potatoes and carrots, store best in high humidity. Fruits, such as apples and pears, store best in lower humidity.
Troubleshooting: Common problems include condensation, freezing, and pest infestations. Address these problems promptly to prevent damage to your stored goods.
[VISUAL: homesteaders inspecting the stored foods]
Key Takeaways: Regular monitoring and adjustments are essential for maintaining optimal conditions and preventing problems.
Section 5: Community Wisdom: Tips and Tricks from Other Homesteaders
Homesteading is a journey best traveled together. Here's some wisdom gleaned from fellow homesteaders who've walked this path before.
- "I wish I had installed a small window on the north side of my root cellar. It would have provided some natural light without compromising the temperature stability," says Sarah from Willow Creek Homestead.
- "Don't underestimate the importance of rodent-proofing! We learned the hard way after a family of mice feasted on our potatoes," shares Tom from Backwoods Acres. He recommends using metal mesh around the base of the structure and sealing any cracks or openings.
For those in colder climates, consider adding a layer of insulation to the inside of the door to further minimize heat loss. In warmer climates, a green roof can help to cool the root cellar during the summer months. The beauty of a passive solar root cellar lies in its adaptability!
[VISUAL: a group working together on a building]
Key Takeaways: Homesteading is a community. Learn from the experiences of others and adapt the design to your specific needs and climate.
Conclusion: A Step Towards Self-Sufficiency
Building a passive solar root cellar is an investment in your homestead's resilience and self-sufficiency. By harnessing the power of the sun, you can reduce your energy consumption, extend your growing season, and improve the quality of your stored food.
It's a journey, not a destination. Every step you take towards self-sufficiency is a step towards a more sustainable and fulfilling lifestyle. Embrace the challenge, learn from your mistakes, and never stop experimenting. Together, we can build a more resilient and resourceful future for ourselves and our communities.
Download our free root cellar planning guide!