Harness the Sun: Build a DIY Solar Food Dehydrator on Your Homestead

Imagine the deep satisfaction of preserving your garden's abundant harvest, extending its life without relying on expensive electricity, and enjoying delicious, nutrient-rich snacks all winter long. Solar food dehydration is a sustainable and cost-effective method for food preservation that allows you to do just that.
This DIY project provides a way to create a passive system that uses the sun's energy to gently remove moisture from your fruits, vegetables, and herbs. Compared to other preservation methods, it is both eco-friendly and budget-conscious. This approach not only saves energy but also, in many cases, retains more nutrients in your preserved foods. This guide will walk you through building a simple, yet effective, solar food dehydrator using readily available materials. Whether you're a seasoned homesteader or just starting your journey towards self-sufficiency, this project is an approachable and rewarding way to harness the power of the sun and enjoy the fruits (and vegetables!) of your labor year-round. Get ready to extend your harvest in a way that's good for your family and the planet.
Why Solar Dehydration? The Benefits Beyond the Bite

While the delicious taste of sun-dried fruits and vegetables is a major perk, the benefits of solar dehydration extend far beyond the culinary realm. Choosing this method offers significant advantages for your homestead, your wallet, and the environment.
Environmental Impact: One of the most compelling reasons to choose solar dehydration is its reduced carbon footprint. Unlike electric dehydrators that draw power from the grid, solar dehydrators rely on a renewable energy source: the sun. By harnessing solar energy, you're actively reducing your dependence on fossil fuels and minimizing your environmental impact. For example, dehydrating just 10 pounds of apples using a solar dehydrator could save approximately 5-7 kWh of electricity compared to using an electric dehydrator. Over a season of preserving your harvest, that savings adds up substantially!
Cost Savings: Beyond the environmental benefits, solar dehydration can lead to significant long-term savings on your electricity bills. Electric dehydrators can be energy hogs, especially when running for extended periods. While there's an initial investment in building your solar dehydrator, the ongoing operating cost is virtually zero. The materials for a basic DIY solar dehydrator might cost between $50-$100, while a good quality electric dehydrator can easily cost $150-$300 or more, plus the ongoing electricity expenses.
Nutrient Retention: Solar dehydration, when done correctly, can preserve more nutrients compared to other methods, especially when maintained at lower temperatures. The gentle heat of the sun helps to retain vital vitamins and enzymes that can be lost during high-heat processing like canning or some electric dehydrators. Here’s a quick comparison:
Nutrient Solar Dehydration Electric Dehydration Canning Vitamin C High Retention Medium Retention Low Retention Vitamin A Medium Retention Medium Retention Low Retention Enzymes High Retention Medium Retention Destroyed Off-Grid Capability: Solar dehydration is a perfect fit for homesteaders seeking energy independence. If you're living off-grid or striving to reduce your reliance on external energy sources, a solar dehydrator is an invaluable tool. It allows you to preserve your harvest even without access to electricity, empowering you to become more self-sufficient.
Flavor Enhancement: Dehydration concentrates the natural sugars in fruits and vegetables, intensifying their flavors. Sun-dried tomatoes are a classic example, offering a richer, more intense taste than fresh tomatoes. The slow, gentle drying process of solar dehydration allows these flavors to develop and deepen, resulting in incredibly delicious and satisfying snacks.
Extending the Harvest and Reducing Waste: Often, we're faced with an abundance of produce at the peak of the season. Dehydrating those fruits and vegetables that might be on the verge of going bad allows you to capture their goodness and prevent food waste.
In short, solar dehydration is an environmentally friendly, cost-effective, and nutritious way to preserve your harvest, increase your homestead's self-sufficiency, and savor the flavors of your garden all year long.
Planning Your Solar Dehydrator – Size, Location, and Materials

Careful planning is crucial to building a solar dehydrator that meets your specific needs and operates efficiently. Consider these factors before you start construction:
Dehydrator Size: The ideal size of your solar dehydrator will depend on several factors, including the size of your garden yield, the amount of storage space you have available, and the size of your family. Here are some general guidelines:
- Small: Suitable for small gardens or individuals. Dimensions might be approximately 2ft x 2ft x 3ft.
- Medium: Good for average-sized gardens and families of 2-4. Dimensions might be approximately 3ft x 3ft x 4ft.
- Large: Ideal for large gardens and families of 5 or more, or for those who plan to dehydrate large quantities of food. Dimensions might be approximately 4ft x 4ft x 5ft.
Location: Optimal placement is key to maximizing sun exposure. The ideal location should have:
- Southern Exposure: In the Northern Hemisphere, a south-facing location will receive the most direct sunlight throughout the day.
- No Shadows: Ensure the location is free from shadows cast by trees, buildings, or other obstructions, especially during the peak sun hours (10 am to 4 pm).
- Wind Protection: A location sheltered from strong winds will help maintain a stable temperature inside the dehydrator.
Materials List: Here's a detailed list of materials, keeping cost-effectiveness and sustainability in mind:
- Lumber: Use untreated lumber for the frame. Consider using reclaimed wood to reduce costs and environmental impact. Pine or cedar are good choices.
- Plexiglass or Polycarbonate Sheeting: For the glazing (the transparent front of the dehydrator). Polycarbonate is more durable and shatter-resistant than plexiglass, but plexiglass is a more affordable option.
- Hardware Cloth or Mesh: For the drying racks. Stainless steel mesh is the most food-safe and durable option. Avoid galvanized mesh unless you can ensure it is properly coated and will not leach zinc into the food. Different mesh sizes can be used depending on the size of the food you are dehydrating.
- Dark Paint: To paint the interior surfaces of the dehydrator. Use a non-toxic, food-safe, and weather-resistant paint. Flat black paint is excellent for absorbing heat.
- Insulation (Optional): For colder climates, insulation will help retain heat inside the dehydrator. Natural options like straw bales or recycled denim insulation are environmentally friendly choices.
- Fasteners: Screws, nails, and staples for assembling the frame and attaching the glazing and racks.
- Weatherstripping: To seal gaps and prevent air leaks.
Tool List: You'll need basic tools for construction, including:
- Saw (hand saw or power saw)
- Drill
- Measuring Tape
- Hammer
- Screwdriver
- Staple Gun (for attaching mesh to racks)
- Safety Glasses
- Gloves
Design Considerations: Keep these factors in mind when planning your dehydrator's design:
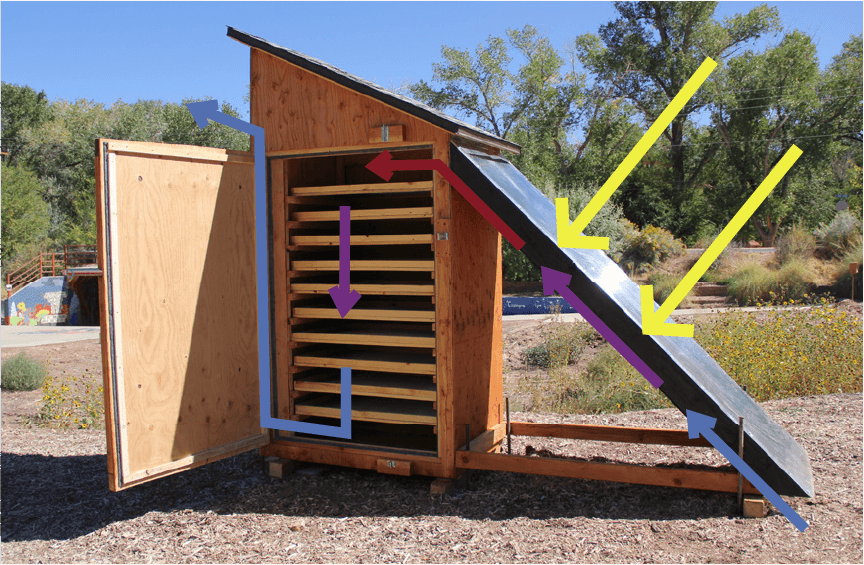
- Airflow: Proper airflow is essential for removing moisture from the food. Design your dehydrator with vents at the bottom and top to allow for natural convection.
- Ventilation: Adjustable vents will allow you to control the temperature and humidity inside the dehydrator.
- Minimizing Condensation: Good ventilation and proper sealing will help prevent condensation from forming inside the dehydrator.
- Food-Safe Materials: Always use food-safe materials to avoid contamination of your dehydrated food.
By carefully considering these factors, you can design and build a solar dehydrator that is perfectly suited to your homestead's needs.
Step-by-Step Construction – Building Your Solar Dehydrator

Follow these step-by-step instructions to build your solar dehydrator. Remember to prioritize safety and double-check your measurements at each stage.
Step 1: Building the Frame:
- Cut the lumber according to your chosen dimensions (small, medium, or large).
- Assemble the frame using screws or nails. Ensure the frame is sturdy and square.
- Reinforce the corners with corner braces for added stability.
Step 2: Installing the Glazing:
- Cut the plexiglass or polycarbonate sheeting to fit the front of the frame.
- Attach the sheeting to the frame using screws or staples.
- Apply weatherstripping around the edges of the sheeting to create an airtight seal.
- Be careful when handling plexiglass or polycarbonate, as it can crack or shatter.
Step 3: Constructing the Drying Racks:
- Cut the hardware cloth or mesh to fit the inside dimensions of the dehydrator.
- Create frames for the racks using thin strips of wood.
- Attach the mesh to the frames using staples.
- Space the racks evenly inside the dehydrator, allowing for adequate airflow between each rack.
Step 4: Painting the Interior:
- Apply the dark, food-safe paint to all interior surfaces of the dehydrator.
- Ensure even coverage for maximum heat absorption.
- Allow the paint to dry completely before proceeding.
Step 5: Installing Ventilation:
- Cut openings for vents at the bottom and top of the dehydrator.
- Cover the openings with mesh to prevent insects from entering.
- Attach adjustable covers to the vents to control airflow.
Step 6: Adding Insulation (Optional):
- Attach insulation to the exterior of the dehydrator using staples or adhesive.
- Cover the insulation with a protective layer of wood or siding.
Using Your Solar Dehydrator – Tips for Success
To get the best results from your solar dehydrator, follow these tips:
Food Preparation:
- Slicing: Slice fruits and vegetables into thin, even pieces (about 1/4 inch thick) for even drying.
- Blanching: Blanching vegetables before dehydrating helps to preserve their color and nutrients. Dip vegetables in boiling water for a few minutes, then immediately transfer them to ice water to stop the cooking process.
- Consult a guide for specific slicing recommendations and blanching times for individual foods.
Loading the Dehydrator:
- Arrange the food on the racks in a single layer, leaving space between each piece for optimal airflow.
- Avoid overcrowding the racks.
Monitoring Temperature and Humidity:
- Use a thermometer to monitor the temperature inside the dehydrator. The ideal temperature range for most foods is between 120°F and 140°F (49°C to 60°C).
- Adjust the vents to control temperature and humidity. Open the vents to increase airflow and lower the temperature. Close the vents to retain heat.
- Optimal temperatures vary with the food being dried.
Drying Times:
- Drying times will vary depending on the type of food, the thickness of the slices, and the weather conditions.
- Check the food regularly and rotate the racks for even drying.
Testing for Doneness:
- Food is properly dehydrated when it is leathery and pliable, with no visible moisture.
- Fruits should be slightly sticky, while vegetables should be brittle.
Troubleshooting:
- Uneven Drying: Rotate the racks and ensure proper airflow.
- Mold Growth: Discard any food that shows signs of mold. Ensure proper ventilation and avoid overcrowding the racks.
Food Safety Considerations: Maintain dehydrator temperatures that will kill potential bacteria. Make sure food is properly cooled and conditioned before storing.
Storing Your Dehydrated Foods – Protecting Your Harvest
Proper storage is essential for preserving the quality and extending the shelf life of your dehydrated foods.
Cooling and Conditioning:
- Allow dehydrated foods to cool completely before storing.
- "Condition" the food by placing it in loosely packed containers for a week. This allows any remaining moisture to redistribute.
Optimal Storage Conditions:
- Store dehydrated foods in a cool, dark, and dry location.
Storage Containers:
- Use airtight glass jars or vacuum-sealed bags to prevent moisture from entering.
Shelf Life:
- Dehydrated fruits and vegetables can last for several months to a year when stored properly.
Signs of Spoilage:
- Discard any food that shows signs of mold, discoloration, or off-odors.
Harness the Power of the Sun – A Sustainable Homesteading Skill
Solar food dehydration is a rewarding and sustainable way to preserve your harvest, reduce your environmental impact, and increase your self-sufficiency. By building your own solar dehydrator, you're taking a step towards a more resilient and sustainable lifestyle. This beginner-friendly project offers long-term rewards, allowing you to enjoy the fruits (and vegetables!) of your labor all year round.
Ready to harness the power of the sun? Share your solar dehydrator projects with us! Tag us on social media @BetterHomesandHarvests and use the hashtag #SolarDehydratorDIY.