Harness the Sun: Build a DIY Solar Food Dehydrator for Your Homestead
[ ]
]
Are you staring down rows of zucchini, bushels of apples, or overflowing herb gardens, wondering how you're going to possibly preserve all that bounty before it goes to waste? Homesteading is all about embracing self-sufficiency, and that includes preserving the fruits (and vegetables!) of your labor. While canning and freezing are valuable methods, they can be energy-intensive. Enter the solar food dehydrator – a sustainable, cost-effective, and incredibly rewarding way to extend the shelf life of your harvest and add nutrient-rich snacks to your pantry.
In this guide, we'll walk you through the process of building your own solar food dehydrator, even if you're a beginner. We'll cover everything from choosing the right design to sourcing materials and optimizing performance. By the end of this post, you'll have the knowledge and confidence to harness the power of the sun and transform your garden's abundance into delicious, long-lasting treats. Get ready to embrace self-sufficiency and drastically reduce food waste with this amazing project!
Planning and Design: Optimizing for Your Climate
[ ]
]
Before you start hammering and sawing, take some time to plan your solar dehydrator. Careful planning is key to building a unit that performs efficiently in your specific climate.
Site Selection: The ideal location for your dehydrator is a sunny, sheltered spot that receives at least 6-8 hours of direct sunlight per day. A south-facing location is usually best in the Northern Hemisphere. Make sure the area is also well-ventilated to promote airflow and moisture removal. Avoid areas prone to strong winds or excessive shade.
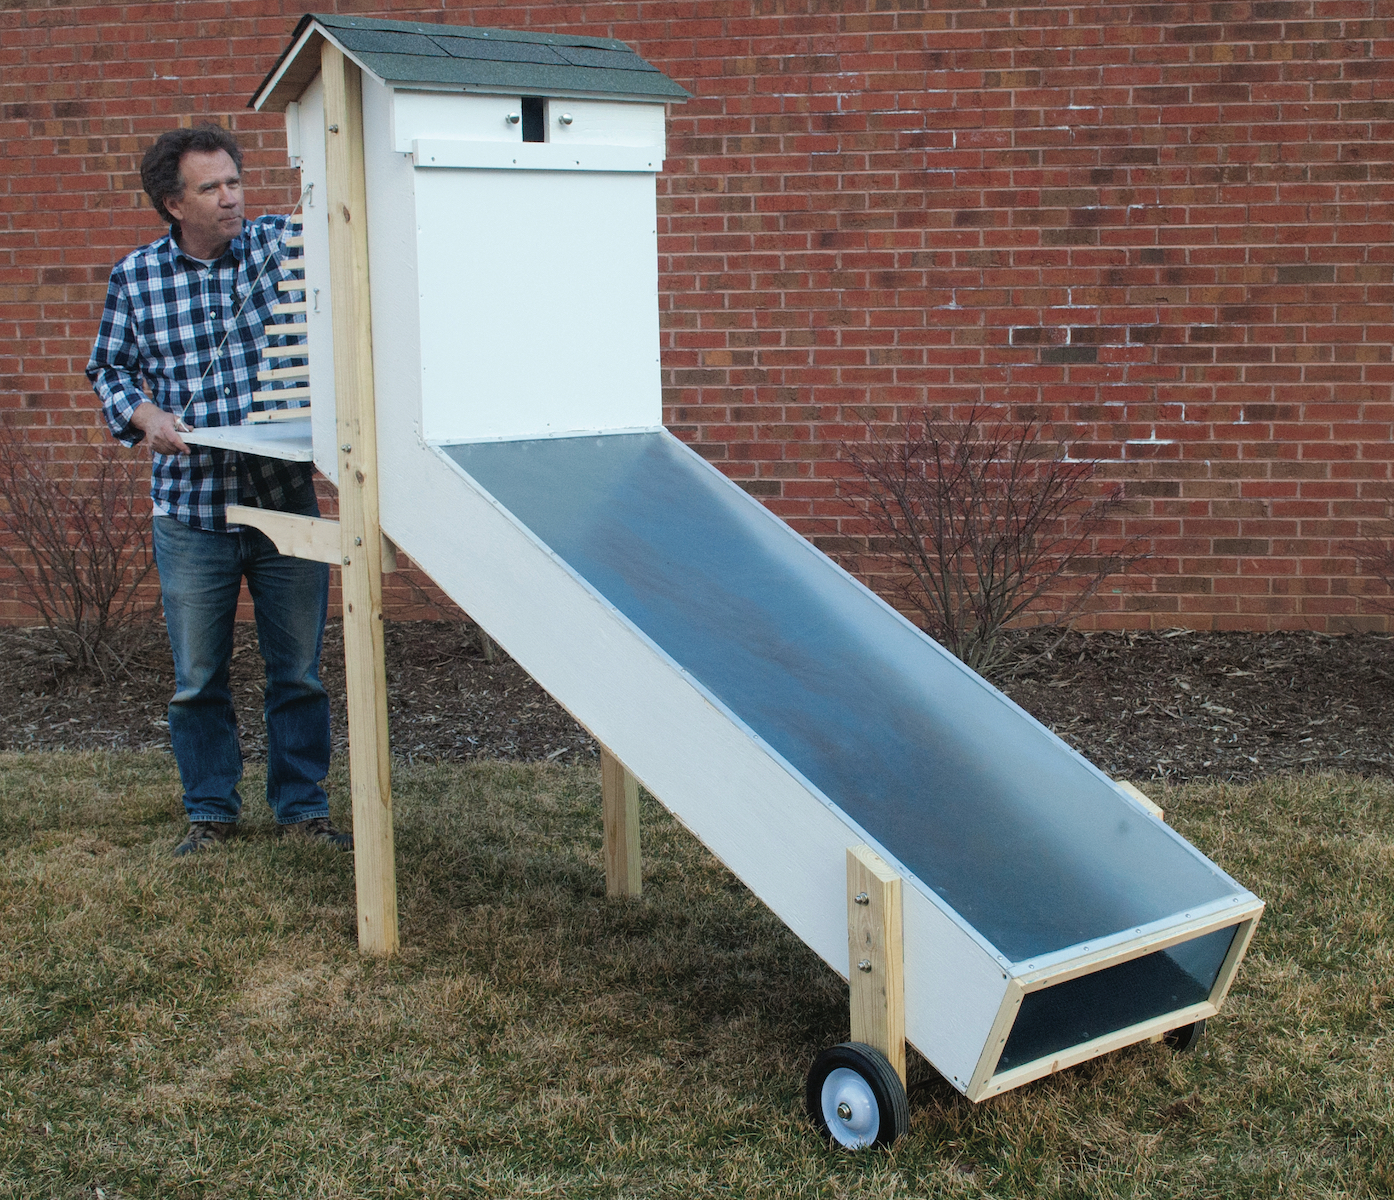
Design Considerations: There are several different solar dehydrator designs to choose from, each with its own advantages and disadvantages. Common designs include:
- Cabinet Style: A box-like structure with angled glazing on the top or front to maximize solar gain. This is a popular and relatively easy design to build.
- A-Frame: A triangular structure with glazing on one or both sides. This design can be very efficient but may require more precise construction.
- Slant-Roofed: Similar to the cabinet style, but with a single, sloped glazing surface.
Consider your climate and available materials when choosing a design. In colder climates, you might want to opt for a design with more insulation.
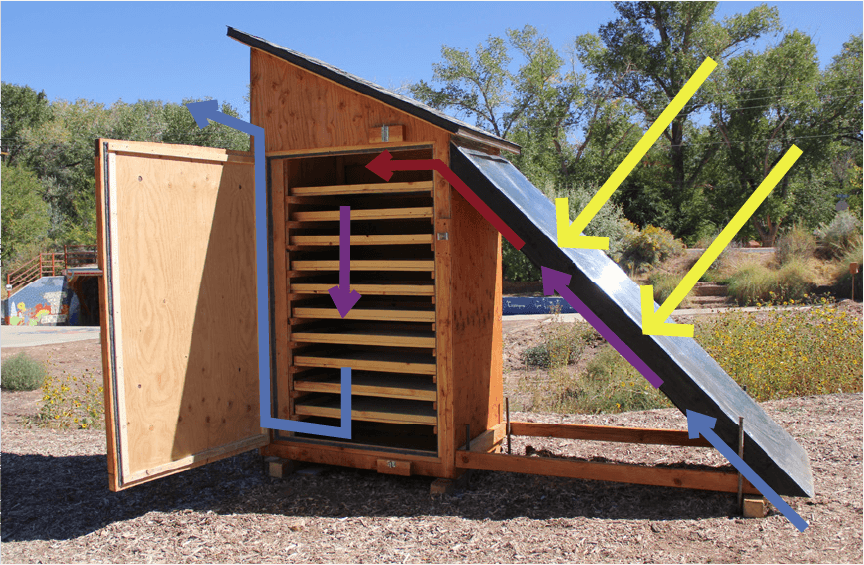
Principles of Operation: Solar dehydration works by using the sun's energy to heat the air inside the dehydrator, which then evaporates moisture from the food. The key principles are:
- Heat Collection: The glazing (transparent material) allows sunlight to enter the dehydrator and traps the heat inside.
- Airflow: Vents at the bottom and top of the dehydrator create a natural convection current, drawing in cool, dry air and expelling warm, moist air.
- Moisture Removal: The airflow carries away the evaporated moisture, preventing mold growth and ensuring proper drying.
Size Matters: The size of your dehydrator will depend on how much produce you anticipate dehydrating at once. Start small and build a larger unit later if needed.
Pest Proofing: Adding screens or fine mesh over vents can help keep insects out.
Lessons Learned: I initially made the mistake of making my vent openings a little too large and had to cover them with very fine mesh, which restricted a bit of airflow. Don't do what I did! Measure and cut the mesh carefully to have it overlap vent edges sufficiently.
Gathering Materials: Budget-Friendly and Repurposed Resources
Building a solar dehydrator doesn't have to break the bank. By using reclaimed and repurposed materials, you can significantly reduce costs and minimize your environmental impact.
Material List (Approximate Costs):
- Lumber (treated or naturally rot-resistant, like cedar or redwood): $50-$100
- Transparent Glazing Material (polycarbonate sheets, recycled window panes (tempered)): $30-$80
- Hardware Cloth or Screening (stainless steel is ideal, but galvanized can work): $20-$40
- Fasteners (screws, nails): $10
- Insulation Material (optional, for colder climates – rigid foam board): $20-$40
- Paint or Sealant (exterior grade, non-toxic): $20
Sourcing Materials:
- Salvage Yards: A great place to find reclaimed lumber, windows, and other materials at discounted prices.
- Construction Sites (with Permission): Ask construction companies if they have any scrap lumber or other materials that they're willing to give away.
- Online Marketplaces: Check Craigslist, Facebook Marketplace, and other online platforms for used materials.
- Local Hardware Stores: For fasteners, paint, and other essential supplies.
Material Alternatives:
- Old oven racks can be repurposed as drying trays.
- Clear plastic sheeting can be used as a temporary glazing material (although it's not as durable as polycarbonate or glass).
- Straw bales can be used as insulation.
Safety Warning: Always check salvaged materials for lead paint or other hazardous substances. When working with glass, wear safety glasses and gloves to prevent injuries.
Step-by-Step Construction: From Frame to Finish
[ ]
]
Now it's time to get your hands dirty and start building your solar dehydrator! Follow these step-by-step instructions:
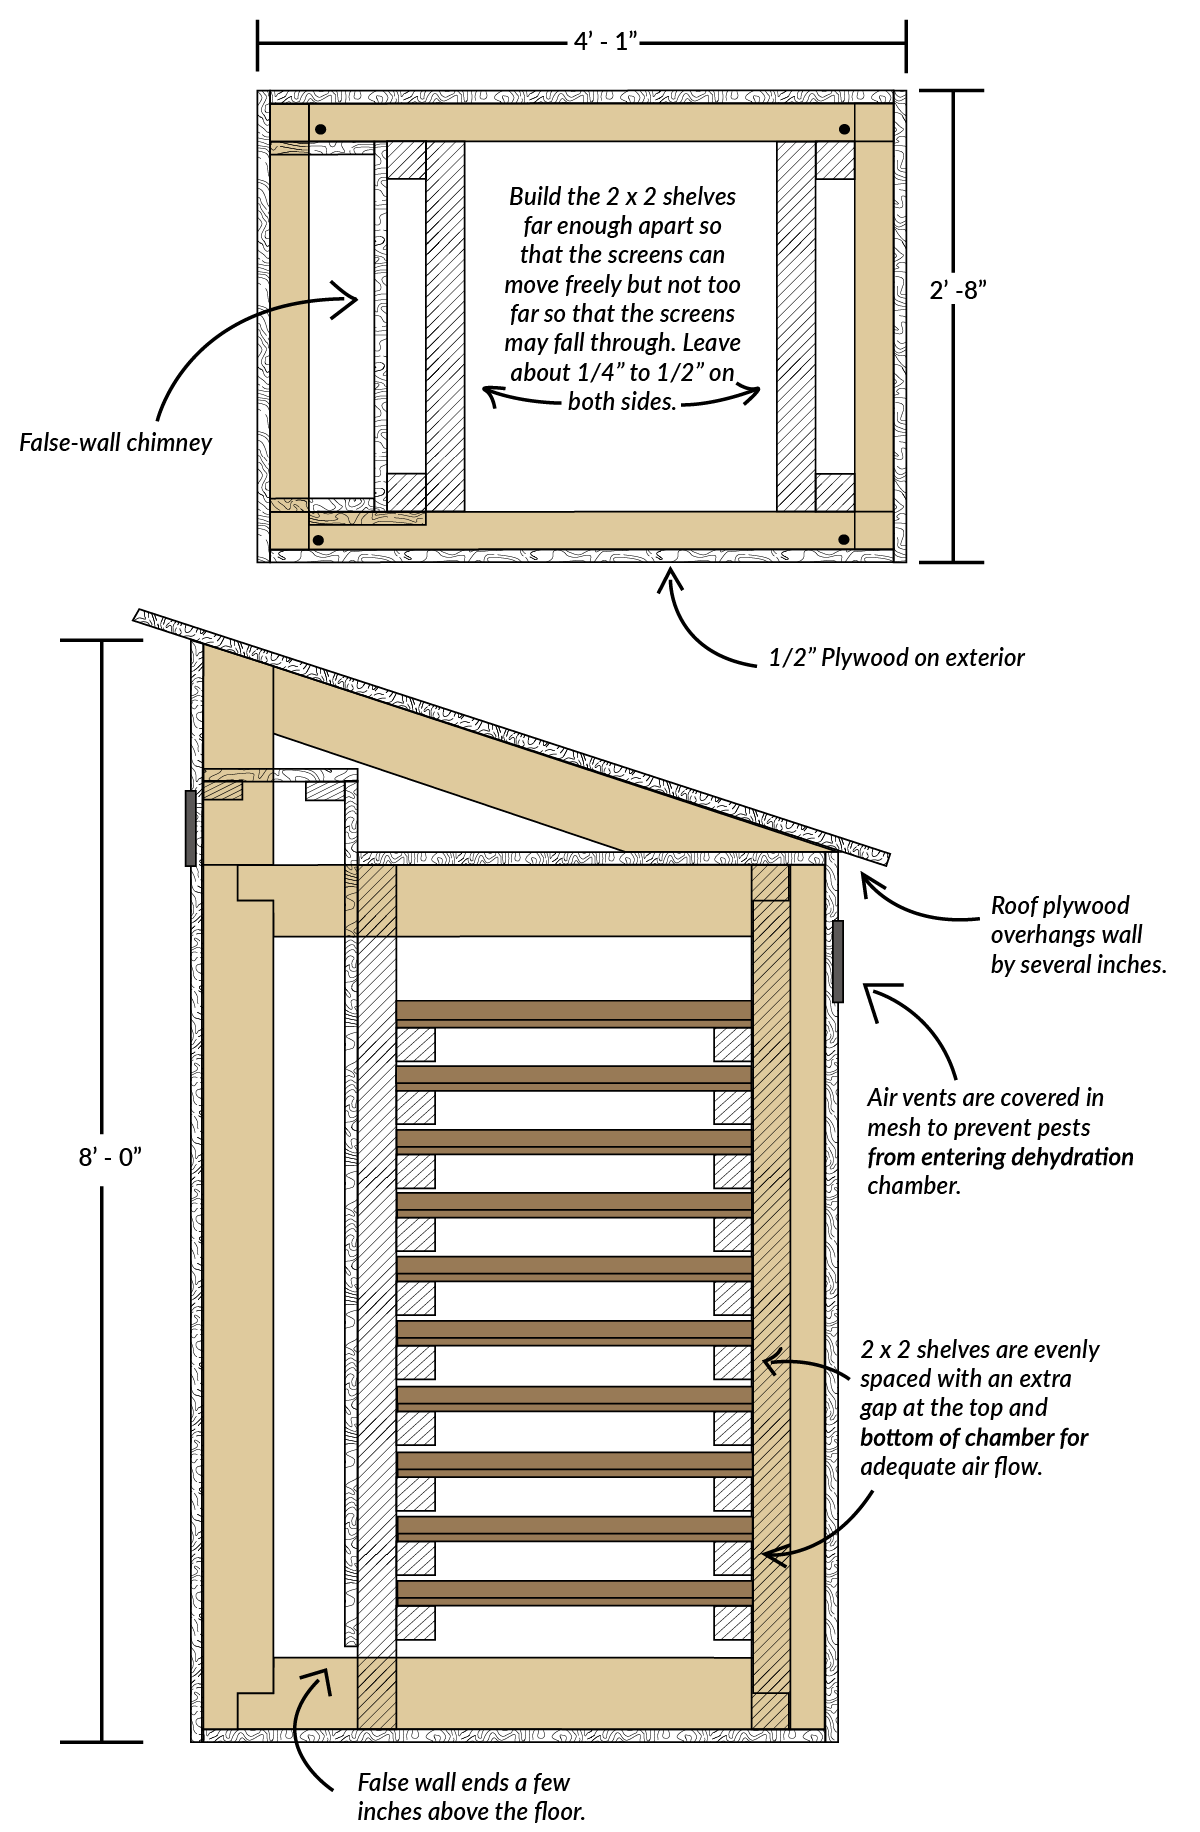
- Build the Frame: Cut the lumber according to your chosen design. Use screws or nails to assemble the frame. Ensure that the frame is sturdy and square.
- Install the Glazing: Cut the glazing material to size and attach it to the frame. Use screws or nails with rubber washers to create a watertight seal. If using glass, be extremely careful to avoid breakage. Remember to use tempered glass!
- Create the Ventilation System: Cut openings for the air intakes and exhaust vents. Position the intakes at the bottom of the dehydrator and the exhaust vents at the top to promote natural convection. Cover the openings with hardware cloth or screening to keep insects out.
- Build the Drying Trays: Cut the hardware cloth or screening to size and attach it to wooden frames. The frames should be sized to fit snugly inside the dehydrator.
- Add Insulation (Optional): If you live in a colder climate, insulate the walls of the dehydrator with rigid foam board.
- Paint or Seal the Exterior: Apply a coat of exterior-grade paint or sealant to protect the wood from the elements. Use a non-toxic paint that is safe for food contact.
Tip: Pre-drill holes before screwing in fasteners to prevent the wood from splitting.
Common Pitfall: I failed to properly consider airflow initially and had to add additional vents later on! Measure, and then measure again!
Optimizing Performance: Mastering the Art of Dehydration
Once your solar dehydrator is built, it's time to start experimenting and perfecting your dehydration technique.
Food Preparation:
- Slicing: Cut food into thin, even slices to ensure consistent drying.
- Blanching: Blanching vegetables helps to preserve their color and nutrients.
- Pretreating: Some fruits, like apples and bananas, should be pretreated with lemon juice to prevent browning.
Temperature and Humidity: The optimal temperature for dehydration is between 120°F and 140°F. Humidity levels should be low to promote moisture removal.
Monitoring and Adjusting:
- Check for Dryness: Test the food regularly to see if it's dry enough. It should be leathery and pliable, but not sticky.
- Rotate Trays: Rotate the trays periodically to ensure even drying.
- Adjust Ventilation: Adjust the size of the vents to control airflow and temperature.
Troubleshooting:
- Mold Growth: If you notice mold growth, increase the airflow and ensure that the food is properly prepared.
- Uneven Drying: If the food is drying unevenly, make sure that it's sliced evenly and that the trays are rotated regularly.
Using Your Solar Dehydrator: Recipes and Inspiration
[ ]
]
Your solar dehydrator is a versatile tool for preserving a wide variety of foods. Here are a few ideas to get you started:
- Dried Fruits: Apples, bananas, berries, grapes, peaches, plums
- Dried Vegetables: Tomatoes, peppers, onions, mushrooms, zucchini
- Herbs: Basil, oregano, thyme, rosemary
- Meat: Jerky, dried sausage
Table of Approximate Drying Times:
| Food | Drying Time (Days) |
|---|---|
| Apples | 1-2 |
| Bananas | 1-2 |
| Tomatoes | 2-3 |
| Herbs | 1-2 |
Embrace the Sun, Embrace Self-Sufficiency
Building and using a DIY solar food dehydrator is a rewarding way to embrace self-sufficiency, reduce food waste, and enjoy delicious, healthy preserved foods. Not only will you save money on store-bought snacks, but you'll also have the satisfaction of knowing that you're using a sustainable and environmentally friendly method of food preservation. So, what are you waiting for? Gather your materials, roll up your sleeves, and start harnessing the power of the sun!
Ready to embark on your solar dehydration journey? Share this article with fellow homesteaders and DIY enthusiasts! Leave a comment below and tell us what you're planning to dehydrate first!