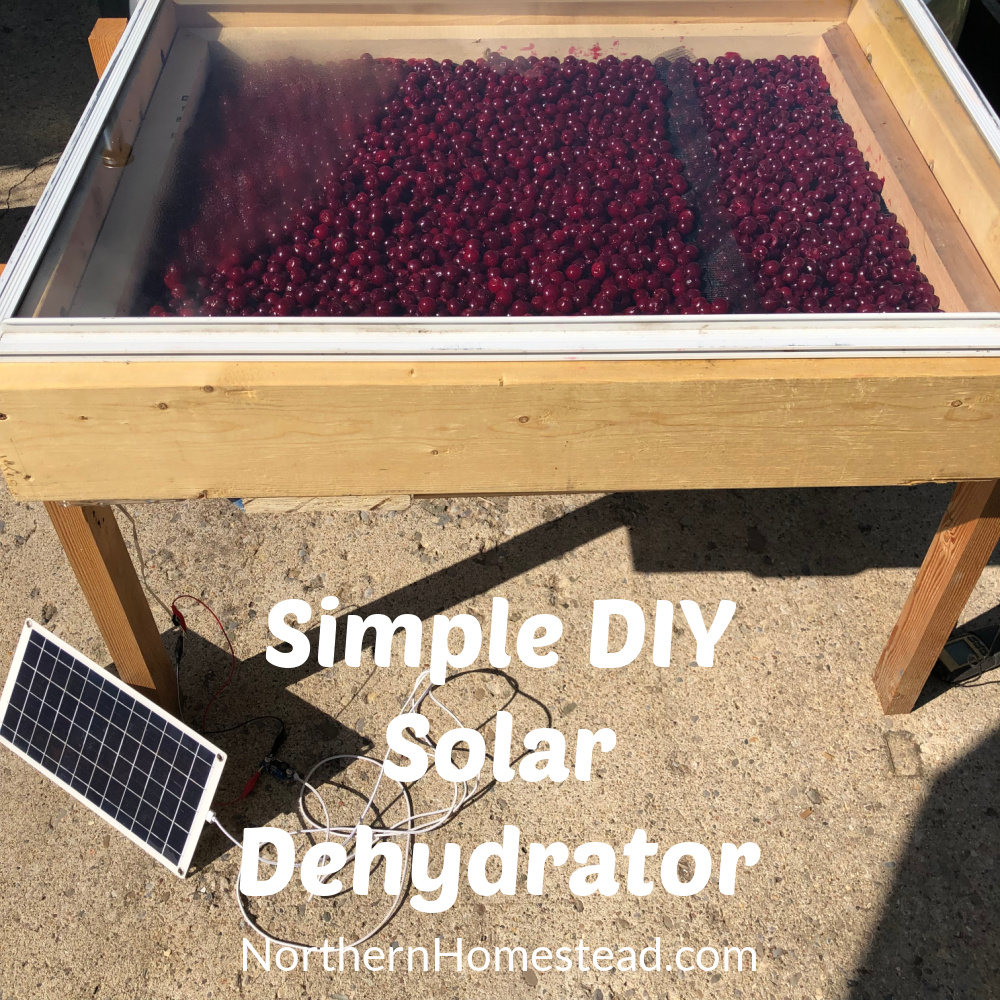
Harness the Sun: Build a DIY Solar Dehydrator for Homestead Food Security
Imagine extending your garden's bounty throughout the year, preserving peak-season flavors without relying on electricity. Solar dehydration makes this a reality, offering a sustainable and cost-effective way to preserve food on your homestead. It's about more than just dried fruit; it's about food security, reducing your carbon footprint, and enjoying the fruits (and vegetables!) of your labor long after the growing season ends.
Solar dehydration is especially beneficial for homesteaders seeking self-sufficiency and resilience. It allows us to take control of our food supply, reduce our reliance on store-bought goods, and minimize waste. Plus, it’s a fun and rewarding project!
This guide will walk you through building a simple, efficient solar dehydrator using readily available materials. We'll focus on beginner-friendliness and cost-effectiveness, proving that you don't need to break the bank to enjoy delicious, home-preserved food. Get ready to harness the power of the sun!

Materials & Tools: What You'll Need
Before we dive into the construction process, let's gather our supplies. Thorough preparation is key to a smooth and enjoyable building experience. Here’s what you’ll need:
Materials:
- Wood: Pine or any other readily available lumber. Aim for untreated wood to avoid chemicals leaching into your food. 1x2 or 1x3 lumber works well for the frame. You'll need enough to build the frame, sides, and a bottom. Consider reclaimed wood for a more sustainable and budget-friendly option!
- Plexiglass or Glass: This will be the glazing for the front of the dehydrator. Plexiglass is lighter and less prone to shattering, while glass offers excellent heat retention. Repurposed windows are a fantastic option if you can find them!
- Screen Mesh: Food-safe mesh for creating the drying trays. Stainless steel or nylon mesh is ideal.
- Black Paint: Food-safe, heat-resistant black paint to coat the interior of the dehydrator. This will maximize heat absorption.
- Insulation: Rigid foam insulation (e.g., polystyrene or polyisocyanurate) to insulate the back and sides of the dehydrator. This helps retain heat and improve efficiency.
- Hinges and Latches: For attaching the glazing door and securing it closed.
- Screws: For assembling the frame and attaching components.
- Caulk: For sealing gaps and creating an airtight enclosure.
- Optional: Small solar panel and fan (more on this later!).
Tools:
- Saw (circular saw, hand saw, or jigsaw)
- Drill with various drill bits
- Screwdriver
- Measuring tape
- Pencil
- Safety glasses
- Gloves
- Utility knife
- Caulk gun
While the exact dimensions will depend on your needs and the size of your glazing material, a good starting point for the dehydrator frame is roughly 24" wide x 36" high x 12" deep. Adjust these dimensions as needed.
Sourcing Materials Sustainably:
Before heading to the hardware store, consider these sustainable sourcing options:
- Reclaimed Wood: Check local salvage yards, construction sites, or online marketplaces for reclaimed lumber.
- Repurposed Windows: Ask friends, neighbors, or local contractors if they have any old windows they’re willing to part with.
- Recycled Insulation: Some building supply stores offer recycled insulation materials.

Thorough preparation and smart sourcing of materials are crucial for a smooth and cost-effective build.
Design & Construction: Step-by-Step Guide
Now for the fun part: building your solar dehydrator!
Building the Frame:
- Cut the Wood: Using your saw, cut the lumber to the dimensions you’ve chosen for your frame. Remember to account for the thickness of the wood when calculating the lengths of the pieces.
- Assemble the Frame: Use screws and wood glue to assemble the frame. Ensure that the corners are square and the frame is sturdy. A well-sealed frame is crucial for trapping heat.
- Add the Back and Sides: Cut pieces of wood to fit the back and sides of the frame, and attach them using screws and glue. This will create a box-like structure.
Installing the Glazing:
- Prepare the Opening: Create a framed opening on the front of the dehydrator to accommodate the plexiglass or glass.
- Attach the Glazing: Carefully position the plexiglass or glass in the opening and secure it with screws or clamps. Apply caulk around the edges to create an airtight seal. Choosing the right glazing is important; consider UV resistance and heat retention properties.
Creating the Trays:
- Build the Tray Frames: Cut pieces of wood to create frames that will fit inside the dehydrator.
- Attach the Mesh: Stretch the food-safe mesh over the frames and secure it with staples or tacks. Ensure the mesh is taut and wrinkle-free. These trays need to allow for maximum airflow.
Painting & Insulating:
- Paint the Interior: Paint the entire interior of the dehydrator with food-safe, heat-resistant black paint. This will maximize heat absorption. Let the paint dry completely before moving on to the next step.
- Insulate the Back and Sides: Cut pieces of rigid foam insulation to fit the back and sides of the dehydrator. Attach them using construction adhesive. Proper insulation is key for efficient heat retention.
Ventilation:
- Add Vents: Create ventilation holes near the bottom and top of the dehydrator. These vents will allow for air circulation, which is essential for removing moisture. You can use adjustable vents to control the temperature and humidity inside the dehydrator.
Precise construction and proper ventilation are essential for efficient dehydration.
Powering Up: Adding a Solar Fan
While a solar dehydrator works without electricity, adding a small solar fan can significantly improve airflow and reduce drying time.
- Choose a Solar Fan: You can purchase a pre-made solar fan kit or build one from scratch using individual components. Look for a low-voltage fan that is suitable for outdoor use.
- Install the Solar Panel: Mount the solar panel on the top or side of the dehydrator, ensuring it receives direct sunlight.
- Wire the Fan: Wire the solar panel to the fan, following the manufacturer’s instructions.
- Mount the Fan: Mount the fan inside the dehydrator, near the bottom vent, to draw air in.
Adding a solar fan significantly enhances the dehydrator's efficiency and performance.
Using Your Solar Dehydrator: Tips & Techniques
Now that your solar dehydrator is built, it’s time to put it to work!
- Food Preparation: Wash, slice, and pretreat your food before placing it in the dehydrator. Blanching vegetables and dipping fruits in lemon juice can help preserve their color and nutrients.
- Arrangement: Arrange the food on the trays in a single layer, ensuring that there is adequate space between pieces for air circulation.
- Monitoring: Monitor the temperature and humidity inside the dehydrator. The ideal temperature for dehydration is between 120°F and 140°F.
- Drying Time: Drying time will vary depending on the type of food, the thickness of the slices, and the weather conditions. Check the food regularly and remove it when it is leathery and no longer contains any moisture.
- Storage: Store dehydrated food in airtight containers in a cool, dark place.
Proper food preparation, monitoring, and storage are crucial for successful solar dehydration.
Troubleshooting & Maintenance
Like any DIY project, you may encounter some challenges along the way. Here are some common problems and solutions:
- Slow Drying Times: Ensure that the dehydrator is placed in direct sunlight and that the vents are open for adequate air circulation.
- Uneven Drying: Rotate the trays regularly to ensure that all pieces of food are exposed to the same amount of heat.
- Mold Growth: Make sure that the food is properly pretreated and that the dehydrator is well-ventilated.
- Maintenance: Regularly clean the trays and the interior of the dehydrator to prevent mold growth. Repair any minor damage to the frame or glazing promptly.
Regular maintenance and prompt troubleshooting will ensure the longevity and efficiency of your solar dehydrator.
Cost Breakdown & Savings
Here’s a rough estimate of the cost of building a DIY solar dehydrator:
- Wood: $20-$50
- Plexiglass/Glass: $10-$30 (repurposed: $0)
- Screen Mesh: $10-$20
- Black Paint: $5-$10
- Insulation: $10-$20
- Hinges and Latches: $5-$10
- Screws and Caulk: $5-$10
- Solar Panel and Fan (optional): $20-$50
Total: $85-$200
A commercial dehydrator can cost anywhere from $100 to $500 or more. By building your own, you can save a significant amount of money and customize the dehydrator to your specific needs. Over time, you’ll also save on electricity costs. Plus, you're contributing to a more sustainable lifestyle by reducing your energy consumption and reliance on manufactured products.
Building a DIY solar dehydrator is a cost-effective and environmentally friendly way to preserve food.
Conclusion
Solar dehydration is a rewarding and sustainable way to preserve your garden's bounty and increase your homestead's self-sufficiency. Building your own solar dehydrator is a fun and empowering project that will provide you with delicious, nutrient-rich food for years to come. So, gather your materials, follow these steps, and get ready to harness the power of the sun!
Share your own solar dehydration tips and experiences in the comments below! What fruits and vegetables are you most excited to dehydrate? Have you built a solar dehydrator before? What challenges did you face? We'd love to hear from you!