Growing Under Cover: Building a Simple Cold Frame for a Winter Harvest
[VISUAL: snow-covered garden colorful cold frame]
Picture this: it's January, the snow is falling, and the garden outside is blanketed in white. You're craving a crisp, vibrant salad bursting with flavor, but the thought of tasteless, pale, store-bought lettuce just doesn't cut it. What if I told you there was a way to enjoy homegrown greens even in the depths of winter? Enter the cold frame, a simple and effective way to extend your growing season and bring a little taste of summer indoors, no matter how frosty it gets. And the best part? You don't need to be a master carpenter or spend a fortune to build one! This guide will walk you through creating your own basic cold frame, so you can enjoy fresh, delicious produce all winter long.
Section 1: Why a Cold Frame? The Benefits of Winter Gardening
[VISUAL: close-up lettuce growing inside cold frame]
Why go to the trouble of building a cold frame? The answer is simple: to keep your garden alive – and productive – even when the weather is trying its best to shut it down.
- Extending the Season: Cold frames act like mini-greenhouses, trapping heat from the sun and protecting your plants from frost, snow, and harsh winds. This allows you to start planting earlier in the spring, continue harvesting later into the fall, and even grow certain crops right through the winter!
- Soil Health Boost: Don't underestimate the benefits of winter cover! Cold frames help retain moisture and prevent soil erosion during the off-season. This also contributes to regenerative gardening by improving soil structure and protecting beneficial soil microbes.
- Saving Money: Think about how much you spend on produce during the winter months. A cold frame can significantly reduce your grocery bill, especially if you focus on growing leafy greens, which tend to be expensive in stores during the off-season.
- Taste the Difference: Homegrown produce simply tastes better. The freshness and flavor of greens harvested from your own cold frame are incomparable to anything you can buy at the supermarket. You control the growing conditions and harvest at peak ripeness.
- Farmhouse Charm: Let's be honest, a well-placed cold frame adds a touch of rustic elegance to any garden. Incorporate reclaimed materials and a thoughtful design, and it'll become a beautiful and functional feature of your cozy farmhouse landscape.
So, if you are craving to extend your seasonal harvest, a cold frame is an easy way to create a longer growing season and a healthier lifestyle!
Section 2: Choosing Your Location: Sunlight and Shelter
[VISUAL: gardener holding tomato seedlings in cold frame]
Location, location, location! Picking the right spot for your cold frame is crucial for its success.
- Sunlight is Key: For those in the Mid-Atlantic (and similar climates), a southern exposure is ideal. This ensures your cold frame receives maximum sunlight during the short winter days. If a southern exposure isn't possible, try southeastern or southwestern. The goal is to capture as much direct sunlight as possible, especially during the morning hours.
- Wind Protection is Essential: Shielding your cold frame from harsh winter winds will help it retain heat and prevent damage to your plants. Utilize existing structures like your house, shed, or garage to block the wind. If that's not possible, consider planting a windbreak using evergreens or shrubs.
- Easy Access: Think about convenience. You'll need to access your cold frame regularly for watering, venting, and harvesting, so choose a location that's easily accessible, even when covered in snow.
- Drainage Matters: Ensure the location has good drainage to prevent waterlogging. Soggy soil can lead to root rot and other problems, especially during the winter months. If drainage is poor, consider building your cold frame on a slightly raised bed.
- Soil Considerations: Even though you'll primarily be growing in a controlled environment, the soil beneath your cold frame still matters. Test your soil and amend it with plenty of compost to improve its fertility and drainage. This will give your plants a healthy start.
Section 3: Building Your Cold Frame: A Simple DIY Project
[VISUAL: lumber reclaimed old windows building cold frame]
Now for the fun part! Building your own cold frame is a manageable DIY project that can be completed in a weekend.
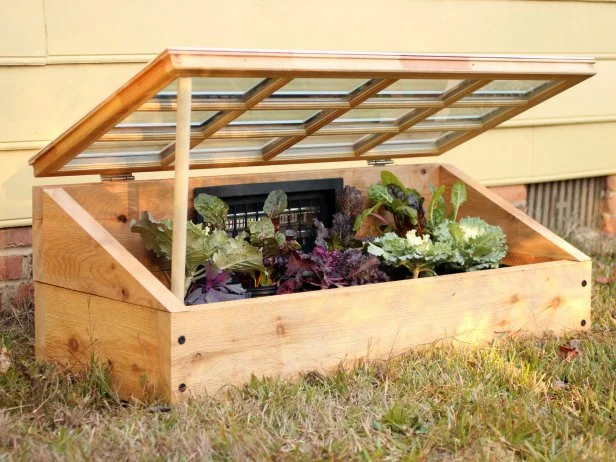
Gather Your Materials: Reclaimed materials are your best friend here. Using old windows, lumber scraps, or even straw bales keeps costs down and aligns with sustainable practices. For a basic cold frame, a 4ft x 4ft structure with a sloped lid is a good starting point. You'll also need hinges, screws, and some basic tools like a saw, drill, and measuring tape. Consider using polycarbonate sheets if reclaimed windows are not available.
Construction Steps:
- Build a simple box frame: Cut the lumber to the desired dimensions and assemble the four sides of the box using screws.
- Attach the lid: Attach the window (or polycarbonate sheet) to one side of the frame using hinges, creating a hinged lid. Make sure the lid fits snugly but can be easily opened and closed.
- Add lid supports: Attach small pieces of wood or metal to the inside of the frame to prop the lid open at different angles for ventilation.
- Insulate the sides: For added insulation, especially in colder climates, stack straw bales or hay around the outside of the cold frame.
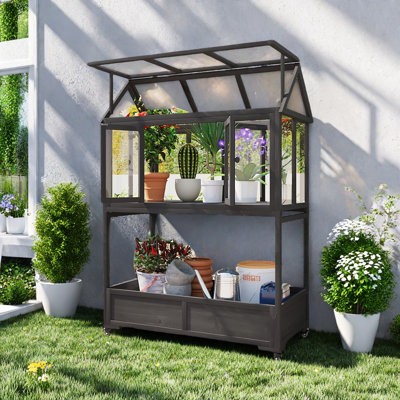
Alternative Designs: While the simple box frame is ideal for beginners, there are other cold frame designs to consider. A-frame cold frames offer more headroom for taller plants, while lean-to cold frames can be attached to an existing wall for added insulation.
Safety First: Always wear safety glasses and gloves when working with tools and materials.
[VISUAL: Garden Wood Portable Cold Frame Greenhouse With Openable Roof, Drainage Troughs And Storage Box]
- Add a Thermometer: Install a soil thermometer inside the cold frame to monitor the temperature and ensure your plants are getting the right amount of heat.
Section 4: What to Grow: Winter Greens and Hardy Herbs
[VISUAL: variety colorful winter vegetables cold frame]
Choosing the right crops is essential for a successful winter harvest.
- Best Winter Crops: Focus on winter-hardy greens and herbs that can tolerate cooler temperatures. Some excellent choices include:
- Spinach
- Kale
- Arugula
- Lettuce (especially cold-hardy varieties like 'Winter Density' and 'Arctic King')
- Chard
- Claytonia
- Radishes
- Scallions
- Carrots
- Parsley
- Chives
- Thyme
- Starting from Seed: You can start seeds indoors in late summer or early fall for transplanting into your cold frame. Use seed starting pellets or peat pots for easy transplanting.
- Planting in the Cold Frame: Space your plants according to the variety's needs. Water thoroughly after planting and mulch around the plants to help retain moisture and suppress weeds.
- Succession Planting: Plant crops in succession, sowing new seeds every few weeks, to ensure a continuous harvest throughout the winter.
- Mid-Atlantic Climate Tips: Consult your local extension office for specific recommendations on planting times and varieties that thrive in your area. They can also provide valuable advice on dealing with regional pests and diseases.
Section 5: Cold Frame Care: Ventilation, Watering, and Pest Control
[VISUAL: hands lifting cold frame lid ventilation sunlight]
Maintaining your cold frame is key to a healthy and productive winter garden.
- Ventilation is Crucial: On sunny days, even in winter, the temperature inside your cold frame can quickly rise to levels that are harmful to your plants. Open the lid to vent excess heat and humidity. As a general rule, open the lid partially when the temperature inside the cold frame reaches 50°F (10°C) and fully when it reaches 60°F (15°C).
- Watering Wisely: Water your plants sparingly, only when the soil feels dry to the touch. Overwatering can lead to fungal diseases, especially in the cool, humid environment of a cold frame. Water in the morning to allow the foliage to dry before nightfall.
- Natural Pest Control: Regularly inspect your plants for signs of pests. Handpicking is often the most effective method for controlling small infestations. For more serious problems, consider using insecticidal soap or introducing beneficial insects (though this may be less practical in a confined space).
- Monitor the Temperature: Keep an eye on the soil temperature inside the cold frame. If the soil is too cold, consider adding more insulation around the sides of the frame.
- Snow Removal: After a snowfall, brush the snow off the lid of your cold frame to allow sunlight to reach your plants.
Conclusion: A Winter Garden Oasis
[VISUAL: hand harvesting lettuce snow-covered background]
Building a cold frame is a rewarding project that allows you to enjoy fresh, homegrown produce throughout the winter months. It's a simple way to extend your growing season, save money, and connect with your garden even when the weather is cold and dreary. Start planning your cold frame in the late summer or early fall to give yourself plenty of time to build it before the first frost. Even a small cold frame can make a big difference in your winter diet and overall well-being, bringing a touch of summer's bounty to your cozy farmhouse kitchen.
Call to Action: Share Your Experience
I'd love to hear about your own cold frame gardening experiences! Share your tips, successes, and challenges in the comments below. What are your favorite crops to grow in a cold frame? What design worked best for you? Tag the friends you think should try this!