From Trash to Treasure: Building a Low-Cost, High-Impact DIY Chicken Coop
Remember that feeling of pure joy when you collected the first eggs from your backyard flock? The warm, brown orbs, fresh and full of flavor, a reward for your efforts. But sometimes, a nagging thought creeps in: "Could their living quarters be better?" Maybe the coop is a bit cramped, or perhaps predator protection is less than ideal. The good news is, you can significantly improve your flock's well-being without breaking the bank, and you can experience the satisfaction of building something amazing with your own hands! This guide will walk you through building a low-cost, high-impact DIY chicken coop from reclaimed materials, empowering you to enhance your homestead in a sustainable and budget-friendly way.

This project isn't just about saving money; it's about resourcefulness, sustainability, and providing a happy, healthy environment for your chickens. Let's get started!
Why Build a Reclaimed Chicken Coop?
Before we dive into the "how," let's talk about the "why." A well-designed chicken coop offers numerous benefits:
- Happier, Healthier Hens: A spacious, well-ventilated coop reduces stress and the risk of disease.
- Fresher, Cleaner Eggs: Nesting boxes kept clean and comfortable encourage laying and reduce egg contamination.
- Improved Predator Protection: A secure coop keeps your flock safe from foxes, raccoons, hawks, and other predators.
- Reduced Feed Costs: A designated feeding area minimizes wasted feed.
- Environmental Responsibility: Reclaiming materials reduces waste and lowers your carbon footprint.
- Budget-Friendly: Significantly cheaper than buying a pre-built coop.
Planning Your Coop: Size, Location, and Design
The first step is to plan your chicken coop. Consider these factors:
- Flock Size: A general rule is 4 square feet per chicken inside the coop and 8-10 square feet per chicken in the outdoor run.
- Location: Choose a well-drained area with partial shade. Consider proximity to your house for easy access but far enough to minimize odor concerns.
- Design: Keep it simple! A basic rectangular or square coop with a slanted roof is easiest to build. Ensure adequate ventilation and easy access for cleaning.
- Local Ordinances: Check your local regulations regarding backyard chickens and coop requirements.
Gathering Your Reclaimed Materials: The Treasure Hunt
The key to a low-cost chicken coop is sourcing reclaimed materials. Here are some ideas:
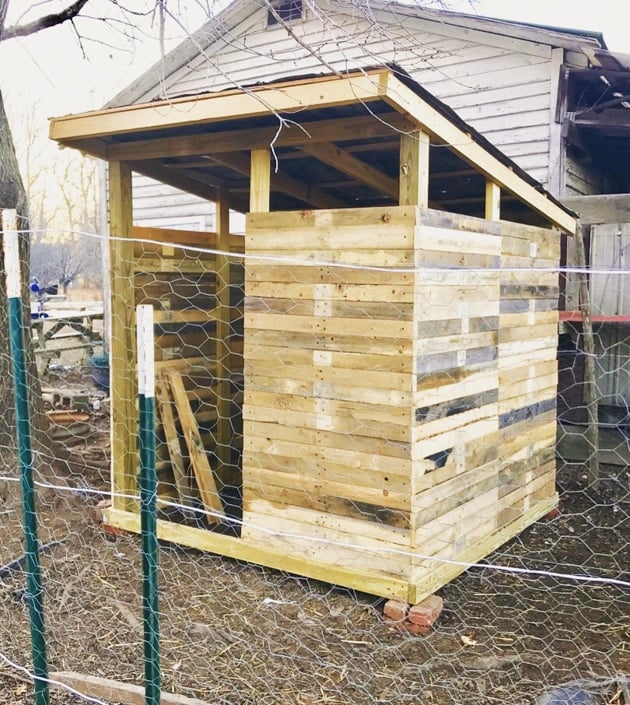
- Pallets: A fantastic source of free or cheap lumber. Check with local businesses, warehouses, and construction sites. Ask before taking any pallets.

- Scrap Wood: Ask friends, neighbors, or local construction companies for leftover wood.
- Old Windows: Perfect for adding light and ventilation. Check architectural salvage stores, flea markets, or ask on online community groups.
- Used Doors: Can be repurposed as coop doors or walls.
- Reclaimed Roofing Materials: Old metal roofing, asphalt shingles, or even sturdy tarps can be used for the roof.
- Hardware: Keep an eye out for used nails, screws, hinges, and latches.
Approximate Costs (Using Reclaimed Materials):
- Lumber (pallets, scrap wood): $0 - $50 (depending on availability)
- Roofing: $0 - $30 (using reclaimed metal or tarps)
- Hardware (nails, screws, hinges): $10 - $20
- Chicken Wire/Hardware Cloth: $30 - $50 (new, for predator protection)
Step-by-Step Building Guide: Turning Trash into a Chicken Palace
Here's a simplified guide to building your reclaimed chicken coop. Remember to adapt these steps to your specific design and materials.
Step 1: Prepare the Foundation
- Clear and level the chosen area.
- A simple gravel base provides good drainage.
- Consider a concrete block foundation for added stability and predator protection (optional).

Step 2: Build the Frame
- Using pallets or lumber, construct the frame of the coop.
- Ensure the frame is square and level.
- Use screws for a stronger and more durable structure.
Step 3: Add the Walls
- Attach pallet boards or scrap wood to the frame to create the walls.
- Leave openings for the door and windows.
- Stagger the joints for added strength.
Step 4: Install the Roof
- Build a simple slanted roof frame.
- Attach your chosen roofing material (reclaimed metal, shingles, or a sturdy tarp).
- Ensure the roof overhangs the walls to protect them from the rain.

Step 5: Add the Door and Windows
- Install the door and windows, ensuring they open and close smoothly.
- Use secure latches to keep predators out.
Step 6: Build the Nesting Boxes
- Construct nesting boxes inside the coop.
- A good size is approximately 12" x 12" x 12".
- Place them in a dark, quiet corner of the coop.
- Line them with straw or wood shavings.

Step 7: Install Roosting Bars
- Provide roosting bars for the chickens to sleep on.
- Use sturdy branches or lumber, positioned about 2-3 feet off the ground.
Step 8: Build the Chicken Run
- Enclose the outdoor run with chicken wire or hardware cloth.
- Bury the wire at least 12 inches deep to prevent predators from digging underneath.
- Consider adding a roof to the run for added protection from the elements.
Step 9: Finishing Touches
- Seal any gaps or cracks to prevent drafts and keep pests out.
- Paint or stain the coop to protect the wood and improve its appearance (use non-toxic paint!).
- Add a feeder and waterer.

Troubleshooting Tips: Overcoming Common Challenges
- Uneven Ground: Use concrete blocks or shims to level the coop.
- Modifying for Different Flock Sizes: Adjust the dimensions of the coop and run accordingly.
- Predator Concerns: Use heavy-duty hardware cloth, bury the wire deep, and install secure latches. Consider adding an electric fence around the perimeter.
- Ventilation: Ensure adequate ventilation to prevent moisture buildup and ammonia odors. Add windows or vents near the roof.
- Finding Reclaimed Materials: Be persistent! Check online classifieds, local businesses, and construction sites.
The Sweet Smell of Success
Building a DIY chicken coop from reclaimed materials is a rewarding experience. Not only will you save money and practice sustainable resource management, but you'll also provide a happy, healthy home for your chickens. The sight of your hens happily scratching and pecking in their new coop, and the taste of those fresh, delicious eggs, will be a testament to your hard work and ingenuity.
So, gather your materials, grab your tools, and get building!
Now it's your turn! Share your own chicken coop building experiences in the comments below or on social media using the hashtag #BetterHomesChickenCoop. We can't wait to see your creations!