From Shower to Garden: Building a Simple Gray Water System
Water. It's the lifeblood of any homestead, essential for nourishing our gardens, sustaining our livestock, and maintaining our own well-being. But in an era of increasing drought and rising water costs, the need to conserve this precious resource has never been greater. As homesteaders, we pride ourselves on self-reliance, and that includes finding innovative ways to manage our water resources responsibly. That’s where gray water comes in.
Gray water, simply put, is the relatively clean wastewater from our homes – water from showers, sinks, and laundry machines (excluding toilets). Instead of letting it flow down the drain and disappear, we can reclaim it to irrigate our gardens and landscapes, reducing our reliance on municipal water and saving money in the process. Imagine the impact of redirecting hundreds of gallons of water each week, turning what was once waste into a valuable resource for growing food and beautifying our surroundings.
But before we dive in, a word of caution: local regulations regarding gray water systems vary widely. It’s crucial to research and comply with your local codes before implementing any gray water system. This guide provides general information, but it's your responsibility to ensure your system meets all applicable regulations. Disclaimer: This article provides general guidance only. Consult with local authorities and qualified professionals before implementing any gray water system.
This blog post will guide you through building a simple, DIY gray water system perfect for beginner homesteaders. We'll cover everything from planning and preparation to step-by-step construction and ongoing maintenance, equipping you with the knowledge and skills to transform your homestead into a model of water conservation. Let's turn that gray water into liquid gold!
1. Planning and Preparation
Proper planning is the cornerstone of a successful gray water system. Rushing into construction without careful consideration can lead to inefficiencies, costly mistakes, and even potential health hazards. Let's break down the essential steps:
Assessing Your Needs: The first step is to understand your household's water usage and your garden's irrigation requirements. How much water does your household typically consume each week? Review your water bill to get an idea. How much water do your plants need, especially during the driest months? These figures will help you determine the scale of your gray water system. Consider the types of plants you are irrigating too!
Choosing Your Gray Water Source: Not all gray water is created equal. Shower water is generally the cleanest and most suitable for irrigation, as it contains fewer contaminants than water from the kitchen sink. Washing machine water can also be used, but requires more careful consideration due to the potential presence of detergents and fabric softeners. Prioritize the gray water sources that offer the largest volume and the least contamination.
Selecting Your Garden Area: The location of your gray water system should be strategically chosen to maximize its benefits. Consider the types of plants you intend to irrigate. Fruit trees and ornamentals are excellent candidates, while root vegetables should generally be avoided. Also, think about your soil type. If your soil drains slowly, you may need to amend it with compost or other organic matter to improve drainage and prevent waterlogging. The closer your water source is to the garden area, the better to prevent long pipe runs.
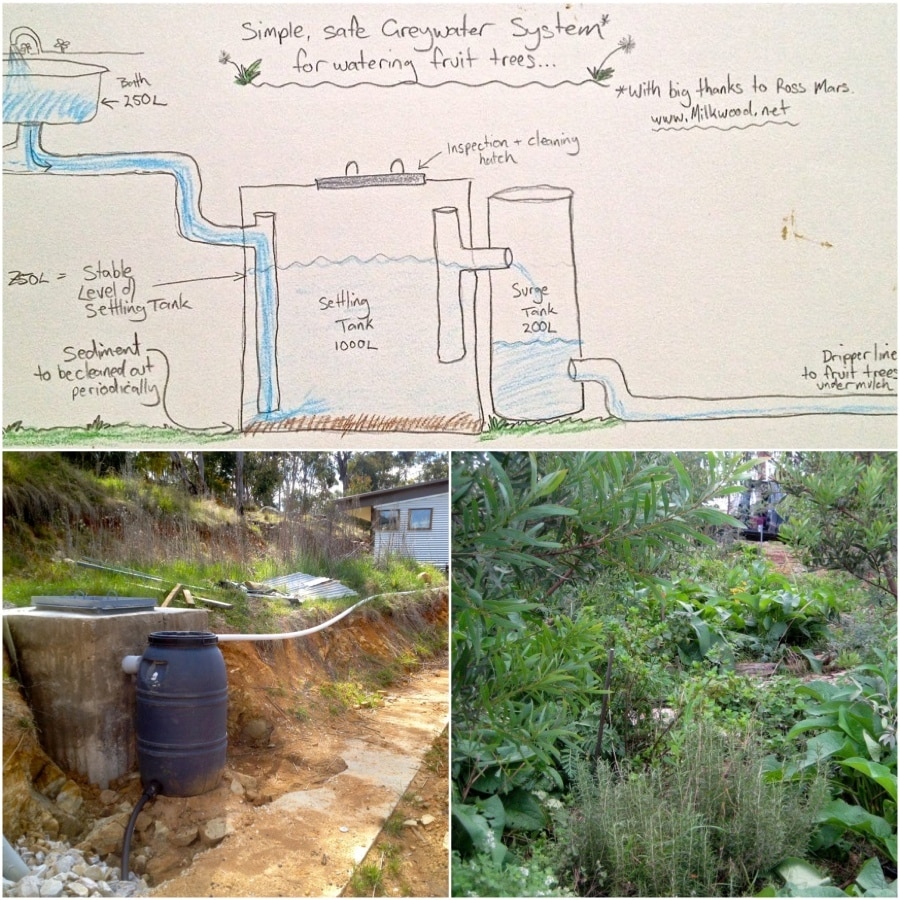
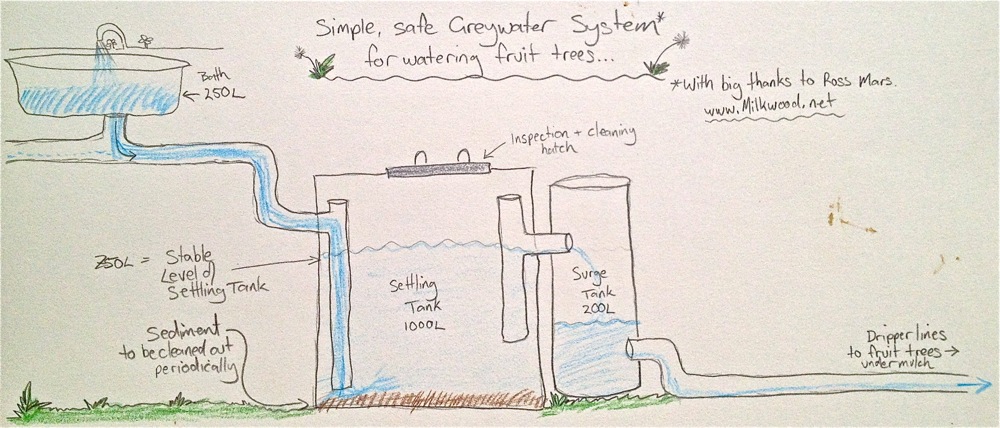
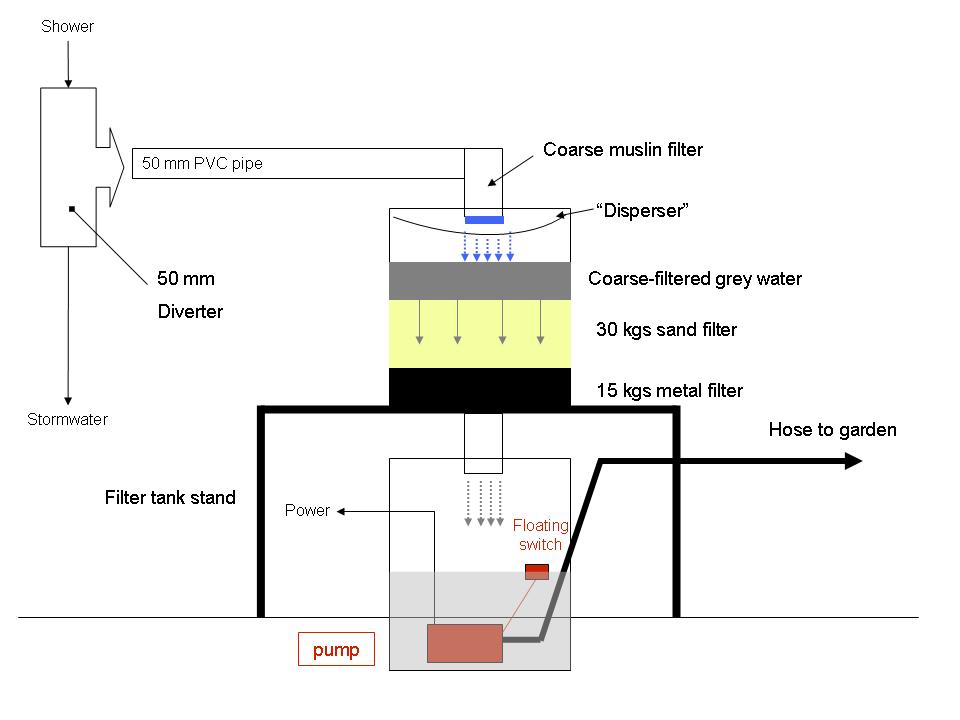
Designing Your System: A simple gray water system consists of three basic components: collection, filtration, and distribution.
- Collection: This is where the gray water is diverted from your plumbing to a holding tank or directly to the filtration system.
- Filtration: Removing hair, lint, and other debris is crucial for preventing clogs and maintaining water quality.
- Distribution: This is how the filtered gray water is applied to your garden, either through a mulch basin or a subsurface irrigation system.
-
- Materials List:
- PVC pipes (various sizes)
- PVC fittings (elbows, tees, couplings)
- Inline filter (sock filter or spin-down filter)
- Filter housing
- Mulch basin materials (wood chips, gravel)
- Optional: Surge tank (plastic drum)
- Plumbing connectors
- PVC cement
- Measuring tape
- Saw
- Drill
- Screwdrivers
- Gloves
- Eye protection
- Cost estimates vary depending on material, but can usually be done for under $150.00.
- Materials List:
Safety Precautions: Gray water can contain bacteria and chemicals that can be harmful to your health. Always wear gloves and eye protection when working with gray water. Avoid direct contact with the water and wash your hands thoroughly after handling any components of the system. Be careful when cutting pipes to avoid injury.
2. Building Your Gray Water System: Step-by-Step
Now that you've planned your system, it's time to get your hands dirty! Here's a step-by-step guide to building your DIY gray water system:
- Diverting the Gray Water: This is the most crucial step and requires careful attention to your plumbing. Locate the drainpipe from your chosen gray water source (e.g., shower or washing machine). Cut into the drainpipe and install a "T" fitting. One branch of the "T" should connect to the original drain line, while the other branch will divert the gray water to your system. Be sure to use appropriate plumbing connectors and PVC cement to ensure a watertight seal. Caution: Double-check that you are NOT connecting to any potable water lines.
- Installing the Filter: Install the inline filter to remove hair, lint, and other debris from the gray water. Connect the filter housing to the diversion pipe using PVC fittings and cement. Insert the filter cartridge into the housing. Different types of filters exist (sock or spin-down) for different filtration needs. Sock filters need to be cleaned more often. Ensure the filter is easily accessible for regular cleaning.
- Building the Surge Tank (Optional): If you're using a washing machine as a gray water source, a surge tank can help regulate the flow of water. A simple plastic drum can serve as a surge tank. Connect the diversion pipe from the washing machine to the top of the surge tank. Install an overflow pipe near the top of the tank to prevent it from overflowing in case of heavy usage. Run the overflow pipe to a safe drain location.
- Creating the Distribution System: The distribution system delivers the filtered gray water to your garden. A simple mulch basin is an easy-to-implement option. Dig a shallow trench around the base of your plants. Line the trench with gravel and then fill it with wood chips. This creates a basin that allows the gray water to slowly infiltrate the soil. Alternatively, you can use perforated pipes buried in the soil for subsurface irrigation. This method reduces surface evaporation and minimizes the risk of direct contact with the gray water.
- Testing the System: Once you've completed the installation, test the system thoroughly for leaks and proper functionality. Run water through the system and check all connections for leaks. Observe the water flow in the distribution system to ensure it's even and consistent. Adjust the system as needed to optimize its performance.

I did run into some issues when I was connecting the pipes and had to disassemble and start again as I used the incorrect connection. You need to make sure everything fits before cementing it. I also noticed there was some soil run-off into my filtration system which I had to resolve by properly sealing the area around the filter.
3. Maintenance and Best Practices
Building a gray water system is just the first step. To ensure its long-term success and safety, regular maintenance and adherence to best practices are essential.
- Filter Cleaning: The filter is the workhorse of your gray water system, trapping debris that could clog the system. Clean the filter regularly, ideally every 1-2 weeks, depending on your water usage and filter type. Simply remove the filter cartridge and rinse it thoroughly with clean water. Replace the cartridge when it becomes excessively dirty or damaged.
- System Inspection: Regularly inspect your entire gray water system for leaks, clogs, and other issues. Check all connections for tightness and look for any signs of water damage or corrosion. Address any problems promptly to prevent them from escalating.
- Troubleshooting Common Problems:
- Slow Drainage: This is often caused by a clogged filter or debris in the pipes. Clean the filter and flush the pipes with clean water to remove any blockages.
- Bad Odors: This can indicate a buildup of bacteria in the system. Ensure adequate ventilation and avoid using soaps and detergents containing harmful chemicals.
- Algae Growth: Algae can grow in the surge tank or distribution system if exposed to sunlight. Cover the tank and distribution system to block sunlight and inhibit algae growth.
- Choosing the Right Plants: Not all plants are suitable for gray water irrigation. Choose plants that are tolerant of moisture and slightly alkaline conditions. Ornamentals, fruit trees, and non-root vegetables are generally good choices. Avoid irrigating edible parts of root vegetables, such as carrots and potatoes, with gray water.
- Avoiding Harmful Substances: Certain cleaning products and chemicals can be harmful to plants and the environment. Avoid using bleach, boron-containing products, and harsh chemicals in your laundry or showers. Opt for environmentally friendly soaps and detergents that are biodegradable and phosphate-free.
- Soil Health: Gray water can impact soil health, so it's important to monitor and maintain soil fertility. Regularly test your soil to determine its pH and nutrient levels. Amend the soil with compost or other organic matter as needed to improve its structure, drainage, and fertility.

4. A Sustainable Step Towards Self-Sufficiency
By building a simple DIY gray water system, you can significantly reduce your water consumption, save money on your water bill, and improve the productivity of your garden. This is a tangible way to embrace self-sufficiency and contribute to a more sustainable future. Even small steps like this make a big difference. As you become more comfortable with the process, you can explore more advanced gray water systems and other water conservation strategies. Every drop counts!
Have you built a gray water system on your homestead? Share your tips, tricks, and photos in the comments below! Want more homesteading tips and DIY project ideas? Sign up for our free newsletter! Explore our other articles on water conservation, gardening, and sustainable living.


