From Seed to Supper: A Beginner's Guide to No-Dig Seasonal Harvests
Have you ever dreamed of walking into your backyard and picking fresh, sun-ripened tomatoes, crisp lettuce, or fragrant herbs for tonight’s dinner? The idea of a bountiful garden is certainly appealing, but the reality of tilling, weeding, and endless backaches can quickly turn that dream into a daunting chore. If the thought of traditional gardening leaves you feeling more overwhelmed than inspired, you’re in the right place!
There’s a simpler, more sustainable, and frankly, lazier (in the best possible way!) approach to gardening: no-dig gardening. This method bypasses the heavy lifting and focuses on building healthy soil from the top down. Imagine a garden that requires less weeding, retains moisture better, and rewards you with an abundant seasonal harvest of delicious and nutritious food. Even if you have limited space, you can transform your yard into a thriving edible oasis.
In this guide, we’ll walk you through the steps to create your very own no-dig garden, from building the bed to planting a seasonal feast. Get ready to unlock your garden’s potential with this easy and rewarding method!

Understanding the No-Dig Difference
No-dig gardening, also known as lasagna gardening or sheet composting, is based on the principle of layering organic materials on top of the existing soil, mimicking the way nature builds soil in a forest. Instead of disturbing the soil through tilling or digging, we create a nutrient-rich environment for plants by layering "brown" and "green" materials, allowing them to decompose and enrich the soil naturally.
Think of it like building a compost pile right where you want to grow your plants. This approach offers several advantages over traditional gardening:
- Improved Soil Health: No-dig gardening promotes a healthy soil structure, improving water retention and drainage. It also encourages beneficial microbial activity, essential for nutrient cycling and plant growth.
- Reduced Effort: Say goodbye to back-breaking tilling! No-dig gardening significantly reduces the amount of physical labor required to prepare and maintain your garden.
- Increased Yields: Healthy soil leads to healthy plants, resulting in increased yields compared to traditional gardening methods.
- Less Weeding: The layers of organic material act as a natural mulch, suppressing weeds and making weeding easier.
- Sustainable Approach: By using readily available organic materials like leaves, grass clippings, and kitchen scraps, no-dig gardening is an environmentally friendly way to garden.
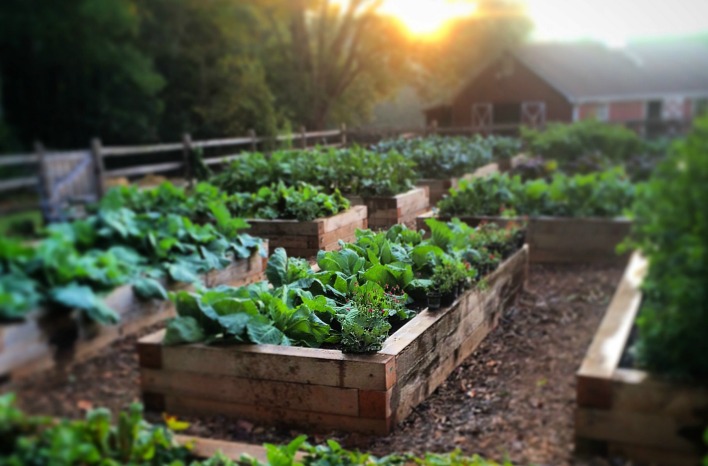
Many people assume that no-dig gardening is only suitable for small spaces or raised beds. While it works wonderfully in these settings, it can also be adapted for larger garden plots. The key is to understand the principles and adjust the scale to suit your needs.
Key Takeaway: No-dig gardening is a gentler, more sustainable approach that improves soil health and reduces gardening effort, leading to happier plants and happier gardeners.
Building Your First No-Dig Garden Bed
Building a no-dig garden bed is surprisingly simple. Here's a step-by-step guide to get you started:
Site Selection: Choose a location that receives at least six hours of sunlight per day and has good drainage. Ensure the area is relatively level.
Weed Suppression: This is a crucial step! To suppress existing weeds, cover the area with a thick layer of cardboard or newspaper. Overlap the edges generously to prevent weeds from growing through the gaps. Wet the cardboard or newspaper thoroughly to help it stay in place and begin to decompose. Pro Tip: Remove any tape or labels from the cardboard first.
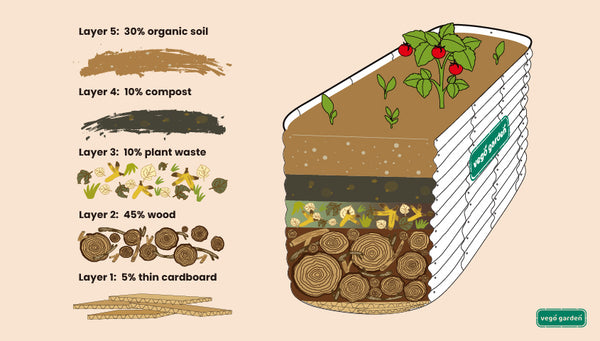
Layering Materials: This is where the magic happens! The ideal layering order is a combination of "brown" and "green" materials, followed by compost and a thin layer of topsoil.
- Browns: These are carbon-rich materials that provide structure and drainage. Examples include cardboard (as the base layer), newspaper, straw, dried leaves, shredded paper, and wood chips.
- Greens: These are nitrogen-rich materials that provide nutrients. Examples include grass clippings, vegetable scraps, coffee grounds, tea bags, manure (aged), and seaweed.
- Compost: A layer of well-rotted compost is essential for providing nutrients and beneficial microorganisms.
- Topsoil/Potting Mix: A thin layer of topsoil or potting mix on top provides a suitable medium for planting seeds or seedlings.
Here's an example of a layering sequence:
- Cardboard (weed barrier)
- Layer of "browns" (dried leaves)
- Layer of "greens" (grass clippings)
- Layer of compost
- Thin layer of topsoil/potting mix
Watering Thoroughly: Moisten each layer as you build the bed. This helps to break down the materials and encourages decomposition.
Allow to "Cook": Ideally, let the bed sit for a few weeks before planting to allow the materials to decompose and create a nutrient-rich growing environment. If you're short on time, you can plant directly into the bed, but be sure to add extra compost around the plants.
Actionable Tips:
- Source Free Materials: Collect leaves in the fall, ask neighbors for grass clippings, and compost your kitchen scraps.
- Coffee Grounds are Gold: Coffee grounds are an excellent source of nitrogen and make a great addition to your compost or no-dig garden.
- Wood Chips as a Border: Adding a layer of wood chips around the perimeter of the bed helps to suppress weeds and retain moisture.
Key Takeaway: Building a no-dig garden bed is a simple, step-by-step process that transforms readily available organic materials into a thriving growing environment.
Seed Starting and Seasonal Planting for Continuous Harvests
To maximize your harvest and enjoy fresh produce throughout the year, careful planning and seasonal planting are key. This includes starting seeds indoors and understanding which crops thrive in each season.
Seed Starting Indoors: Starting seeds indoors gives you a head start on the growing season and allows you to grow varieties that might not otherwise have enough time to mature in your climate.
- Benefits: Longer growing season, greater variety of crops, and stronger plants.
- Basic Guide: Use seed-starting trays or small pots filled with seed-starting mix. Sow seeds according to package directions, water gently, and provide adequate light (either natural sunlight or grow lights).
- Seasonal Recommendations: In early spring, start seeds for tomatoes, peppers, eggplants, and herbs. In late spring, start seeds for cucumbers, squash, and melons.

Seasonal Planting Guide: Understanding which crops thrive in each season is essential for a continuous harvest.
- Spring: Leafy greens (lettuce, spinach, kale), root vegetables (radishes, carrots), peas, and early-season herbs.
- Summer: Tomatoes, peppers, cucumbers, beans, squash, and a wide variety of herbs (basil, oregano, thyme).
- Fall: Brassicas (broccoli, cabbage, cauliflower), root vegetables (beets, turnips), salad greens (arugula, mustard greens).
- Winter (mild climates): Garlic, onions, winter greens (chard, kale), and cover crops to improve soil health.
Succession Planting: Plant small batches of crops every few weeks to extend the harvest season. For example, plant a row of lettuce every two weeks to have a continuous supply throughout the spring.
Actionable Tips:
- Create a Planting Calendar: Research the optimal planting times for different crops in your specific climate and create a planting calendar to stay organized.
- Harden Off Seedlings: Before transplanting seedlings to the garden, gradually acclimate them to outdoor conditions by exposing them to increasing amounts of sunlight and wind over a period of one to two weeks.
- Companion Planting: Plant crops that benefit each other. For example, basil repels pests that attack tomatoes, and carrots deter onion flies.
Key Takeaway: Careful planning, starting seeds indoors, and seasonal planting are essential for maximizing yields and enjoying a continuous harvest from your no-dig garden.
Maintaining Your No-Dig Garden: Weeding, Watering, and Feeding
While no-dig gardens require less maintenance than traditional gardens, some regular upkeep is still necessary to keep your plants healthy and productive.
Weeding: The layers of organic material in a no-dig garden act as a natural mulch, suppressing weeds. However, some weeds may still pop up, especially around the edges of the bed.
- Mulching: Maintain a thick layer of mulch (straw, wood chips, or compost) to suppress weeds.
- Hand-Pulling: Regularly inspect your garden for weeds and hand-pull them as soon as you see them.
Watering: Consistent watering is essential, especially during dry periods.
- Soaker Hose or Drip Irrigation: These methods deliver water directly to the roots of plants, conserving water and reducing evaporation.
- Water deeply and infrequently: Encourage deep root growth by watering thoroughly but less often.
Feeding: As plants grow, they deplete nutrients from the soil. Replenish these nutrients by adding compost, worm castings, or organic fertilizers.
- Side-Dressing: Apply compost or fertilizer around the base of plants throughout the growing season.
- Compost Tea: Soak compost in water for a few days to create a nutrient-rich "tea" that can be used to water plants.
Actionable Tips:
- Organic Fertilizers: Use organic fertilizers such as fish emulsion, kelp meal, or bone meal to provide essential nutrients.
- Rain Barrel: Collect rainwater in a rain barrel to conserve water and provide plants with a natural source of irrigation.
Key Takeaway: Consistent maintenance, including weeding, watering, and feeding, is essential for keeping your no-dig garden healthy and productive.

Small Space, Big Harvest: Adapting No-Dig to Limited Areas
Don't let limited space stop you from enjoying the benefits of no-dig gardening. This method can be easily adapted to container gardens, vertical gardens, and even balconies.
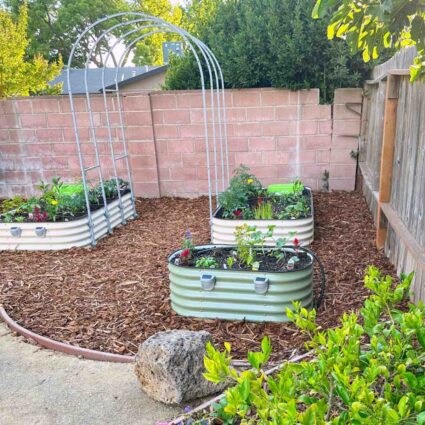
Container Gardening: Use pots, raised beds, or grow bags filled with a mixture of compost, topsoil, and potting mix. Follow the same layering principles as you would for a traditional no-dig bed.
Vertical Gardening: Maximize space by growing plants vertically on trellises, pallets, or hanging baskets. Choose vining plants like tomatoes, cucumbers, and beans, or trailing herbs like thyme and oregano.
Balcony Gardening: Use lightweight containers and protect plants from wind and sun exposure. Consider using a self-watering system to reduce the frequency of watering.
Actionable Tips:
- Choose Compact Varieties: Select varieties of vegetables and herbs that are well-suited for container gardening, such as bush beans, dwarf tomatoes, and compact herbs.
- Pallet Garden: Build a simple pallet garden by attaching fabric planters to the slats of a wooden pallet.
- Self-Watering System: Use a self-watering system for container gardens to ensure plants receive consistent moisture.
Key Takeaway: No-dig gardening can be adapted to small spaces, allowing you to enjoy fresh, homegrown produce even if you have limited room to grow.
Embracing the Simplicity and Sustainability of No-Dig Gardening
No-dig gardening is more than just a gardening method; it's a philosophy that embraces simplicity, sustainability, and a deep connection to nature. It's about working with nature, not against it, to create a thriving ecosystem in your backyard.
By building healthy soil, reducing waste, and growing your own food, you’re not only creating a beautiful and productive garden, but you're also contributing to a more sustainable and resilient future.
As the leaves begin to turn and the days grow shorter, now is the perfect time to start collecting leaves for composting and preparing your no-dig beds for the upcoming growing season. Imagine the rich, fertile soil you'll have come spring, ready to nourish a new bounty of homegrown goodness.
So, take a deep breath, embrace the simplicity of no-dig gardening, and get ready to experience the joy of growing your own food. Your garden (and your back!) will thank you for it.
Share Your Experiences! Have you tried no-dig gardening? What are your favorite tips and tricks? Share your experiences in the comments below!