Fall Into No-Dig: Easy Regenerative Garden Prep for a Bountiful Spring
The air is crisp, the leaves are turning vibrant shades of red and gold, and the days are getting shorter. It's the time of year when cozy sweaters and warm drinks beckon us indoors. But before you completely succumb to the allure of autumn hibernation, consider this: a little effort in the garden now can lead to a truly spectacular spring harvest. And the best part? You can achieve this without breaking your back, thanks to the magic of no-dig gardening.
No-dig gardening, also known as lasagna gardening or sheet mulching, is a simple yet powerful method that mimics nature's way of building healthy soil. Instead of tilling or digging, you layer organic materials on top of the soil surface, allowing them to decompose and create a nutrient-rich growing medium. This method not only saves you time and energy, but also promotes soil health, improves water retention, and helps sequester carbon from the atmosphere – a win-win for you and the planet!
Fall is the perfect time to prepare a no-dig garden bed. The cooling temperatures and increased rainfall encourage decomposition, giving the layers ample time to break down and create a thriving ecosystem by springtime. In this guide, we'll walk you through the easy steps to set up your own no-dig garden bed this fall, paving the way for a bountiful and sustainable harvest next year.
Understanding the "Why" of No-Dig Gardening
Before we dive into the how-to, let's take a moment to understand why no-dig gardening is so beneficial. Traditional tilling, while seemingly helpful, can actually disrupt the delicate balance of the soil ecosystem. Tilling damages soil structure, which is essential for water retention and aeration. It also releases carbon dioxide into the atmosphere, contributing to climate change. Even worse, tilling can disrupt the homes of beneficial soil organisms like earthworms and fungi, which play a vital role in nutrient cycling and disease suppression.
No-dig gardening, on the other hand, works with nature, not against it. By layering organic materials on top of the soil, you create a hospitable environment for earthworms and other beneficial organisms. These creatures naturally aerate the soil, break down organic matter, and transport nutrients to plant roots. The result is healthier, more fertile soil that requires less watering and fertilizing. No-dig is aligned with regenerative agriculture, which is designed to build soil, sequester carbon, and promote biodiversity.

Gathering Your Materials
The beauty of no-dig gardening is that it utilizes readily available, often free, organic materials. Here's what you'll need:
- Cardboard (untreated): This forms the base layer of your no-dig bed, suppressing weeds and providing a carbon source for decomposition. Be sure to remove any tape or labels and use only untreated cardboard to avoid introducing harmful chemicals to your soil.
- Compost: Compost is the engine of your no-dig bed, providing essential nutrients for plant growth. Use high-quality compost that is well-decomposed and rich in organic matter.
- Leaf Mulch: Fallen leaves are a fantastic source of carbon and add valuable nutrients to the soil as they break down. Shredding the leaves with a lawnmower will speed up the decomposition process.
- Grass Clippings (untreated): Fresh grass clippings provide nitrogen, which is essential for plant growth. Be sure to use clippings from lawns that haven't been treated with herbicides or pesticides.
- Aged Manure (optional): If you have access to aged manure (cow, horse, chicken, etc.), it can be a valuable addition to your no-dig bed. Manure provides a boost of nutrients and helps to improve soil structure.
- Straw or Hay: This final layer acts as a mulch, helping to retain moisture, suppress weeds, and insulate the soil over the winter.
Sourcing these materials affordably and sustainably is key. Check with local farms for aged manure or hay. Ask neighbors for leaf mulch or untreated grass clippings. Start your own compost pile to recycle kitchen scraps and yard waste. With a little creativity, you can create a thriving no-dig garden without spending a fortune. If compost is scarce, consider planting a green manure crop earlier in the season (like buckwheat or rye) and then cutting it down and incorporating it into your no-dig bed.
Step-by-Step: Creating Your No-Dig Bed
Now for the fun part! Here's how to create your own no-dig garden bed this fall:
- Step 1: Clear the Area. Remove any existing vegetation from the area where you plan to build your bed. You can mow or cut down any grass or weeds, but don't till the soil.
- Step 2: Lay Down Cardboard. Overlap the cardboard pieces generously (at least 6 inches) to prevent weeds from growing through the cracks. Aim for at least a double layer of cardboard.
- Step 3: Wet the Cardboard Thoroughly. This is crucial for initiating the decomposition process and helping the cardboard to stay in place. Use a hose or watering can to saturate the cardboard.
- Step 4: Layer with Compost. Add a layer of compost that is 4-6 inches thick. Spread it evenly over the cardboard, ensuring that all areas are covered.
- Step 5: Layer with Leaf Mulch, Grass Clippings, and Aged Manure. Add a layer of leaf mulch (4-6 inches), followed by a layer of grass clippings (2-3 inches) and aged manure (if using, 2-3 inches). You can mix these materials together or layer them separately.
- Step 6: Top with Straw or Hay. Add a final layer of straw or hay (4-6 inches) to insulate the soil and suppress weeds.
- Step 7: Let it Rest Over the Winter. Now, the hard work is done! Simply let the no-dig bed sit over the winter, allowing the organic materials to decompose and create a rich, fertile growing medium. By spring, it will be ready to plant!
What if weeds keep coming back? Some persistent weeds, like Bermuda grass, might require an extra layer of cardboard or a more thorough clearing of the area. Address this by repeating the steps in the coming seasons. The cardboard must be untreated (no glossy print or plastic coating) so that it decomposes naturally into the soil, creating a dark rich base for your garden bed.

Seed Saving for a Sustainable Spring
While you're preparing your garden for winter, take some time to save seeds from your most successful plants. Seed saving is a cornerstone of self-sufficiency and helps to preserve heirloom varieties. Select the healthiest and most productive plants to save seeds from. Allow the seed heads or fruits to fully mature on the plant. Clean, dry, and store the seeds properly in airtight containers in a cool, dark place. When spring arrives, you'll have a ready supply of homegrown seeds to plant in your no-dig garden, creating a truly sustainable cycle. You can save seeds from beans, tomatoes, peppers, and flowers for future use. Seed saving promotes genetic diversity and contributes to food security.
Extending the Harvest with Cold Frames and Cloches
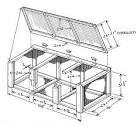
Don't let the arrival of fall signal the end of your harvest! Extend the growing season with the use of cold frames and cloches. These simple structures provide protection from frost and allow you to continue harvesting leafy greens, kale, and spinach well into the winter. You can easily build your own cold frames using scrap wood and recycled windows, or purchase inexpensive cloches from garden supply stores. Remember to ventilate cold frames on sunny days to prevent overheating and water as needed.
Planning for Spring: Heirloom Varieties
Now is the perfect time to start planning your spring garden and selecting the heirloom varieties you want to grow. Heirloom varieties are open-pollinated plants that have been passed down through generations, prized for their unique flavor, disease resistance, and historical significance. Consider growing heirloom tomatoes like 'Brandywine' or 'Cherokee Purple,' beans like 'Kentucky Wonder,' or peppers like 'Jimmy Nardello.' These varieties not only taste amazing, but also help to preserve genetic diversity and support local seed companies.
Embracing the Cycle
As the days grow shorter and the nights grow cooler, take solace in the fact that you're actively preparing your garden for a bountiful spring. No-dig gardening is not just a technique; it's a philosophy that embraces the natural cycle of growth, decay, and renewal. By working with nature, you can create a thriving garden that nourishes your body, enriches your soil, and contributes to a more sustainable future. So, get outside, gather your materials, and start building your no-dig garden bed today.
The leaves are falling, the air is crisp, and the earth is calling. It's time to prepare for a spring bursting with life!
Share your no-dig gardening plans and experiences in the comments below! What are your favorite heirloom varieties to grow? Let us know! Tag us in your garden photos on social media using #BetterHomesAndHarvests and #NoDigGardening!