Extending Your Harvest: Build a DIY Cold Frame for Year-Round Veggies
The garden's vibrant hues are starting to fade. The tomato plants are looking weary, and a crispness hangs in the air, hinting at the inevitable: frost. You can almost hear the garden sighing, readying itself for its winter slumber. But what if you could coax just a little more life from it? What if you could enjoy fresh salads and herbs long after the first frost?
With a DIY cold frame, you can! It's a simple, affordable way to extend your growing season, protect your plants from harsh weather, and enjoy fresh, homegrown goodness even when the rest of the world is buying wilted lettuce from the grocery store. A cold frame acts as a miniature greenhouse, trapping solar energy to keep your plants cozy and productive. In this guide, we'll explore the basics of cold frames and provide you with several DIY options, from beginner-friendly upcycled designs to more advanced projects. So, are you ready to keep your garden growing all year long?

Alt text: A frost-covered garden with a homemade cold frame in the background, showcasing the possibility of extending the growing season into winter. The image emphasizes the contrast between the dormant garden and the protected plants inside the cold frame.
Understanding Cold Frames: The Basics
At its core, a cold frame is a simple, unheated structure designed to protect plants from the elements. Think of it as a miniature greenhouse for your garden. It's typically built with transparent materials, like glass or plastic, that allow sunlight to penetrate and warm the soil and air inside. The frame itself provides insulation, shielding plants from cold temperatures, wind, and snow.
How it Works: The magic of a cold frame lies in its ability to trap solar energy. Sunlight enters through the transparent lid, warming the soil and air inside. This creates a microclimate that is significantly warmer than the surrounding environment, allowing plants to continue growing even when temperatures drop. Ventilation is key to prevent overheating; without it, the sun can quickly turn your cold frame into an oven.
Ideal Plants for Cold Frames: Not all plants are created equal when it comes to cold frames. Leafy greens like spinach, lettuce, kale, and arugula thrive in these environments. Root vegetables like carrots, radishes, and beets also do well. Hardy herbs like parsley, thyme, and oregano can overwinter successfully in a cold frame, providing you with fresh flavor throughout the colder months. You can even start early-season crops like tomatoes or peppers indoors and then transplant them into the cold frame for an extra boost.
Location Considerations: Choosing the right location for your cold frame is crucial. Look for a spot that receives at least six hours of sunlight per day, ideally with a south-facing orientation to maximize solar exposure. Good drainage is also essential to prevent waterlogging, and protection from strong winds will help maintain a stable temperature inside the cold frame.
Four DIY Cold Frame Designs: From Simple to Slightly Skilled
The beauty of cold frames is that you can build them yourself with readily available materials. Here are four DIY designs to get you started, catering to different skill levels and material availability:
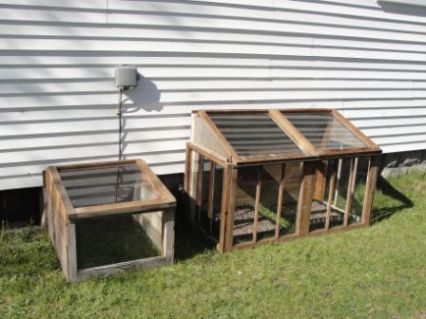
1. The Upcycled Window Cold Frame (Beginner): This is the perfect project for beginners, as it utilizes salvaged materials like old windows and reclaimed wood. Not only is it easy to assemble, but it's also an environmentally friendly way to repurpose materials.
- Materials Needed: Old windows (same size preferred), reclaimed wood (for the frame), screws, hinges (optional), caulk (optional).
- Instructions:
- Build a simple rectangular frame from the reclaimed wood, ensuring it's slightly larger than the window(s). Angle the back of the frame slightly higher than the front to maximize sun exposure.
- Attach the window(s) to the top of the frame using hinges (if desired) or simply rest them on top. Hinges allow for easy ventilation.
- Caulk any gaps between the windows and the frame to improve insulation (optional).

Alt text: A close-up of a cold frame constructed with old windows and repurposed wood, demonstrating a sustainable and budget-friendly approach to extending the growing season.
2. The Straw Bale Cold Frame (Beginner/Intermediate): This design uses straw bales as insulated walls and a sheet of clear plastic or polycarbonate for the lid. It's incredibly simple and requires no building, just assembly.
Materials Needed: Straw bales, clear plastic or polycarbonate sheet, stakes (optional).
Instructions:
- Arrange the straw bales in a rectangular or square shape to form the walls of the cold frame.
- Secure the corners of the bales with stakes (optional) to prevent them from shifting.
- Cover the top of the bales with the clear plastic or polycarbonate sheet, securing it with weights or clips.
This design's pros include easy setup and great insulation from the straw. Cons include the straw eventually decomposing and the space the bale design requires.
3. The Hinged Wooden Cold Frame (Intermediate): This is a more traditional cold frame design with a hinged lid for easy access and ventilation control. It requires some basic woodworking skills.
- Materials Needed: Wood (for the frame and lid), hinges, screws, clear plastic or polycarbonate sheet, saw, drill.
- Instructions:
- Cut the wood to the desired dimensions for the frame and lid. Angle the back of the frame slightly higher than the front.
- Assemble the frame using screws.
- Attach the clear plastic or polycarbonate sheet to the lid frame.
- Attach the lid to the frame using hinges.

Alt text: A sturdy cold frame constructed from wood, featuring a hinged lid that allows for easy access and ventilation control. The image showcases a well-built structure designed for durability and functionality.
4. The Pallet Cold Frame (Intermediate/Advanced): This design utilizes upcycled pallet wood to create a sturdy and cost-effective cold frame. It requires some carpentry experience and caution when working with pallets.
Materials Needed: Pallets, screws, nails, hammer, saw, clear plastic sheeting
Instructions:
- Disassemble pallets carefully using gloves and proper safety glasses. Inspect wood for nails/screws
- Use wood to construct a standard cold frame design.
- Add the plastic sheeting to the lid
- Hinge lid using various hinges
Be sure to use caution when handling the pallet wood to ensure no injuries.
Safety Considerations: Always wear appropriate safety gear, such as gloves and safety glasses, when working with wood, tools, and salvaged materials. Ensure the cold frame is stable and secure to prevent it from collapsing.
Cold Frame Maintenance: Keeping Your Plants Happy
Building your cold frame is just the first step. To keep your plants thriving, you need to provide proper care and maintenance.
Ventilation: Ventilation is crucial to prevent overheating, especially on sunny days. Open the lid of the cold frame partially or fully during the warmest part of the day to allow excess heat to escape. Close it again in the late afternoon to trap heat overnight.
Watering: Water your plants regularly, but be careful not to overwater. Condensation can build up inside the cold frame, potentially leading to fungal diseases. Water in the morning to allow the foliage to dry out during the day.
Temperature Monitoring: Use a thermometer inside the cold frame to monitor the temperature. Aim to maintain a temperature between 40°F and 70°F for most plants. Adjust ventilation as needed to maintain this range.
Pest and Disease Control: Monitor your plants regularly for signs of pests or diseases. Aphids and fungal diseases are common problems in cold frames. Use organic pest control methods, such as insecticidal soap or neem oil, to combat infestations. Improve air circulation to reduce the risk of fungal diseases.
Insulation During Extreme Cold: During extreme cold spells, provide extra insulation for your cold frame. Cover it with blankets, bubble wrap, or straw to trap heat and protect your plants from freezing.
Soil Health in Cold Frame: Maintain proper soil health using compost to ensure your plants receive the necessary nutrients. Add additional compost after seasonal harvests.
Beyond the Basics: Advanced Cold Frame Techniques
Ready to take your cold frame gardening to the next level? Here are some advanced techniques to consider:
Extending the Season Even Further: Use row covers inside the cold frame for extra protection during the coldest periods. These lightweight fabric covers provide an additional layer of insulation.
Companion Planting in Cold Frames: Utilize companion planting to deter pests and improve yields. For example, plant garlic alongside spinach to repel aphids, or plant basil near tomatoes to improve their flavor.
Seed Starting in Cold Frames: Use your cold frame to start seeds earlier in the spring. This will give your plants a head start on the growing season. Make sure to harden off your seedlings gradually before transplanting them into the garden.

Alt text: A hand opening the hinged lid of a cold frame to provide ventilation, demonstrating a crucial step in maintaining optimal temperature and humidity levels for plant growth.
A Harvest That Endures
Building a DIY cold frame is a rewarding project that allows you to extend your growing season and enjoy fresh, homegrown produce for longer. It's a testament to self-sufficiency and a tangible connection to the natural world, even in the depths of winter. As the leaves continue to fall and the days grow shorter, remember that with a little ingenuity, you can still cultivate a vibrant garden, a small oasis of green in the heart of winter. Now is the perfect time to plan your cold frame construction so you are ready when the first frost comes.
Have you tried using cold frames to extend your growing season? Share your experiences and tips in the comments below! What are your favorite crops to grow in cold frames? Show us your DIY cold frames! Tag @BetterHomesAndHarvests on Instagram with the hashtag #BHHColdFrame to be featured on our page.