Extend Your Harvest: Building Cold Frames for Seasonal Eating

There's a certain bittersweet moment every year when the first frost kisses the garden. The vibrant colors of summer fade, and the promise of juicy tomatoes and sun-ripened peppers dwindles. But what if you could extend that season, coaxing fresh greens from your garden even as the temperatures drop? The answer lies in the simple, yet powerful tool: the cold frame.
Cold frames are miniature greenhouses that protect plants from frost and allow you to enjoy homegrown produce for longer. Imagine crisp lettuce salads in November, or the satisfaction of harvesting fresh herbs in December. This post will guide you through understanding, building, and maintaining your own DIY cold frame, empowering you to enjoy a longer growing season and fresh, homegrown food, even in colder climates.
We'll cover the science behind cold frames, explore different designs and materials, provide a step-by-step guide to building your own, and discuss which plants thrive in this protected environment. Get ready to say goodbye to the end-of-season blues and hello to a sustainable harvest, season after season!
Understanding Cold Frames: Design, Materials, and Placement
What exactly is a cold frame, and how does it work its magic? At its core, a cold frame is a transparent-roofed enclosure built to protect plants from the elements. Unlike a greenhouse, it’s typically unheated, relying solely on solar energy to warm the interior. Think of it as a miniature sun trap.
The science is simple but effective. Sunlight enters the cold frame through the transparent roof, warming the air and the soil inside. The enclosure then traps this heat, preventing it from escaping, creating a microclimate that is significantly warmer than the surrounding environment. This allows plants to survive and even thrive in conditions that would otherwise be too cold.
There are various types of cold frames, each with its own advantages:
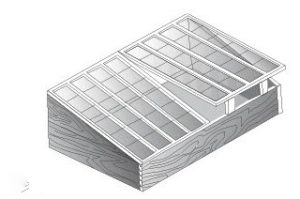
Sloped Cold Frame: This is the most common design, featuring a single, sloped roof that maximizes sunlight exposure. It's easy to build and provides good ventilation.
A-Frame Cold Frame: As the name suggests, this design resembles the letter "A," with two sloping sides meeting at a peak. It offers more headroom than the sloped design, making it suitable for taller plants.
Repurposed Window Frame Cold Frame: This is a great option for the budget-conscious gardener. It utilizes old windows or doors as the roof and sides, creating a unique and sustainable structure.
When choosing materials, consider durability, insulation, and cost. Wood is a classic choice, offering good insulation and a rustic aesthetic, blending seamlessly into your farmhouse life. Straw bales are a surprisingly effective and inexpensive option, providing excellent insulation. Brick or cinder blocks offer superior durability and thermal mass, but can be more expensive and require more effort to construct. Repurposed materials are a sustainable and budget-friendly choice, but may require more creativity and ingenuity to assemble. Consider the insulation values of different materials; thicker, denser materials will retain heat more effectively.
Choosing the right location is crucial for maximizing the effectiveness of your cold frame. A south-facing location will provide the most sunlight exposure, especially during the winter months. Sheltering the cold frame from wind will help to prevent heat loss. Ensure the location is well-drained to prevent waterlogging. Consider placing your cold frame against a south-facing wall. The wall will absorb heat during the day and radiate it back at night, providing extra warmth to your plants.
Ventilation is essential for temperature regulation. Without proper ventilation, the inside of the cold frame can overheat, especially on sunny days, potentially damaging your plants. To achieve proper ventilation, simply prop open the lid of the cold frame during the day to allow excess heat to escape, and close it at night to retain warmth.
Actionable Tips:
- Simple Sloped Cold Frame Plan: Build a cold frame 4 feet wide, 6 feet long, and 1 foot high at the front, sloping up to 2 feet high at the back. Use 2x4 lumber for the frame and cover it with clear polycarbonate sheets.
- Calculate Sunlight Angle: The ideal angle for your cold frame roof depends on your latitude. A general rule of thumb is to add 15 degrees to your latitude for the optimal winter sun angle.
- Affordable Materials: Check local classifieds for used windows or doors. Scour construction sites for scrap lumber.
Understanding the principles of cold frame design, materials, and placement is essential for creating an effective and long-lasting structure that will help you enjoy a sustainable home and garden.
Building Your First DIY Cold Frame: A Step-by-Step Guide

Ready to get your hands dirty and build your own cold frame? This step-by-step guide will walk you through the process of building a simple sloped cold frame using wood and, ideally, a repurposed window. Remember to wear gloves and eye protection when working with tools.
Materials Needed:
- Lumber (2x4s, 1x4s)
- Repurposed window or clear polycarbonate sheet
- Screws
- Hinges
- Latch
- Saw
- Drill
- Measuring tape
- Level
Step 1: Cut the Wood to Size
Cut the lumber according to your desired dimensions (refer to the plan mentioned earlier or adjust to fit your window). You'll need pieces for the front, back, sides, and top frame.
Step 2: Assemble the Frame
Use screws to assemble the frame. Ensure the corners are square and the frame is level.
Step 3: Attach the Window or Clear Covering
Attach the window or polycarbonate sheet to the top frame using hinges. This will allow you to open and close the cold frame for ventilation.
Step 4: Add Hinges and Latches
Secure the hinges to the frame and the window. Add a latch to keep the cold frame closed securely.
Alternative Building Methods:
- Straw Bale Cold Frame: Stack straw bales in a rectangle and cover with a clear plastic sheet. This is a quick and easy option, but less durable.
- Cinder Block Cold Frame: Stack cinder blocks in a rectangle and cover with a piece of glass or plastic. This is a more durable option, but requires more effort to build.
Actionable Tips:
- Precise Measurements: Double-check all measurements before cutting the wood to ensure a snug fit.
- Troubleshooting: If the window doesn't fit perfectly, use weather stripping to seal any gaps.
- Weather Stripping for Insulation: Apply weather stripping around the edges of the window frame to create a tight seal and prevent heat loss.
With clear instructions and readily available materials, anyone can build a functional cold frame to extend their growing season and embrace cozy living.
What to Grow in Your Cold Frame: Plant Selection and Care

Now that you have your cold frame built, it's time to start planting! Cold frames are ideal for growing a variety of cool-season crops.
Here are some of the best vegetables to grow:
- Leafy Greens: Lettuce, spinach, kale, arugula, and other leafy greens thrive in cold frames, providing a continuous supply of fresh salads throughout the fall and winter.
- Root Vegetables: Radishes, carrots, and turnips can also be grown in cold frames, offering a tasty and nutritious addition to your seasonal harvest.
- Herbs: Parsley, cilantro, chives, and other herbs can be grown in cold frames, adding flavor to your winter dishes.
Cold frames can also be used for starting seeds in the spring, giving you a head start on the growing season. Tomatoes, peppers, and eggplants can be started indoors and then transplanted to the cold frame to harden off before being moved to the garden. Additionally, they are useful for extending the life of summer crops. Protecting tomatoes and peppers from early frost will allow you to enjoy a longer harvest.
Soil preparation is crucial for success. Use a well-draining, nutrient-rich potting mix. Amend the soil with compost to improve drainage and fertility.
Watering and fertilization are also important. Adjust watering frequency based on weather conditions. Water thoroughly when the soil is dry to the touch. Fertilize regularly with an organic fertilizer to provide essential nutrients.
Monitor for pests and diseases and use organic solutions to control them. Aphids, whiteflies, and spider mites can be common pests in cold frames. Use insecticidal soap or neem oil to control these pests. Prevent fungal diseases by ensuring good ventilation and avoiding overwatering.
Actionable Tips:
- Planting Calendar: Plant leafy greens in the fall for a winter harvest. Start seeds in the early spring for a summer garden.
- Watering: Water early in the day to allow the foliage to dry before nightfall, preventing fungal diseases.
- Organic Pest Control: Introduce beneficial insects like ladybugs to control aphids.
Choosing the right plants and providing proper care will ensure a bountiful harvest from your cold frame.
Maintaining Your Cold Frame: Year-Round Management and Upkeep
Maintaining your cold frame is essential for ensuring its longevity and effectiveness.
Ventilation is crucial for temperature regulation. Open the lid of the cold frame during the day to prevent overheating and close it at night to retain heat. Monitor the temperature inside the cold frame using a thermometer.
Watering is also important. Check soil moisture regularly and water as needed. Weeding will prevent competition for nutrients. Remove weeds regularly to prevent them from competing with your plants for nutrients.
Add extra insulation during cold snaps. Use blankets, straw, or bubble wrap to insulate the cold frame during extremely cold weather.
During the summer months, store the cold frame to prevent overheating and damage. Disassemble the cold frame and store it in a cool, dry place.
Actionable Tips:
- Temperature Chart: Maintain a temperature of 60-70°F during the day and 40-50°F at night for most cool-season crops.
- Automatic Vent Opener: Install an automatic vent opener to automatically regulate the temperature inside the cold frame.
- Wood Treating: Treat the wood with a non-toxic wood preservative to protect it from rot and decay.
Regular maintenance and upkeep will ensure the longevity and effectiveness of your cold frame, guaranteeing a sustainable harvest year after year.
A Sustainable Harvest, Season After Season
By building and maintaining a cold frame, you can extend your growing season and enjoy fresh, homegrown produce for longer. It's a simple, yet powerful way to connect with nature, reduce your reliance on store-bought food, and embrace a more sustainable lifestyle.
Now is the perfect time to start planning and building your cold frame, before the first frost arrives. Prepare your garden, gather your materials, and get ready to enjoy a bountiful harvest, even as the temperatures drop.
What are your experiences with cold frames? Share your tips and tricks in the comments below!
Ready to dive deeper into extending your growing season? Subscribe to our newsletter for more tips and tricks on sustainable gardening and seasonal living!