Extend Your Growing Season with a DIY Cold Frame: A Homesteader's Guide
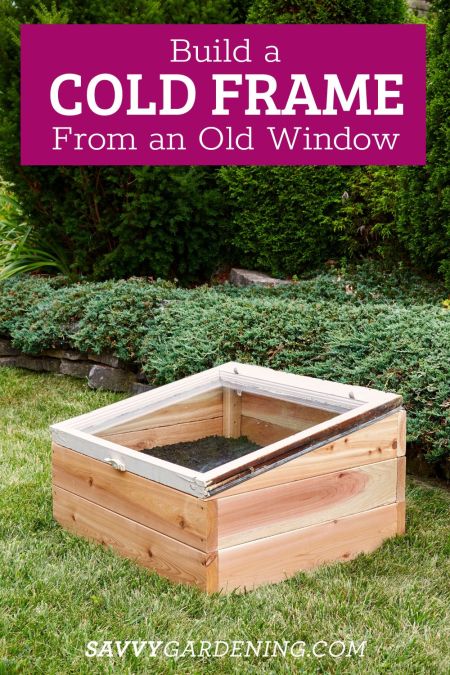
Are you dreaming of fresh, homegrown veggies long after the first frost? As homesteaders, we're always looking for ways to maximize our harvest and extend the growing season. One of the simplest and most effective solutions is building your own cold frame. With a little ingenuity and reclaimed materials, you can create a miniature haven for your plants, protecting them from the elements and giving them a head start in spring or a longer run in the fall. This guide will walk you through building a low-cost, highly effective cold frame from reclaimed materials step-by-step, ensuring you enjoy fresh produce for more of the year. Let's get started with this DIY cold frame project!
Why Build a Cold Frame?
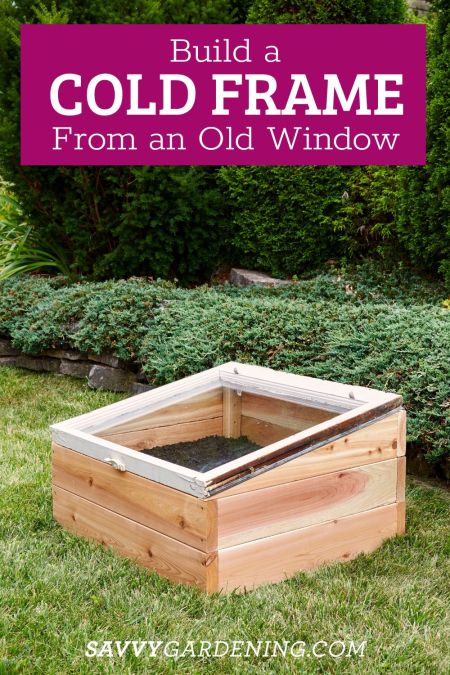
Before we dive into the how-to, let’s talk about the why. A cold frame is essentially a miniature greenhouse, offering several benefits:
- Extends the Growing Season: Protects plants from frost, allowing you to start planting earlier in the spring and harvest later in the fall. This is a key season extension technique.
- Hardens Off Seedlings: Provides a sheltered environment for gradually acclimating seedlings to outdoor conditions.
- Protects Against Pests and Weather: Shields plants from harsh winds, heavy rain, and hungry critters.
- Saves Money: Building your own cold frame from reclaimed materials is a budget-friendly way to expand your gardening capabilities. This is a great DIY gardening project!
Gathering Your Reclaimed Materials
The beauty of this project lies in its sustainability. Using reclaimed materials not only saves you money but also gives discarded items a new life. Here’s a list of what you’ll need:
- Glazing: This will be the top of your cold frame, allowing sunlight to enter. Old windows are perfect. Storm windows work well, but any glass or sturdy clear plastic will do.
- Framing: This will create the structure of your cold frame. Reclaimed wood pallets are an excellent choice. You can also use scrap lumber, cinder blocks, or even hay bales.
- Fasteners: Screws, nails, or bolts, depending on the materials you're using.
- Hinges (Optional): If you want a hinged lid for easy access and ventilation.
- Handles (Optional): To easily open and close the lid.
- Insulation (Optional): Bubble wrap, old blankets, or straw bales can be used for added insulation during particularly cold periods.
- Tools: Saw, drill, screwdriver, measuring tape, level, safety glasses, and gloves.
My own experience: I’ve built several cold frames over the years. My first one was a complete disaster – I used warped wood and the lid didn't quite fit! But I learned from my mistakes and now I always take the time to ensure the frame is square and the lid seals properly. Don't be afraid to experiment and learn as you go. This project is great for homesteading gardening!
Step-by-Step Cold Frame Construction
Here's a step-by-step guide to building your cold frame. Remember to adapt these instructions based on the materials you have available.
Step 1: Choose Your Location
Sunlight is crucial! Select a spot that receives at least 6 hours of direct sunlight per day, especially during the winter months. Good drainage is also essential to prevent waterlogging. A south-facing location is ideal.
Step 2: Build the Frame
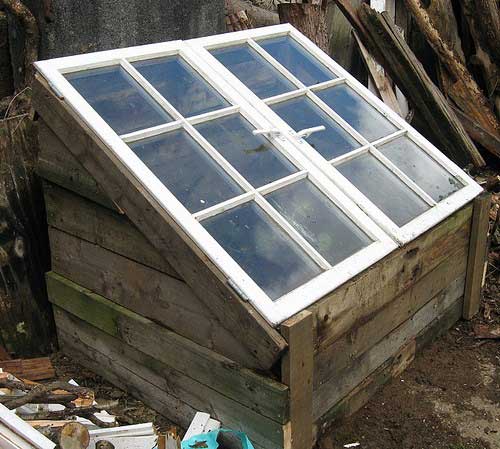
- With Wood: Cut your wood to the desired dimensions. A typical cold frame is about 3-4 feet wide, 4-6 feet long, and 1-2 feet high at the back, sloping down to about 6-12 inches at the front. This slope allows for maximum sunlight capture. Assemble the frame using screws or nails. Ensure the frame is square and sturdy.
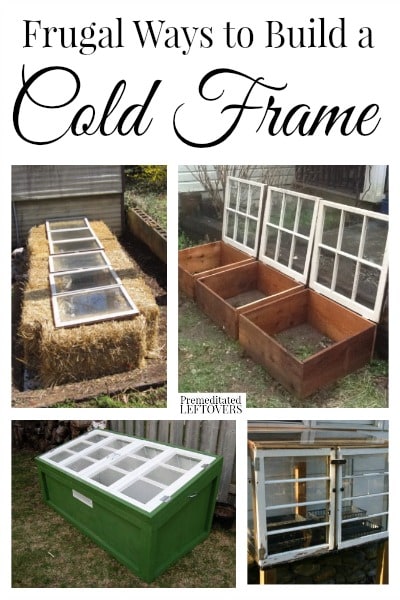
- With Pallets: Disassemble the pallets carefully. Use the pallet wood to create a frame as described above. Alternatively, you can use whole pallets to create the sides and back of the cold frame for a raised bed cold frame.
- With Hay Bales: Arrange the hay bales in a rectangular shape, forming the walls of your cold frame. This is the simplest and quickest method, perfect for a temporary cold frame.
Step 3: Attach the Glazing
- If you’re using an old window, build the frame to match its dimensions.
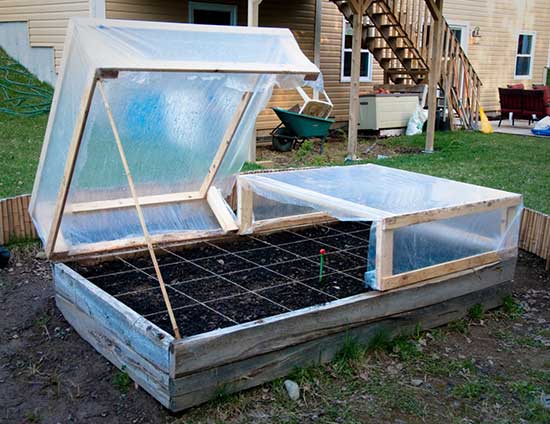
- Attach hinges to the top of the back frame and the window to create a hinged lid. This makes ventilation and access much easier.
- If you’re using plastic, stretch it tightly over the frame and secure it with staples or tacks.
- Consider adding handles for easy opening and closing.
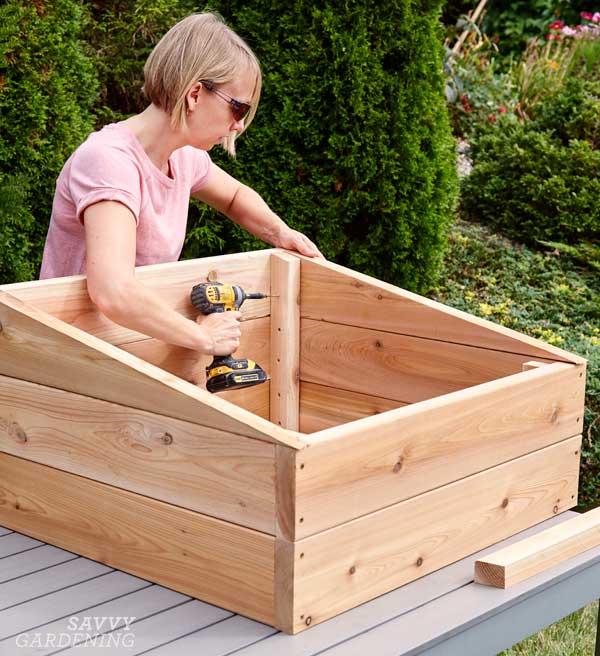
Step 4: Ventilation is Key
Proper ventilation is vital to prevent overheating, especially on sunny days. A hinged lid allows you to easily adjust the temperature inside the cold frame. Prop the lid open with a stick or brick on warmer days.
Step 5: Insulate (If Necessary)
For extra protection during cold snaps, insulate the outside of the frame with bubble wrap, blankets, or straw bales. You can also bury the base of the cold frame a few inches into the ground for added insulation.
Temperature Management
Monitoring and managing the temperature inside your cold frame is crucial.
- Ventilation: Open the lid on sunny days to prevent overheating.
- Watering: Water plants in the morning to allow foliage to dry before nightfall, reducing the risk of fungal diseases.
- Thermometer: Use a thermometer inside the cold frame to monitor the temperature.
- Shade Cloth: On very hot days, you may need to use shade cloth to prevent scorching.
What to Plant in Your Cold Frame
Cold frames are versatile and can be used to grow a variety of plants.
- Spring: Start seeds of tomatoes, peppers, and eggplants. Harden off seedlings before transplanting them into the garden.
- Fall: Extend the harvest of leafy greens like lettuce, spinach, kale, and chard. These are some of the best vegetables to grow in a cold frame in fall.
- Winter: Grow cold-hardy vegetables like spinach, kale, and lettuce for a winter harvest.
Maintaining Your Cold Frame During Winter
- Check Regularly: Monitor the temperature inside the cold frame and ventilate as needed.
- Snow Removal: Brush off any snow that accumulates on the lid to allow sunlight to penetrate.
- Insulation: Add extra insulation during extremely cold periods.
- Watering: Water sparingly during the winter months.
Tips for Success
- Start Small: Begin with a simple cold frame and gradually expand as you gain experience.
- Experiment: Don't be afraid to try different materials and techniques.
- Observe: Pay attention to how your plants are responding and adjust your practices accordingly.
- Recordkeeping: Keep a gardening journal to track what works and what doesn't.
The Joy of Homegrown Food
Building a DIY cold frame is more than just a gardening project; it's an investment in your self-sufficiency and a connection to the natural world. There's nothing quite like the taste of fresh, homegrown vegetables, especially when you've nurtured them through the colder months.
So, gather your reclaimed materials, roll up your sleeves, and start building your own cold frame today. You'll be amazed at how much you can extend your growing season and enjoy the fruits (and vegetables!) of your labor. Don't forget to consider making your own DIY cold frame greenhouse to have even more control!
Now it’s your turn! Have you built a cold frame before? What materials did you use? Share your experiences and ask any questions you have in the comments below! We’d love to hear from you! Let's get the discussion going about gardening for self-sufficiency!