DIY Vermicomposting Bin: Turn Kitchen Scraps into Garden Gold
Tired of tossing valuable kitchen scraps into the trash? Want to supercharge your garden with nutrient-rich fertilizer, naturally? Vermicomposting, or composting with worms, is the answer you've been looking for! This incredible process transforms your food waste into "black gold" – a potent soil amendment that will have your plants thriving.
Many people think composting is messy or complicated, but vermicomposting is surprisingly easy, odorless, and perfect for beginner homesteaders. Today, we'll walk you through building a simple and effective DIY vermicomposting bin. Get ready to unlock the power of worm poop and create a closed-loop system that benefits your garden and the environment.
Why Vermicomposting? The Homesteading Advantage

A flourishing garden, showcasing the potential results of using vermicompost, with healthy vegetable plants thriving in the enriched soil.
Vermicomposting offers a multitude of benefits for the self-sufficient homesteader. It's a game-changer for waste reduction, soil health, and your wallet.
Waste Reduction: The average household throws away a shocking amount of food waste. In the United States alone, food waste accounts for a huge portion of what ends up in landfills. Vermicomposting significantly reduces this waste by turning it into a valuable resource. You can divert pounds of scraps each week, preventing them from contributing to methane emissions in landfills.
Nutrient-Rich Compost: Worm castings, the end product of vermicomposting, are far superior to traditional compost. They are packed with essential nutrients, beneficial microbes, and enzymes that boost plant growth. Think of it as a superfood for your garden! Worm castings are rich in Nitrogen (N), Phosphorus (P), and Potassium (K) – the essential macronutrients plants need to thrive. These are readily available in worm castings, making them easy for plants to absorb.
Liquid Gold: Worm Tea: As the worms munch away, they produce a liquid fertilizer called worm tea. This nutrient-rich liquid can be diluted and used to feed your seedlings, vegetables, and flowers. It provides an instant boost of nutrients and helps to improve soil health.
Cost Savings: By creating your own compost and liquid fertilizer, you can drastically reduce your reliance on store-bought products. This saves you money and allows you to invest in other areas of your homestead.
Sustainability: Vermicomposting embodies the principles of sustainability. It creates a closed-loop system where waste becomes a resource, reducing your environmental footprint and promoting healthy ecosystems.
Worm farming as a potential supplemental business: Once you have a thriving worm population, you may even consider selling the excess! Gardeners, fishermen, and even other homesteaders are often looking to buy red wigglers.
Key Takeaways: Vermicomposting is a low-effort, high-reward practice that benefits the environment, your garden, and your wallet. It's a win-win-win for any aspiring homesteader.
Choosing Your Vermicomposting Bin – Size and Type

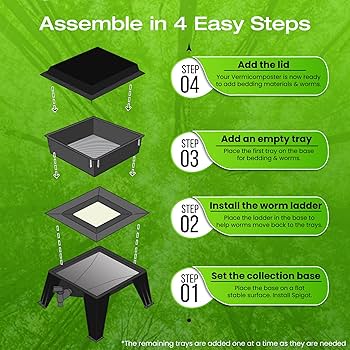
Two distinct vermicomposting bin styles: a multi-tiered system designed for continuous harvesting and a simpler single-tub setup, demonstrating the variety of options available.
Selecting the right vermicomposting bin is an important first step. There are various options available, each with its own advantages and disadvantages.
Bin Material Options:
- Plastic Storage Totes: This is the most common and affordable option. They are durable, easy to clean, and readily available.
- Wooden Bins: Wooden bins can be aesthetically pleasing, but they may be more susceptible to moisture damage and require more maintenance.
- Commercially Available Vermicomposting Systems: These systems are designed specifically for vermicomposting and often feature tiered trays for easy harvesting. They can be more expensive but offer added convenience.
Bin Size Considerations: Choose the right size bin based on the amount of food waste your household generates. A general rule of thumb is 1 square foot of surface area per pound of food waste per week. So, if you generate 2 pounds of food waste per week, you'll need a bin with at least 2 square feet of surface area. For a family of 2-4, a 10-20 gallon tote is generally sufficient.
DIY vs. Pre-made: DIY bins offer cost savings and customization, while pre-made bins offer convenience and aesthetics. If you're on a budget or enjoy DIY projects, building your own bin is a great option. If you prefer convenience and a more polished look, a pre-made system might be a better choice.
Placement Considerations: Consider where you'll place your vermicomposting bin. It can be kept indoors (in a garage or basement) or outdoors (in a shaded, sheltered area). Temperature control is crucial. Worms thrive in temperatures between 55-75°F. Avoid exposing the bin to extreme heat or cold.
Key Takeaways: Selecting the right vermicomposting bin involves balancing cost, space, and commitment. Consider your individual needs and preferences when making your decision.
DIY Vermicomposting Bin: Step-by-Step Instructions

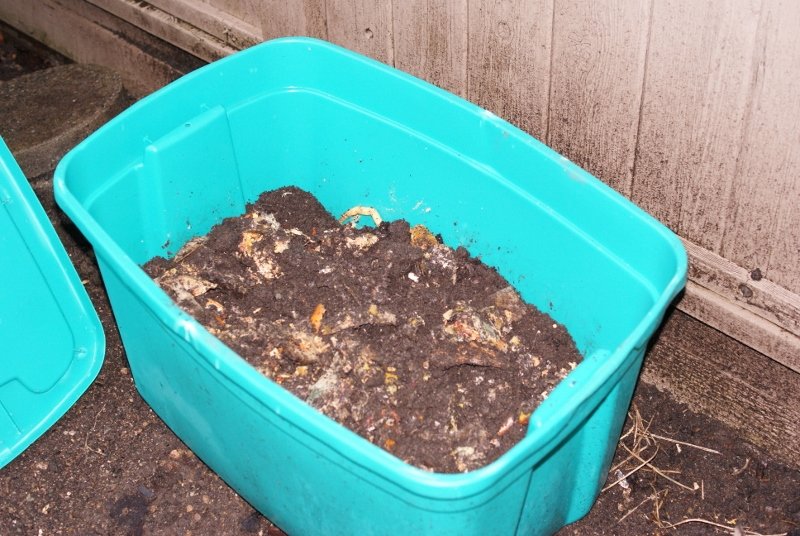
A typical bin to house your composting worms.
Here's how to build a simple and effective vermicomposting bin using a plastic storage tote:
Material List (detailed):
- Plastic storage tote (10-20 gallon capacity)
- Drill
- 1/4 inch drill bit (for air holes)
- 1/2 inch drill bit (for drainage holes)
- Bedding material (shredded newspaper, cardboard, coconut coir)
- Worms (Red Wigglers – Eisenia fetida) - available online or at local bait shops. Start with about 1 pound of worms.
- Dark, breathable cover (burlap, old towel, or even a piece of cardboard)
Step-by-Step Instructions (with clear photos at each step):
- Drill Drainage Holes: Drill 6-8 drainage holes in the bottom of the tote, using the 1/2 inch drill bit. This will allow excess moisture to drain out and prevent the bin from becoming waterlogged.
- Drill Air Holes: Drill air holes along the sides and lid of the tote, using the 1/4 inch drill bit. Space the holes a few inches apart to ensure good air circulation.
- Prepare the Bedding: Soak the shredded newspaper, cardboard, or coconut coir in water until it is thoroughly saturated. Then, squeeze out the excess moisture until the bedding is damp like a wrung-out sponge.
- Add Bedding: Place the moistened bedding in the tote, filling it about halfway. This provides a comfortable and nutritious environment for the worms.
- Introduce the Worms: Gently introduce the worms to their new home. Spread them evenly over the bedding.
- Cover the Bin: Cover the bedding with a dark, breathable cover. This helps to retain moisture and create a dark, comfortable environment for the worms.
Safety Precautions:
- Wear gloves to protect your hands.
- Avoid breathing in dust from the bedding.
- Be careful when using power tools.
First Feeding:
- Wait a day or two before feeding the worms. This allows them to acclimate to their new environment.
- Start with a small amount of food scraps (about a handful) and bury it under the bedding.
Key Takeaways: Building a DIY vermicomposting bin is a simple and rewarding project achievable in an afternoon.
Feeding Your Worms: What to Feed and What to Avoid
A well-fed worm is a happy worm! Understanding what to feed your worms is crucial for their health and the quality of your compost.
- Worm Diet Basics: Worms are not picky eaters, but they do have preferences. They enjoy a diet of fruit and vegetable scraps, coffee grounds, tea bags (remove the staples), crushed eggshells, and soaked shredded paper/cardboard.
- Foods to Avoid: Avoid feeding your worms meat, dairy, oily foods, citrus fruits (in large quantities), and spicy foods. These foods can attract pests, create foul odors, and harm the worms.
- Feeding Frequency and Amount: Feed your worms 2-3 times per week. Start with a small amount of food scraps (about a handful) and bury it under the bedding. Observe how quickly the worms consume the food and adjust the amount accordingly. If the food scraps are still visible after a week, you're feeding them too much.
- Burying Food Scraps: Burying food scraps under the bedding helps to prevent fruit flies and odors. It also provides a more accessible food source for the worms.
- Observation is Key: Regularly observe your worm bin to determine if you're feeding too much or too little. If the bin smells foul, it's likely due to overfeeding. If the worms are sluggish or trying to escape, they may be lacking food or the bin may be too acidic.
Key Takeaways: A balanced worm diet is crucial for their health and the quality of your compost. Avoid harmful foods, feed them regularly, and observe their behavior to ensure they are thriving.
Maintaining Your Vermicomposting Bin
Maintaining a healthy vermicomposting bin requires a little bit of attention and care.
- Moisture Control: Maintaining the right moisture level is crucial. The bedding should be damp like a wrung-out sponge. If the bin is too dry, add water using a spray bottle. If the bin is too wet, add dry shredded newspaper or cardboard to absorb the excess moisture.
- Temperature Regulation: Worms thrive in temperatures between 55-75°F. In hot weather, move the bin to a shaded area or add ice packs to keep it cool. In cold weather, move the bin indoors or insulate it with blankets or straw.
- Aeration: Aerate the bin every few weeks by gently turning the compost. This helps to provide oxygen to the worms and prevent anaerobic conditions.
- Pest Control: Common pests include fruit flies and mites. Preventative measures include burying food scraps, maintaining the proper moisture level, and using a breathable cover.
- Troubleshooting:
- Foul Odors: Indicates overfeeding or anaerobic conditions. Reduce feeding and aerate the bin.
- Slow Decomposition: Indicates a lack of moisture or nutrients. Add water or feed the worms more frequently.
- Dying Worms: Indicates extreme temperatures, harmful foods, or a lack of oxygen. Correct the underlying problem immediately.
Key Takeaways: Regular maintenance ensures a healthy worm population and efficient composting.
Harvesting Vermicompost and Worm Tea
Harvesting your vermicompost and worm tea is the exciting culmination of your efforts!
- When to Harvest: The vermicompost is ready for harvesting when it is dark, crumbly, and has an earthy smell. It should resemble rich soil.
- Harvesting Methods:
- Dump and Sort Method: Dump the bin contents onto a tarp and manually sort the worms from the compost. This method is more labor-intensive but allows you to harvest all of the compost at once.
- Migration Method: Move food to one side of the bin to encourage the worms to migrate to that side, leaving the finished compost on the other side. This method is less labor-intensive but takes longer.
- Collecting Worm Tea: Collect worm tea (leachate) from the bottom of the bin (if applicable). Dilute it with water (1:10 ratio) before using it to fertilize your plants.
- Using Vermicompost and Worm Tea: Apply vermicompost directly to your garden beds as a soil amendment. Use worm tea as a liquid fertilizer for seedlings, vegetables, and flowers.
Key Takeaways: Harvesting vermicompost and worm tea unlocks the full potential of your vermicomposting system, providing you with valuable resources for your garden.
Conclusion: Joining the Vermicomposting Revolution
Vermicomposting is a simple yet powerful way to enhance your homestead's self-sufficiency and sustainability. By building your own DIY vermicomposting bin and following these simple steps, you can transform kitchen scraps into valuable resources for your garden, reduce your environmental impact, and save money.
Ready to join the vermicomposting revolution? It's time to turn your waste into wonder and unlock the power of worm poop!
Call to Action: Ready to Get Started?
We encourage you to try building your own vermicomposting bin and share your results in the comments below! What challenges did you encounter, and what tips did you learn? Also, let us know what other DIY homesteading projects you'd like to see covered on Better Homes and Harvests. Happy composting!