Craft a Compelling DIY Homesteading Guide for Better Homes and Harvests: Build a Budget-Friendly Chicken Coop!
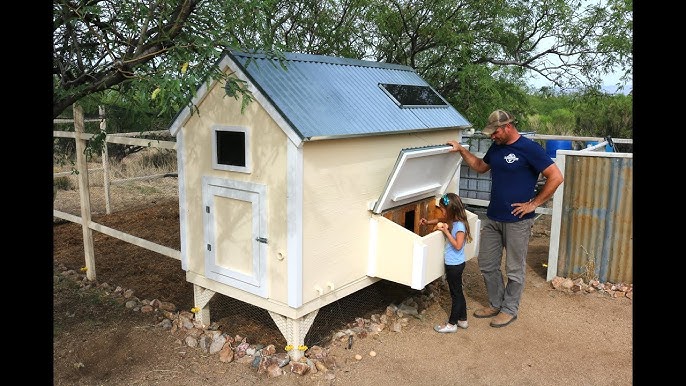
Are you dreaming of farm-fresh eggs every morning, the satisfying clucking of happy hens in your backyard, and a more self-sufficient lifestyle? Raising chickens on your homestead is a fantastic way to achieve these goals. But the initial investment in a chicken coop can be daunting. Fear not! This DIY guide will show you how to build a budget chicken coop using reclaimed materials, saving you money and contributing to a more sustainable homestead. Perfect for beginner DIY homesteading project enthusiasts.

This project is designed for homesteaders with intermediate DIY skills – those comfortable with basic tools and construction techniques. We'll focus on simplicity, affordability, and using what you have available to create a functional and attractive home for your flock. Get ready to roll up your sleeves and build a cheap chicken coop!
Why Build a Budget-Friendly Chicken Coop?
There are numerous benefits to building your own chicken coop:
- Cost Savings: Buying a pre-built coop can be expensive. Using reclaimed materials significantly reduces your expenses. This is especially important for a budget chicken coop.
- Customization: You can tailor the coop to your specific needs and space constraints. This allows you to create the best chicken coop design for your flock.
- Sustainability: Reusing materials keeps them out of landfills and reduces your environmental impact.
- Satisfaction: There's nothing quite like the feeling of accomplishment that comes from building something with your own hands.
- Learning Experience: This project is a great way to expand your DIY skills and learn more about construction.
Planning Your Chicken Coop: Size, Location, and Design
Before you start hammering, careful planning is essential.
- Determine the Size: A good rule of thumb is 4 square feet per chicken inside the coop and 8-10 square feet per chicken in the run. Consider the best chicken coop size for 6 chickens, or however many you plan to keep.
- Choose a Location: Select a well-drained area with partial shade. Protection from prevailing winds is also important. Ensure adequate space for the backyard chicken coop.
- Sketch a Design: A simple rectangular coop with a slanted roof is easiest to build. Include nesting boxes (one per 3-4 hens), roosting bars, and a secure door. Explore various chicken coop plans online for inspiration.
Gathering Your Reclaimed Materials: The Hunt for Treasure
The beauty of this project lies in its resourcefulness. Here are some ideas for sourcing reclaimed wood chicken coop materials:
- Pallets: Businesses often discard pallets, which can be disassembled and used for framing and siding.
- Old Fencing: Damaged or unwanted fencing can be repurposed for the coop walls or run.
- Reclaimed Lumber: Check local salvage yards or construction sites for discarded lumber.
- Old Doors and Windows: These can add character and provide ventilation.
- Scrap Metal: Use for roofing or reinforcing the structure. This helps you get free materials to build a chicken coop.

Important Safety Note: Always wear gloves and eye protection when handling reclaimed materials. Check for nails, staples, and splinters. Treat any wood with signs of rot or insect infestation before using it.
Tools You'll Need
- Safety Glasses
- Gloves
- Measuring Tape
- Pencil
- Circular Saw or Hand Saw
- Drill with Screwdriver Bits
- Hammer
- Level
- Staple Gun (optional, for attaching hardware cloth)
- Wire Cutters (for hardware cloth)
Step-by-Step Guide to Building Your Budget-Friendly Chicken Coop
Now, let's get building!
Step 1: Build the Frame
- Cut the lumber to the desired dimensions for the base, walls, and roof.
- Assemble the base frame using screws or nails. Ensure it's square and level.
- Attach the wall frames to the base. Use a level to ensure they are plumb (vertical).
- Construct the roof frame, incorporating a slight slope for water runoff.

Step 2: Add the Siding
- Attach the reclaimed siding to the wall frames. Overlap the boards slightly to prevent drafts. Pallet wood works well here! Get creative with the reclaimed wood chicken coop design.
- Cut openings for the door and windows.
Step 3: Build the Roof
- Attach reclaimed metal roofing or wooden planks to the roof frame. Overlap the materials to create a watertight seal.
- Consider adding a layer of roofing felt underneath for extra protection.
Step 4: Construct the Nesting Boxes and Roosting Bars
- Build the nesting boxes from scrap wood. A size of 12" x 12" x 12" is generally sufficient.
- Install the nesting boxes inside the coop, near the back.
- Attach the roosting bars at different heights, providing ample space for the chickens to perch.
Step 5: Build the Door and Add Hardware Cloth
- Construct a simple door from reclaimed wood. Attach hinges and a secure latch.
- Cover any openings in the coop with hardware cloth (wire mesh) to protect the chickens from predators. Use a staple gun to attach the hardware cloth securely. The goal is to build a predator-proof chicken coop on a budget.
Step 6: Build the Chicken Run
- Construct a frame for the chicken run using wooden posts and lumber.
- Enclose the run with hardware cloth, burying the bottom edge a few inches to prevent digging predators.
- Attach a door to the run for easy access.
Step 7: Finishing Touches
- Add bedding to the coop floor (straw, wood shavings, or shredded paper).
- Provide food and water for your chickens.
- Admire your handiwork!

Personal Experience and Lessons Learned
When I built my first DIY chicken coop, I underestimated the importance of predator protection. A sneaky raccoon managed to get inside and wreak havoc. I learned the hard way that burying the hardware cloth and using secure latches are crucial. Don't skimp on these details! Also, ensure proper ventilation to prevent moisture build-up inside the coop.
Tips and Tricks for Success
- Start Small: If you're new to construction, begin with a smaller coop and expand later if needed.
- Gather All Your Materials Before You Start: This will save you time and frustration.
- Don't Be Afraid to Ask for Help: If you're stuck, reach out to experienced DIYers in your community.
- Be Patient: Building a chicken coop takes time and effort. Don't get discouraged if you encounter challenges along the way.
- Embrace Imperfection: Remember, it's a budget chicken coop made from reclaimed materials. It doesn't have to be perfect!
The Finished Product and Call to Action
Building a budget-friendly chicken coop using reclaimed materials is a rewarding and cost-effective way to enhance your homestead. Not only will you save money, but you'll also contribute to a more sustainable lifestyle. By following these steps and incorporating your own personal touches, you can create a safe, comfortable, and attractive home for your chickens.
Now it's your turn! Share your own DIY chicken coop experiences in the comments below. What challenges did you face? What tips would you offer to other homesteaders? We'd love to see photos of your creations! Do you have suggestions on how to get free materials to build a chicken coop? Let us know!
For more information on raising chickens and other homesteading topics, visit the Better Homes and Harvests website at [Insert Better Homes and Harvests website link here]. We also encourage you to check out our recommended resources on [affiliate link to chicken coop hardware] and [affiliate link to chicken keeping books].