Compost Like a Pro: Building a Simple Three-Bin System for Homestead Gold
[VISUAL: Vibrant garden healthy plants compost bin background]

Have you ever looked out at your garden and felt that nagging frustration? The soil just isn't cooperating. The plants are struggling despite your best efforts. For many homesteaders, the dream is a thriving, self-sufficient ecosystem, but achieving that dream starts with the foundation: healthy soil. And building healthy soil sustainably often feels like an uphill battle. Enter composting, the alchemist's secret to turning waste into garden gold!
Composting is truly the cornerstone of homestead fertility. It’s more than just throwing your kitchen scraps into a pile; it’s a powerful process that transforms organic waste into nutrient-rich humus, a superfood for your garden. By composting, you're not only reducing your environmental impact but also enriching your soil, saving money on expensive fertilizers, and building resilience against drought and disease. But how can you maximize your composting efforts for a continuous supply of "black gold"? The answer: a three-bin composting system.
This system offers several advantages. It allows for efficient decomposition at different stages, ensuring a continuous supply of usable compost. It's easy to manage, providing distinct areas for fresh waste, active decomposition, and finished compost. And best of all, you can build it yourself with readily available materials! In this guide, we'll walk you through the process of building a simple, effective three-bin composting system that will transform your homestead's fertility. Get ready to unlock the power of compost!
Section 1: Planning Your Three-Bin Compost System: Size, Location, and Materials
[VISUAL: Hand drawn plan sketch compost bins garden landscape]

Before you start swinging a hammer, a little planning goes a long way. Consider these factors to ensure your compost system meets your needs:
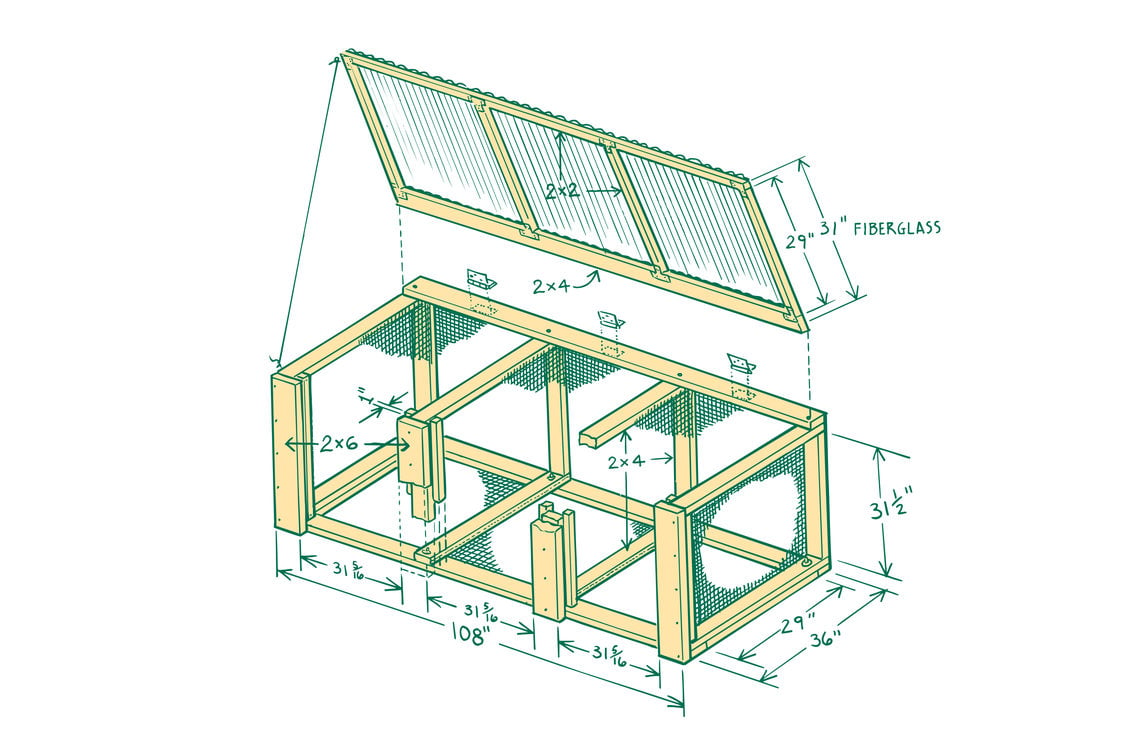
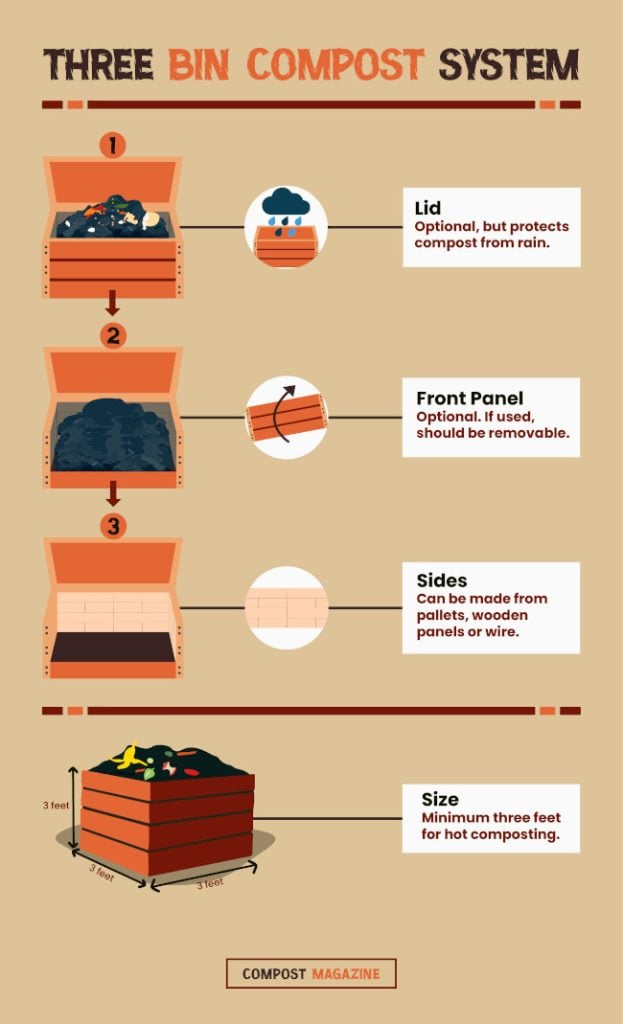
Determining the Right Size: The ideal size depends on your garden size, the amount of organic waste you generate, and the space available. A general rule of thumb is to aim for bins that are approximately 3ft x 3ft x 3ft each. This size is manageable to turn and provides sufficient volume for decomposition. If you have a large garden or generate a lot of waste, you may want to consider larger bins, while smaller homesteads can scale down accordingly.
Choosing the Ideal Location: Location, location, location! Your compost bins should be easily accessible from both your garden and your kitchen. Consider sun exposure (some sun can help warm the pile, but too much can dry it out), proximity to a water source for moistening the pile, and adequate drainage to prevent waterlogging. Convenience is key, or else you might not use the system as consistently as you should. Nobody wants to haul buckets of kitchen scraps across the entire property in the dead of winter!
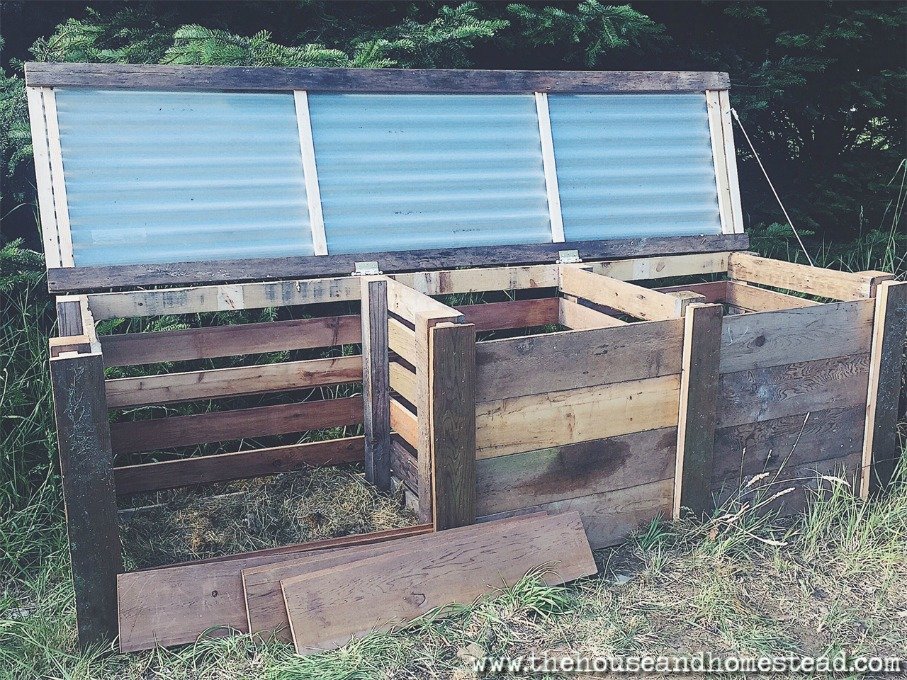
Selecting Affordable Materials: The beauty of a DIY compost system is its cost-effectiveness. Look for reclaimed lumber, such as old pallets or scrap wood, to minimize expenses. Hardware cloth is essential for preventing material loss and deterring rodents. You'll also need posts for support, screws for assembly, and hinges (optional) for creating access doors. Don't be afraid to get creative! If lumber is unavailable, you can use cinder blocks, large durable plastic bins (with ventilation holes!), or even repurposed shipping containers (though these might be overkill for a basic system). Focus on upcycling what you have available!
Tools You'll Need: Gather your tools before you begin. You'll need a hammer, saw (circular saw makes quick work), drill, measuring tape, level, wire cutters, safety glasses, and gloves. A well-prepared toolbox prevents frustration and wasted time.
Careful planning ensures that your compost system is the right size, located in the ideal spot, and built with affordable, readily available materials.
Section 2: Building Your Compost Bins: A Step-by-Step Guide
[VISUAL: Person building compost bin using reclaimed lumber power tools]

Now for the fun part – putting it all together!
Step 1: Preparing the Site: Start by leveling the ground where you plan to build your bins. This ensures stability and prevents the bins from leaning. Mark the outline of each bin on the ground to guide your construction.
Step 2: Constructing the Frames: Assemble the sides, front, and back of each bin. If using reclaimed lumber, cut the pieces to the desired length and join them using screws. When using pallets, you may need to disassemble them first and then reassemble them into the bin frames. Ensure the frames are square and sturdy. A wobbly frame will cause problems later.
Step 3: Adding Hardware Cloth (Optional): Line the inside of the bins with hardware cloth to prevent material loss and deter rodents. Secure the hardware cloth to the frame using staples or nails. Overlap the edges of the hardware cloth to create a tight seal. Using a small mesh size is vital for keeping out pests like rats.
Step 4: Creating Dividers (If Needed): If you want to divide each bin into sections for better organization, build dividers using lumber or hardware cloth. These dividers can help separate different stages of composting.
Step 5: Installing Hinges/Access Doors (Optional): Adding hinges to the front of one bin allows for easy access to the finished compost. You can create a simple door using lumber and hinges, or consider a sliding door made from scrap wood.
Step 6: Reinforcing and Securing: Add extra supports to the corners and along the sides of the bins to ensure they can withstand the weight of the compost. Use screws to reinforce the joints and prevent the bins from collapsing.
Troubleshooting Tips:
- Wobbly Frame: Ensure all connections are tight and square. Add corner braces for extra support.
- Uneven Ground: Level the ground before construction. Use shims to level the bins if necessary.
- Material Shortages: Get creative! Substitute materials or adjust the size of the bins.
By following these step-by-step instructions, you can build a sturdy and functional three-bin compost system that will serve you for years to come.
Section 3: Filling and Managing Your Compost Bins
[VISUAL: Three compost bins various stages decomposition fresh compost]
Now that your bins are built, it's time to start composting! Proper management is essential for creating high-quality compost.
Understanding the "Greens" and "Browns" Ratio: The key to successful composting is maintaining the right balance of "greens" (nitrogen-rich materials) and "browns" (carbon-rich materials). Aim for a ratio of 2:1 or 3:1 browns to greens.
- Greens: Kitchen scraps (fruit and vegetable peels, coffee grounds), grass clippings, fresh weeds.
- Browns: Dried leaves, shredded paper, cardboard, straw, wood chips.
Layering Materials: Layer green and brown materials in the first bin. Start with a layer of browns to provide drainage and aeration. Add a layer of greens, followed by another layer of browns. Continue layering until the bin is full.
Turning and Aerating: Turning the compost regularly provides oxygen, which is essential for decomposition. Turn the compost every few days or once a week, depending on the temperature and moisture levels.
Monitoring Moisture Levels: The compost should be moist but not soggy. If it's too dry, add water. If it's too wet, add more brown materials.
Troubleshooting Common Issues:
- Foul Odors: This usually indicates anaerobic conditions (lack of oxygen). Turn the compost more frequently.
- Slow Decomposition: This could be due to a lack of moisture or an imbalance of greens and browns. Adjust accordingly.
- Pest Infestations: Ensure the hardware cloth is properly secured. Add more brown materials to cover food scraps.
Moving the Compost: Once the first bin is full, let it decompose for several weeks or months. Then, move the partially decomposed compost to the second bin. This allows the composting process to continue in a separate area. Finally, move the compost from the second bin to the third bin, where it can fully mature into finished compost.
Section 4: Harvesting and Using Your Compost "Black Gold"
[VISUAL: Gardener applying finished compost garden bed smiling]
It's time to reap the rewards of your hard work!
Signs of Finished Compost: Finished compost should be dark brown or black in color, crumbly in texture, and have a sweet, earthy smell. You should no longer be able to recognize the original materials.
Screening Compost (Optional): Use a screen to remove any large chunks or undecomposed materials. This creates a finer compost that is easier to work with.
Ways to Use Compost:
- Amending Garden Soil: Mix compost into your garden soil before planting to improve soil structure, water retention, and nutrient availability.
- Top-Dressing Lawns: Spread a thin layer of compost over your lawn to fertilize it and improve its health.
- Creating Potting Mix: Mix compost with other ingredients, such as peat moss and perlite, to create a nutrient-rich potting mix for your container plants.
- Making Compost Tea: Steep compost in water to create a nutrient-rich liquid fertilizer.
The Benefits of Compost: Compost improves soil structure, increases water retention, and provides essential nutrients for plant growth. It also helps suppress plant diseases and pests.
Harvesting and using your finished compost will enrich your soil, boost plant growth, and reduce your reliance on synthetic fertilizers.
Conclusion: The Cycle of Homestead Life
[VISUAL: close up rich dark compost hands holding ]
Composting is more than just a way to dispose of waste; it's a vital part of the cycle of homestead life. A three-bin composting system offers an efficient, manageable, and affordable way to transform organic waste into valuable soil amendments. By building your own system, you're not only reducing your environmental impact but also creating a more self-sufficient and sustainable homestead. It is a zero waste lifestyle. You're creating a thriving ecosystem, one bucket of kitchen scraps at a time. Embracing composting is about embracing resilience, self-reliance, and a deep connection to the land. Start building your compost system today, and watch your garden flourish!
Ready to build your own compost system? Share your plans and progress in the comments below!