Build Your Own Homestead Root Cellar: A DIY Guide for Year-Round Food Storage
Imagine biting into a crisp apple in the middle of winter, its flavor a vibrant reminder of summer's bounty. Or perhaps enjoying roasted root vegetables harvested from your own garden, even as snow blankets the landscape. A root cellar makes this dream a reality.
But what exactly is a root cellar? It's essentially a naturally cool and humid environment designed for storing fruits and vegetables, allowing you to extend the harvest season and enjoy fresh, homegrown produce year-round.
The benefits are numerous: reduced reliance on grocery stores, minimized food waste (say goodbye to wilted lettuce!), preserved nutrients (far better than freezing or canning for many items), and significant cost savings (think of all those out-of-season produce purchases you can avoid!).
The idea of building a root cellar might seem daunting, conjuring images of complex construction projects. But fear not! This guide will break down the process into manageable steps, proving that building a budget-friendly root cellar is within reach for any homesteader with basic DIY skills. And while this guide focuses on constructing a new root cellar, many of the same principles apply if you're looking to renovate an existing one. Get ready to unlock a new level of self-sufficiency!

Section 1: Planning Your Root Cellar: Location, Size, and Design
The foundation of any successful root cellar is careful planning. Before you even think about picking up a shovel, consider these key factors: location, size, and design.
Location, Location, Location:
The ideal location for your root cellar is one that naturally provides stable temperature and humidity. This usually means underground, partially underground (earth bermed), or in a cool, dark corner of a basement.
- Underground: This offers the most stable temperature, as the earth acts as a natural insulator. The deeper you go, the more consistent the temperature.
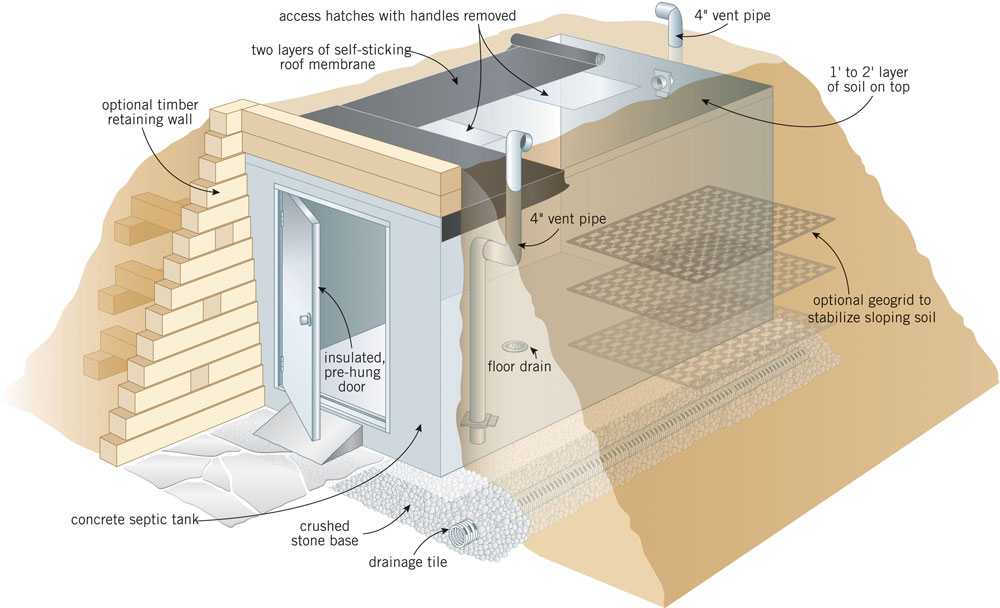
- Earth Bermed: This involves building a structure above ground and then covering it with soil, mimicking the insulating effect of an underground cellar.
- Basement: If you have a cool, dark basement, this can be a convenient option. However, be mindful of potential temperature fluctuations due to heating systems.
Consider the water table in your area. You don't want your root cellar to become a swimming pool! Good drainage is essential.
Size Matters:
How much space do you need? This depends on the size of your garden and how much produce you plan to store. A good rule of thumb is to start small and expand if necessary. Overestimating space can lead to inefficient use and temperature control issues.
Think about the types of produce you'll be storing. Some items, like potatoes and apples, require more space than others. Also, consider how long you want to store your harvest. If you plan to keep food through the entire winter, you'll need more space than if you're just looking to extend the season a few months.
Design Considerations:
The design of your root cellar should prioritize ventilation, insulation, and drainage.
- Ventilation: Crucial for controlling humidity and preventing spoilage. Natural ventilation involves strategically placed inlet and outlet pipes that allow air to circulate. Forced ventilation uses a fan to improve airflow, but it's generally not necessary for smaller cellars.
- Insulation: Helps maintain a stable temperature, preventing the cellar from getting too hot in the summer or too cold in the winter. Earth itself provides excellent insulation, but you can also use materials like rigid foam insulation.
- Drainage: Prevents water damage. Ensure the site is well-drained and consider adding a drainage system around the foundation.
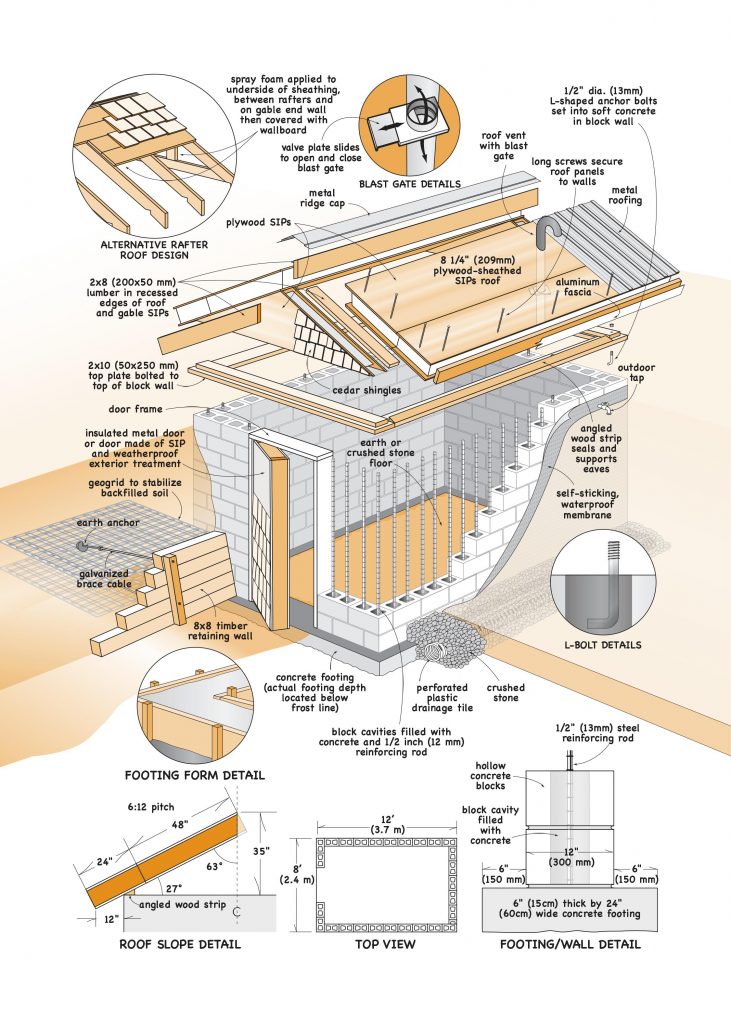
- Materials: Options include wood, concrete, stone, or a combination. Wood is relatively inexpensive and easy to work with, but it's susceptible to rot. Concrete and stone are more durable but require more effort to build.
- Shelving: Opt for wood, metal, or wire shelving, depending on your budget and aesthetic preferences. Consider adjustable shelving to accommodate different sizes of produce.
Finally, be sure to check local building codes and regulations before starting any construction. You may need to obtain permits, especially for underground structures. Don't skip this step!

Section 2: Gathering Your Materials and Tools: Budget-Friendly Options
Once you have a plan, it's time to gather your materials and tools. Here's a comprehensive list to get you started, along with some cost-saving tips.
Materials List:
- Framing Lumber: Pressure-treated lumber is recommended for ground contact. (Approx. cost: $5-$10 per board)
- Concrete Blocks: For building the walls (if using concrete). (Approx. cost: $2-$5 per block)
- Insulation: Rigid foam insulation or fiberglass batts. (Approx. cost: $1-$3 per square foot)
- Ventilation Pipes: PVC or metal pipes. (Approx. cost: $10-$20 per pipe)
- Gravel: For drainage around the foundation. (Approx. cost: $50-$100 per cubic yard)
- Plastic Sheeting: For waterproofing. (Approx. cost: $20-$50 per roll)
- Door: A sturdy, insulated door. (Approx. cost: $100-$500)
- Shelving Materials: Lumber, metal, or wire. (Approx. cost: Varies depending on material)
- Fasteners: Screws, nails, bolts. (Approx. cost: $20-$50)
Tools List:
- Shovel: For excavation.
- Level: Essential for ensuring walls and floors are level.
- Measuring Tape: For accurate measurements.
- Saw: For cutting lumber.
- Drill: For drilling holes and driving screws.
- Hammer: For driving nails.
- Concrete Mixer: (If using concrete) Renting is often more cost-effective than buying.
- Wheelbarrow: For moving materials.
Safety Gear:
- Gloves: Protect your hands from cuts and abrasions.
- Safety Glasses: Protect your eyes from dust and debris.
- Appropriate Footwear: Sturdy boots are essential.
Budget-Friendly Tips:
- Reclaimed Lumber: Salvage lumber from old buildings or construction sites.
- Repurposed Concrete Blocks: Check with local contractors for leftover blocks.
- DIY Insulation: Consider using straw bales or other natural materials for insulation.
- Rent or Borrow Tools: Don't buy tools you'll only use once.
- Shop Around: Compare prices at different hardware stores and online retailers.
Remember to prioritize safety when working with tools and materials. Always wear appropriate safety gear and follow manufacturer's instructions.

Section 3: Step-by-Step Construction: Building the Root Cellar
Now for the exciting part: building your root cellar! This section provides a general overview of the construction process. Keep in mind that specific steps may vary depending on your chosen design and materials.
Step 1: Foundation (If Needed):
- Excavation: Dig a hole to the desired depth. Ensure the bottom of the hole is level.
- Leveling: Compact the soil and add a layer of gravel for drainage.
- Pouring Concrete (Optional): Pour a concrete slab for a solid foundation.
Step 2: Walls:
- Laying Concrete Blocks: Stack the blocks to form the walls, using mortar to bind them together. Ensure the walls are level and plumb.
- Building Wooden Framing: Construct a wooden frame for the walls. Use pressure-treated lumber for ground contact.
- Waterproofing: Apply a waterproof coating to the exterior walls to prevent moisture from seeping in.
Step 3: Roof:
- Building a Wooden Frame: Construct a wooden frame for the roof, ensuring it's strong enough to support the weight of the soil (for earth-bermed cellars).
- Insulation: Add insulation between the roof rafters.
- Waterproofing: Apply a waterproof membrane to the roof.
- Adding Soil (For Earth-Bermed Cellars): Cover the roof with a layer of soil, gradually increasing the depth. You can even plant vegetation on top for added insulation and aesthetic appeal.
Step 4: Ventilation System:
- Installing Ventilation Pipes: Install inlet and outlet pipes, positioning them to allow for natural airflow.
- Adding Screens: Cover the pipe openings with screens to prevent pests from entering.
Step 5: Door and Entryway:
- Building or Purchasing a Door: Choose a sturdy, insulated door that fits tightly.
- Creating an Entry Porch: Build a small entry porch or landing to provide shelter from the elements.

Important Note: This is a simplified overview. For detailed construction instructions, consult books, online resources, or experienced builders.
Section 4: Interior Finishing and Organization: Setting Up for Success
With the basic structure in place, it's time to focus on the interior. This is where you'll create an environment that's conducive to long-term food storage.
Insulation:
If your cellar experiences significant temperature fluctuations, consider adding interior insulation. Rigid foam insulation is a good option, as it's moisture-resistant and easy to install.
Shelving:
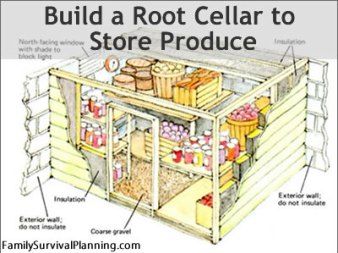
Install shelving units to maximize storage space. Consider adjustable shelving to accommodate different sizes of produce.
- Wooden Shelving: A classic choice, but be sure to use untreated lumber to avoid contaminating your food.
- Metal Shelving: Durable and easy to clean.
- Wire Shelving: Allows for good air circulation.
Flooring:
- Gravel: Provides good drainage and helps maintain humidity.
- Dirt: A natural and inexpensive option, but it can be difficult to keep clean.
- Concrete: Easy to clean, but it can be cold and damp.
Lighting:
Install low-wattage lighting to illuminate the interior. Consider solar-powered options to reduce energy consumption.
Humidity Control:
Maintaining the right humidity level is crucial for preserving your produce.
- Hygrometer: Use a hygrometer to monitor humidity levels.
- Ventilation: Adjust ventilation as needed to increase or decrease humidity.
- Water Source: Add a bucket of water or damp sand if humidity is too low.
Remember that different types of produce have different storage requirements. Research the ideal temperature and humidity levels for each item you plan to store.

Section 5: Troubleshooting Common Root Cellar Problems
Even with careful planning, you may encounter some challenges along the way. Here's how to troubleshoot some common root cellar problems.
Excessive Moisture:
- Causes: Leaks, condensation, poor drainage.
- Solutions: Improve drainage, add more ventilation, repair leaks, use a dehumidifier (as a last resort).
Insufficient Ventilation:
- Signs: Mold growth, unpleasant odors.
- Solutions: Increase ventilation pipe size, add a fan.
Temperature Fluctuations:
- Causes: Inadequate insulation, extreme weather conditions.
- Solutions: Add insulation, modify the ventilation system.
Pest Control:
- Prevention: Use screens, traps, and proper sanitation.
- Control: Remove infested produce, use natural pest control methods.
Produce Spoilage:
- Prevention: Proper storage techniques, regular inspection.
- Control: Remove spoiled produce promptly.

Be prepared to adjust your root cellar setup as needed to maintain optimal conditions. Monitoring temperature and humidity levels regularly will help you identify and address potential problems early on.
Conclusion: Reap the Rewards of Your DIY Root Cellar
Building a root cellar is an investment in your self-sufficiency and food security. It allows you to extend the harvest season, reduce food waste, enjoy fresher produce, and save money. While the construction process may require some effort, the long-term rewards are well worth it. So, gather your materials, roll up your sleeves, and get ready to reap the benefits of your very own DIY root cellar!
Don't forget to download our free root cellar storage guide for tips on keeping your food fresh all winter long!