Build a FREE Solar Food Dehydrator: Preserve Your Homestead Harvest!
Are you tired of watching your garden bounty go to waste? Do you dream of stocking your pantry with healthy, homegrown snacks year-round? At Better Homes and Harvests, we understand the joys and challenges of homesteading. That's why we're excited to share a game-changing DIY project that will revolutionize your food preservation efforts: building a solar food dehydrator from upcycled materials! This project not only helps you reduce food waste and your grocery bill but also empowers you to create a more sustainable and resilient homestead. Ditch the expensive store-bought snacks and embrace the delicious, nutritious rewards of solar food dehydration!

Why a Solar Food Dehydrator? The Homesteading Benefits
Before we dive into the how-to, let's talk about the why. Why should you spend your precious time building a solar dehydrator? The answer is simple: self-sufficiency and sustainability.
- Food Preservation: Dehydrating food is an ancient and effective method of preservation. It removes moisture, preventing spoilage and extending the shelf life of your fruits, vegetables, herbs, and even meats.
- Reduce Food Waste: No more watching your hard-earned garden produce rot in the crisper drawer! Dehydrate excess harvests and enjoy them throughout the year. This directly combats food waste, a major concern for both environmental and economic reasons.
- Save Money: Say goodbye to expensive store-bought dried snacks. With a solar dehydrator, you can create your own healthy and delicious snacks using your garden's bounty. Think apple chips, dried tomatoes, herb blends, and even jerky!
- Sustainable Living: Solar dehydration is a completely off-grid method of food preservation. By harnessing the power of the sun, you're reducing your reliance on electricity and fossil fuels.
- Healthy Snacks: Control exactly what goes into your dehydrated snacks. No added sugars, preservatives, or artificial flavors. Just pure, natural goodness. For more information on sustainable living practices, check out our article on Off-Grid Living Tips.
Gathering Your Upcycled Materials: Keeping Costs Down
One of the best things about this project is that it can be done on a shoestring budget. The key is to embrace upcycling! Here's a list of materials you'll need, along with tips on where to find them for free or at a low cost.
Materials List:
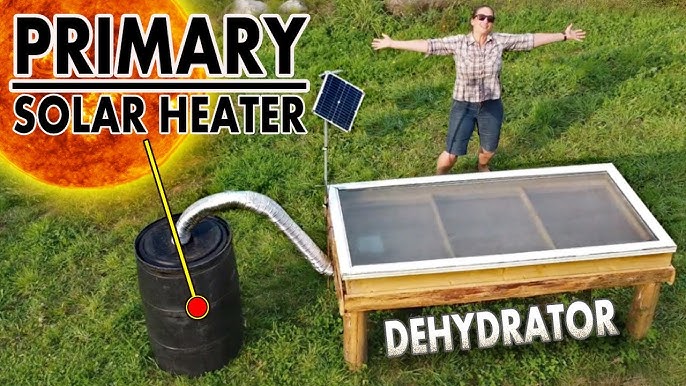
- Old Window(s): This will be the "greenhouse" of your dehydrator, trapping solar heat. Look for discarded windows at construction sites, salvage yards, or ask friends and neighbors. Estimated Cost: Free - $20
- Scrap Wood: You'll need wood for the frame, base, and supports. Pallets, old fence boards, or leftover lumber from other projects are ideal. Estimated Cost: Free - $10
- Screening: For the drying trays. Old window screens, insect screens, or even food-grade mesh are great options. Estimated Cost: Free - $15
- Black Paint (Non-Toxic): Black absorbs heat, which is essential for the drying process. Use a non-toxic paint that is safe for food contact if you plan to paint the interior. Estimated Cost: $5 - $10
- Clear Polycarbonate Sheet (Optional): If your window has cracks or is missing glass, you can use a clear polycarbonate sheet to seal it. Estimated Cost: $10 - $20
- Hardware: Screws, nails, hinges, and latches. Use what you have on hand or purchase them cheaply at a hardware store. Estimated Cost: $5 - $10
- Insulation (Optional): To improve efficiency, you can insulate the back and sides of the dehydrator with scrap insulation, cardboard, or even old blankets. Estimated Cost: Free
Tools You'll Need:
- Saw (hand saw or circular saw)
- Drill
- Screwdriver
- Hammer
- Measuring Tape
- Square
- Staple Gun (for attaching screen)
- Safety Glasses
- Gloves
Step-by-Step Guide: Building Your Solar Dehydrator
Now for the fun part! Here's a detailed guide to building your solar food dehydrator. Remember to adjust the measurements to fit the size of your window(s).
Step 1: Build the Frame
- Measure your window: Determine the length, width, and thickness of your window.
- Cut the wood: Cut the scrap wood to create a frame that snugly fits around the window. The frame should be deep enough to accommodate the window's thickness and leave some room for airflow.
- Assemble the frame: Screw or nail the wood pieces together to create a sturdy frame. Ensure the corners are square.
Step 2: Create the Base
- Build a box: Create a box-shaped base for the frame to sit on. This will elevate the dehydrator and improve airflow. The dimensions of the base should be slightly larger than the frame.
- Attach the frame to the base: Securely attach the frame to the base using screws or nails.
Step 3: Angle for Maximum Sun Exposure
- Determine the optimal angle: The ideal angle for your dehydrator will depend on your location and the time of year. A general rule of thumb is to match your latitude. You can use scrap wood to create supports that prop the dehydrator up at the desired angle.
- Attach the supports: Securely attach the supports to the base.
Step 4: Build the Drying Trays
- Cut the wood: Cut the wood to create frames for the drying trays. The trays should be slightly smaller than the interior dimensions of the dehydrator.
- Assemble the frames: Screw or nail the wood pieces together to create the tray frames.
- Attach the screening: Stretch the screening tightly over the tray frames and secure it with a staple gun. Ensure the screening is food-grade and clean.
Step 5: Paint and Insulate (Optional)
- Paint the interior: Paint the inside of the dehydrator black to maximize heat absorption. Use a non-toxic paint that is safe for food contact.
- Insulate the back and sides: Attach insulation to the back and sides of the dehydrator to improve efficiency.
Step 6: Add Ventilation
- Create vents: Cut small holes at the bottom and top of the dehydrator to allow for airflow. This is crucial for removing moisture and preventing mold growth.
- Cover the vents (optional): Cover the vents with screen to prevent insects from entering.
Step 7: Assemble and Test
- Place the window in the frame: Carefully place the window in the frame. Secure it with screws or nails if necessary.
- Test the dehydrator: Place a thermometer inside the dehydrator and monitor the temperature on a sunny day. You should aim for a temperature between 120°F and 140°F (49°C and 60°C) for optimal drying.

Troubleshooting Tips and Common Mistakes
- Not enough airflow: Airflow is critical for successful dehydration. If your food is not drying properly, add more ventilation holes.
- Too much heat: If the temperature inside the dehydrator gets too high, partially cover the window with a piece of cardboard to reduce the amount of sunlight entering.
- Uneven drying: Rotate the trays regularly to ensure even drying.
- Mold growth: Mold growth indicates poor airflow or insufficient drying. Discard any moldy food and improve ventilation.
- Using toxic materials: Always use non-toxic materials that are safe for food contact.
Dehydrating Food: Tips and Tricks
- Prepare your food: Wash and slice your food into thin, even pieces. This will ensure even drying.
- Arrange the food: Arrange the food on the drying trays in a single layer, leaving space between pieces for airflow.
- Monitor the drying process: Check the food regularly and remove it when it is dry and leathery.
- Store the dehydrated food: Store the dehydrated food in airtight containers in a cool, dark place.

Foods to Dehydrate: Endless Possibilities
The possibilities are endless when it comes to dehydrating food! Here are some ideas to get you started:
- Fruits: Apples, bananas, berries, grapes, peaches, plums, strawberries
- Vegetables: Tomatoes, peppers, onions, carrots, zucchini, mushrooms
- Herbs: Basil, oregano, thyme, rosemary, mint
- Meat: Beef jerky, venison jerky, turkey jerky
Dehydrated Tomato Recipe
Ingredients:
- Tomatoes
- Salt and Pepper
- Herbs of choice (oregano, basil, thyme)
Instructions:
- Slice tomatoes thinly
- Lay tomato slices on dehydrator trays
- Sprinkle with salt, pepper, and herbs.
- Dehydrate 6-12 hours (or until dry).
- Enjoy!
Share Your Dehydrator Project!
We'd love to see your solar dehydrator projects! Share your photos and videos on social media using the hashtag #BetterHomesAndHarvests. Ask questions and share your experiences in the comments below!
Conclusion: Embracing Self-Sufficiency
Building a solar food dehydrator from upcycled materials is a rewarding project that will empower you to embrace self-sufficiency and sustainability on your homestead. By reducing food waste, saving money, and creating healthy snacks, you'll be taking a step towards a more resilient and empowered lifestyle. So, gather your materials, roll up your sleeves, and start building your own solar food dehydrator today! For information on solar options for your homestead, check out our other article on solar battery storage.