Beat the Freeze: Building a Reclaimed Lumber Cold-Frame Greenhouse for Homestead Success

As homesteaders, we're always looking for ways to extend our growing season, protect our precious plants from unexpected frosts, and generally increase our self-sufficiency. One of the simplest, most rewarding projects for achieving just that is building a cold-frame greenhouse. And what's even better? You can construct it using reclaimed lumber, giving new life to discarded materials and saving yourself some money in the process. This guide will walk you through the step-by-step process of building a sturdy and efficient cold-frame, ready to nurture your seedlings and overwinter your hardiest crops. Let's get started on this rewarding DIY homestead project that will boost your resilience and bring you closer to your self-sufficiency goals!
Why Build a Cold-Frame Greenhouse?
Before we dive into the construction details, let's quickly recap why a cold-frame is such a valuable asset to any homestead, urban homestead, or backyard homestead.
- Extended Growing Season: Protect plants from early frosts and extend your harvest well into the fall and even winter.
- Seed Starting Success: Create the perfect environment for starting seeds early in the spring.
- Hardening Off Seedlings: Acclimate tender seedlings to outdoor conditions before transplanting.
- Overwintering Plants: Shelter cold-hardy plants from harsh winter weather.
- Increased Self-Sufficiency: Grow more of your own food, reducing your reliance on store-bought produce.
- Cost-Effective: A DIY cold frame is a budget-friendly alternative to a full-sized greenhouse, especially when using reclaimed materials.
Planning Your Cold-Frame
Consider the size and location. Ideally, choose a sunny spot with southern exposure, protected from harsh winds. A standard size of 4 feet wide by 6 feet long is a good starting point, but you can adjust based on your needs and available materials. Decide on a single or double-lid design depending on the range of plants that need sheltering.
Gathering Your Materials: Reclaimed Lumber and More
Sourcing reclaimed lumber is a great way to save money and reduce waste. Look for old barns, fences, or construction sites offering discarded materials. Cedar, redwood, or pressure-treated lumber are excellent choices for their weather resistance.
Material List:
- Reclaimed Lumber:
- Two 4x4 pressure-treated posts (8 feet long) for the base corners.
- Two 2x6 cedar planks (6 feet long) for the front and back frame.
- Two 2x6 cedar planks (4 feet long) for the side frames.
- Two 2x4 cedar planks (4 feet long) for the lid frame.
- Two 2x4 cedar planks (6 feet long) for the lid frame.
- Glazing:
- Two polycarbonate panels (4mm thickness, UV protection rating) – cut to size (approximately 3'x6' each)
- Hardware:
- 3-inch exterior wood screws
- 2-inch exterior wood screws
- Two heavy-duty hinges
- One latch or hook-and-eye closure
- Construction adhesive (optional)
- Tools:
- Circular saw or hand saw
- Drill with various drill bits
- Screwdriver
- Measuring tape
- Level
- Safety glasses
- Gloves
- Square
- Staple gun (for attaching the polycarbonate)
- Utility knife
Step-by-Step Construction Guide
Prepare the Lumber: Start by cleaning the reclaimed lumber. Remove any nails, screws, or debris. Cut the lumber to the required lengths according to the material list. If the lumber is rough, sand it down for a smoother finish.
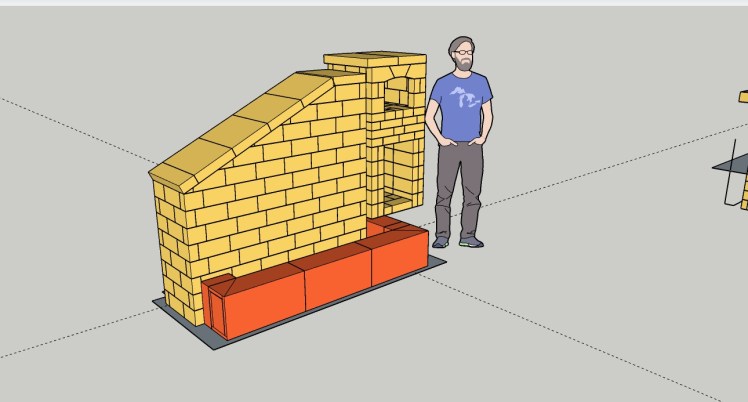
Build the Base Frame: Assemble the base frame using the 4x4 posts and the 2x6 cedar planks. The 4x4 posts should be inset a few inches so that they create "feet" for the coldframe. Fasten the planks to the posts using 3-inch exterior wood screws. Ensure the frame is square and level. Consider using construction adhesive for added strength.
Construct the Lid Frame: Build the lid frame using the 2x4 cedar planks. Use 2-inch exterior wood screws to assemble the frame. Again, ensure the frame is square.
Attach the Polycarbonate Panels: Carefully measure and cut the polycarbonate panels to fit the lid frame. Secure the panels to the frame using a staple gun. Overlap the edges of the panels slightly to prevent water leakage. Silicone caulk can also be used to seal the polycarbonate to the frame for added weather protection.
Attach the Lid to the Base: Position the lid frame on top of the base frame. Attach the heavy-duty hinges to connect the lid to the back of the base frame. Make sure the lid opens and closes smoothly.
Install the Latch: Install a latch or hook-and-eye closure on the front of the cold frame to secure the lid when closed.
Prepare the Soil: Now that the structure is complete, it's time to prepare the soil inside the cold frame. Remove any weeds or debris from the area. Amend the soil with compost or other organic matter to improve drainage and fertility.
Install Ventilation Supports: In order to keep the cold frame from overheating, simple props can be cut and installed into the frame to allow for venting on warmer days.
Technical Specifications & Dimensions:
- Overall Dimensions: 4 feet (width) x 6 feet (length) x 2 feet (height at the back, sloping down to 1 foot at the front). This slope maximizes sunlight exposure.
- Lid Angle: The lid should be angled to optimize sunlight capture. A 20-30 degree angle is ideal.
- Polycarbonate Thickness: 4mm (provides good insulation and light transmission)
- Post Depth: Sink the 4x4 posts at least 1 foot into the ground for stability.
Troubleshooting Tips
- Lid Won't Close Properly: Check the alignment of the hinges and the frame. Adjust as needed.
- Water Leakage: Seal any gaps between the polycarbonate panels and the frame with silicone caulk. Ensure the panels are properly overlapped.
- Overheating: Provide adequate ventilation by propping open the lid on warm days. Consider adding automatic vent openers.
- Cold Frame Not Heating Up: Ensure the cold frame is located in a sunny spot. Consider adding a dark-colored mulch to absorb more heat.
Integrating Your Cold-Frame into the Homestead
Once your cold-frame greenhouse is built, consider how it integrates with your overall homestead plan. Are you using it for seed starting, extending the season for certain vegetables, or overwintering herbs?
- Seed Starting: Sow seeds indoors 6-8 weeks before the last expected frost and then transfer the seedlings to your cold frame to harden them off before planting them in the garden.
- Extending the Season: Plant cold-hardy vegetables like spinach, kale, lettuce, and chard in the cold frame in late summer for a fall and winter harvest.
- Overwintering: Protect tender herbs like rosemary and thyme from freezing temperatures by overwintering them in the cold frame.

Maintaining Your Cold-Frame
Regular maintenance will ensure your cold-frame lasts for years to come.
- Clean the Glazing: Regularly clean the polycarbonate panels to maximize light transmission.
- Check for Leaks: Inspect the cold frame for leaks and seal them as needed.
- Replace Damaged Lumber: Replace any damaged or rotting lumber promptly.
- Monitor Soil Conditions: Regularly check the soil moisture and fertility levels.
Safety Precautions
- Always wear safety glasses and gloves when working with lumber and tools.
- Use caution when cutting and handling polycarbonate panels, as the edges can be sharp.
- Be careful when lifting heavy lumber and assembled cold frame components.
- If using power tools, follow the manufacturer's instructions and safety guidelines.
The Satisfaction of Self-Sufficiency
Building a cold-frame greenhouse with reclaimed lumber is more than just a DIY project; it's an investment in your homestead's resilience and self-sufficiency. By extending your growing season and protecting your plants from the elements, you'll be able to grow more of your own food and reduce your reliance on external sources. And there's a special satisfaction in knowing that you built it yourself, using recycled materials and your own two hands. So, gather your materials, put on your safety glasses, and get ready to enjoy the fruits (and vegetables!) of your labor. Happy homesteading!