Beat the Freeze: Building a DIY Passive Solar Chicken Coop Greenhouse for Winter Greens (and Happy Hens!)
Winter on the homestead in USDA Zones 3-5 presents unique challenges. The growing season shrinks, the snow piles up, and keeping livestock comfortable and productive becomes a daily focus. But what if you could address several of these challenges with one clever DIY project? Enter the passive solar chicken coop greenhouse – a simple extension that provides your chickens with a warmer, brighter winter haven while simultaneously allowing you to grow fresh greens, even when the landscape is blanketed in snow. This project perfectly blends animal husbandry and cold-climate gardening, enhancing your winter homesteading efforts.
This guide will walk you through building a small, lean-to style greenhouse attached to an existing chicken coop. This is a moderately ambitious project, requiring basic carpentry skills and access to common tools. However, the rewards – fresh eggs, happy hens, and homegrown salads in January – are well worth the effort. This project is perfect for enhancing your self-sufficiency during the colder months.

Why a Chicken Coop Greenhouse?
Before we dive into the building process, let's explore the benefits of this unique homesteading synergy:
- Extended Growing Season: A passive solar greenhouse captures the sun's energy, creating a warmer microclimate for growing greens like spinach, kale, lettuce, and even herbs throughout the winter.
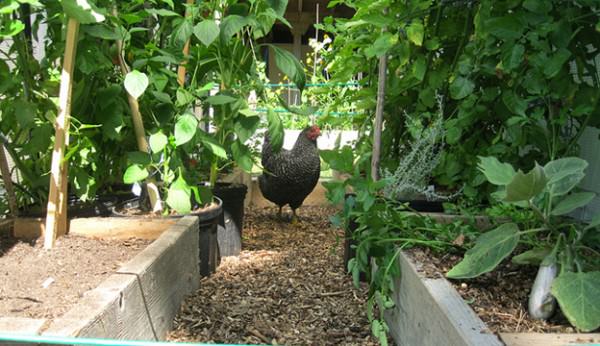
- Happier, Healthier Hens: Chickens need light for egg production and overall well-being. The greenhouse provides a bright, sunny space for them to scratch and dust bathe, improving their quality of life during the dark winter months.
- Reduced Feed Costs: Allowing your chickens access to fresh greens reduces their reliance on commercial feed, saving you money. They’ll enjoy pecking at the plants, and you'll appreciate the decreased feed bill.
- Waste Management: The greenhouse environment helps to break down chicken manure, reducing odors and creating a valuable compost amendment for your garden in the spring. This improves your homestead's overall sustainability. (See our guide on composting chicken manure for more details: example.com/composting-chicken-manure)
- Heat Retention for Coop: The greenhouse acts as a buffer, helping to insulate the coop and retain heat, reducing the risk of frostbite for your chickens in extremely cold climates.
Planning Your Chicken Coop Greenhouse
Careful planning is crucial for a successful project. Consider the following factors:
- Location: Choose a south-facing wall of your chicken coop to maximize sunlight exposure. Ensure the area is relatively sheltered from prevailing winter winds.
- Size: The size of your greenhouse will depend on the size of your chicken coop and your desired growing area. A good starting point is an 8ft wide x 4ft deep lean-to structure.
- Materials: Opt for durable, weather-resistant materials that can withstand the rigors of winter. Consider using reclaimed materials to save money and reduce your environmental impact.
- Ventilation: Proper ventilation is essential to prevent overheating and excessive humidity. Plan for vents that can be opened and closed as needed.
- Chicken Access: Design a secure opening between the coop and the greenhouse that allows chickens to move freely but prevents them from escaping into your main garden.
Materials List (Approximate Costs)
- Lumber:
- 4x4 pressure-treated posts (4): $40
- 2x4 lumber for framing: $80
- 1x4 lumber for trim: $20
- Glazing:
- Polycarbonate panels (8mm twin-wall): $150 (Consider using recycled windows if available)
- Fasteners:
- Screws, nails, bolts: $30
- Hardware:
- Hinges, latches, vent hardware: $20
- Insulation:
- Rigid foam insulation (for back wall): $40
- Miscellaneous:
- Gravel for drainage: $20
- Door (reclaimed or new): $30
- Black paint (for thermal mass): $15
- Total Estimated Cost: $445 (This is an estimate; costs may vary depending on material choices and availability.)
Sourcing Suggestions:
- Lumber and Hardware: Your local hardware store (e.g., Home Depot, Lowe's)
- Polycarbonate Panels: Greenhouse supply companies (e.g., Greenhouse Megastore https://www.greenhousemegastore.com/)
- Reclaimed Materials: Local salvage yards, online marketplaces (e.g., Craigslist, Facebook Marketplace)
Step-by-Step Construction Guide
Step 1: Prepare the Site
Clear the area where the greenhouse will be built. Ensure the ground is level and well-drained. Add a layer of gravel to improve drainage.
Step 2: Build the Frame
Construct a rectangular frame using the 2x4 lumber. The frame should be attached securely to the existing chicken coop wall. Use pressure-treated 4x4 posts for added support, especially if your area experiences heavy snow loads. Ensure the frame is square and level before proceeding.

Step 3: Insulate the Back Wall
The north-facing wall (the existing chicken coop wall) should be well-insulated to prevent heat loss. Attach rigid foam insulation to the inside of the frame. Seal all seams with tape to create an airtight barrier.
Step 4: Install the Glazing
Cut the polycarbonate panels to size and attach them to the frame using screws and washers. Overlap the panels slightly to prevent leaks. Ensure the panels are securely fastened to withstand wind and snow.

Step 5: Build the Door and Vents
Construct a simple door using 2x4 lumber and hinges. Install a latch to keep the door securely closed. Create vents near the top of the greenhouse to allow for ventilation. Use hinges and latches to make the vents adjustable.
Step 6: Add Thermal Mass
Thermal mass helps to regulate temperature fluctuations inside the greenhouse. Paint the inside of the chicken coop wall with black paint to absorb and store solar heat. You can also add containers of water, dark-colored rocks, or concrete blocks to increase thermal mass.

Step 7: Create Chicken Access
Cut an opening in the chicken coop wall to allow chickens access to the greenhouse. Install a small door or flap that can be closed to separate the chickens from the greenhouse when needed. This is useful if you want to protect your plants from being eaten or scratched up.
Step 8: Planting and Finishing Touches
Add soil and plant your winter greens. Install shelves or hanging baskets to maximize growing space. Monitor the temperature and humidity inside the greenhouse and adjust the vents as needed.
Safety Precautions
- Wear safety glasses when cutting lumber or polycarbonate panels.
- Use caution when working with power tools.
- Ensure the structure is stable and can withstand wind and snow loads.
- Properly ventilate the greenhouse to prevent overheating.
- Monitor the chickens for signs of overheating or stress.
Potential Pitfalls
- Overheating: Greenhouses can quickly overheat on sunny days, even in winter. Ensure adequate ventilation to prevent this.
- Excessive Humidity: High humidity can lead to fungal diseases. Provide good airflow and avoid overwatering.
- Chicken Damage: Chickens may damage or eat your plants. Protect vulnerable plants with fencing or netting.
- Inadequate Sunlight: If the greenhouse is shaded for part of the day, supplement with artificial lighting.
Personal Anecdote
Last winter, I built a similar chicken coop greenhouse and was amazed at the results. My hens were noticeably happier and laid more eggs than in previous winters. I also harvested a steady supply of fresh spinach and kale, which added a much-needed boost of vitamins to our winter diet. The project required some initial effort, but the long-term benefits were well worth it. Plus, the satisfaction of creating a self-sufficient system is unparalleled. Don't be discouraged if you encounter challenges along the way; learning from your mistakes is part of the homesteading journey.
Optimizing for Cold Climates
- Double Glazing: Consider using double-layered polycarbonate panels for increased insulation in extremely cold climates.
- Earth Berming: Building up soil around the base of the greenhouse can help to insulate it and protect it from wind.
- Nighttime Insulation: Cover the greenhouse with blankets or tarps at night to retain heat.
- Heated Bedding: Utilize a thick layer of bedding inside the coop portion of the greenhouse that the chickens can fluff and burrow into.
- Consider a small, thermostatically controlled electric heater for extremely cold nights, but use sparingly and with caution, prioritizing safety.
Expanding Your Winter Homesteading Efforts
Once you've mastered the chicken coop greenhouse, explore other ways to enhance your winter self-sufficiency. Consider building a root cellar for storing vegetables (Read more about root cellaring example.com/root-cellaring), learning to dehydrate fruits and vegetables (Explore food dehydration methods: example.com/food-dehydration), or constructing a more robust animal shelter for other livestock. The possibilities are endless!

Conclusion
Building a passive solar chicken coop greenhouse is a rewarding DIY project that can significantly enhance your winter homesteading efforts. It provides a warmer, brighter environment for your chickens, extends your growing season, and reduces your reliance on external resources. By carefully planning and executing this project, you can enjoy fresh eggs, homegrown greens, and the satisfaction of self-reliance, even in the coldest climates. Embrace the challenge, learn from your experiences, and reap the rewards of a more sustainable and self-sufficient homestead.