Balcony Bounty: Grow a Salad Garden Without Breaking Your Back (or the Soil!)
Do you dream of fresh, vibrant salads brimming with homegrown goodness, but feel limited by a small balcony or patio? I used to feel the same way! Living in an apartment, I thought my gardening aspirations were destined to remain just that—dreams. I envisioned sprawling fields and hours spent toiling in the soil, things that simply weren't feasible with my limited space and busy schedule. But then, I discovered the magic of no-dig gardening in containers. And let me tell you, it's a game-changer!
Now, my small porch bursts with a surprisingly abundant salad garden. I’m not breaking my back tilling soil, and I’m harvesting delicious greens practically at my doorstep. I can’t believe I waited so long to get started.
In this blog post, I’ll walk you through how to create your own thriving salad garden in even the tiniest of spaces, using the simple and effective no-dig method. Get ready to enjoy delicious, homegrown salads, all season long, without the backache!

Planning Your Porch-Based Salad Oasis
Before you dive into planting, a little planning goes a long way. Think of it as designing your miniature garden paradise.
Assess Your Space:
First, take a good look at your available space. Measure the area where you plan to place your containers. Even a small balcony can accommodate several planters! The most crucial element is sunlight. Salad greens need at least 4-6 hours of sunlight per day. Observe your space throughout the day to determine how much direct sunlight it receives. A simple chart can help: note the time the sun hits a specific spot, the duration of direct sunlight, and where shady patches fall. This will inform your plant choices.
Also, if you're on a balcony, be mindful of weight restrictions. Soil, especially when wet, can be heavy. Check with your building management if you have any concerns.
Choosing the Right Containers:
Containers are your garden beds in a small space. Opt for containers that are at least 6-8 inches deep for shallow-rooted greens like lettuce and spinach, and 12 inches or more for plants like radishes and dwarf tomatoes.
Material matters, too. Terra cotta pots look beautiful and allow the soil to breathe, but they dry out quickly. Plastic containers retain moisture better but can overheat in full sun. Fabric grow bags are a great option: they're lightweight, allow for excellent drainage, and promote healthy root growth.
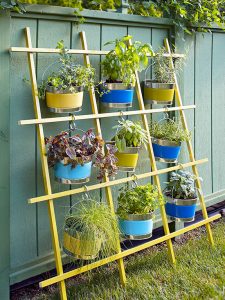
Don’t underestimate the power of upcycling! Old buckets, crates (lined with fabric), or even repurposed plastic storage bins can make excellent containers. Just ensure they have drainage holes. I drilled holes into a couple of old metal pails, added some decorative paint, and now they're stylish additions to my porch garden.
Salad Greens Selection:
Now for the fun part: choosing your greens! Loose-leaf lettuce is a fantastic choice for beginners as it’s easy to grow and you can harvest leaves as needed. Spinach, arugula, mesclun mix, and baby kale are also excellent options. Consider the growth habits of different varieties. Some, like romaine lettuce, grow upright, while others, like spinach, are bushier.
The real trick is to plant "cut and come again" varieties. These types of greens allow you to harvest leaves as needed, encouraging new growth and extending your harvest period.

Beyond Greens:
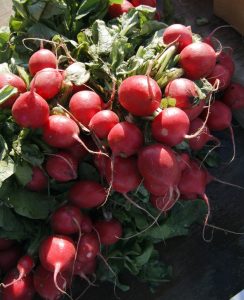
Don’t limit yourself to just lettuce! Radishes are quick and easy to grow in containers, adding a peppery kick to your salads. Dwarf varieties of cherry tomatoes thrive in pots and offer a burst of sweetness. Herbs like parsley, chives, and basil add flavor and aroma. And don't forget edible flowers like nasturtiums and pansies, which add a beautiful pop of color and a slightly spicy flavor.
Companion Planting:
Companion planting is a natural way to deter pests and improve growth. Basil repels tomato hornworms and whiteflies from tomatoes, while marigolds are known to deter nematodes and other soil pests. Plant chives near lettuce to deter aphids. It’s a symbiotic relationship that benefits all your plants.
Key Takeaway: A little planning regarding space, containers, and plant selection can set your small-space salad garden up for success!
The No-Dig Method: Building Your Soil Foundation
The no-dig method is a revolutionary approach to gardening that minimizes soil disturbance, promotes healthy soil ecosystems, and reduces the need for weeding. It's perfect for container gardening, especially when you're dealing with limited space and time.
Why No-Dig?
Traditional gardening often involves tilling or digging, which disrupts the soil structure and can harm beneficial microbes. No-dig gardening, on the other hand, works with nature, building healthy soil through layering organic materials. This results in improved soil structure, better water retention, and fewer weeds.
Layering Your Containers:
Here’s how to build your no-dig container:
- Base Layer: Start with a layer of coarse material for drainage. Gravel, broken pottery shards, or even small rocks work well. This prevents the soil from becoming waterlogged.
- Carbon Layer: Add a layer of "brown" materials, such as cardboard, shredded paper (avoid glossy print), or dry leaves. This layer suppresses weeds and helps retain moisture. I like to use flattened cardboard boxes from deliveries, making sure to remove any tape or labels.
- Nitrogen Layer: Next, add a layer of "green" materials, such as grass clippings, kitchen scraps (vegetable peelings, coffee grounds), or spent tea bags. This layer provides essential nutrients for your plants.
- Compost Layer: Add a generous layer of finished compost or well-rotted manure. This is the heart of your no-dig garden, providing a rich source of nutrients and beneficial microbes. You can source compost locally from garden centers or nurseries, or even make your own (more on that later!).
- Top Layer: Finish with a layer of good-quality topsoil or potting mix. This is where you’ll plant your seedlings or seeds.
Watering:
Water your container thoroughly after layering. The water will help settle the materials and initiate the decomposition process. Consistent watering is vital, especially in containers, as they tend to dry out more quickly than garden beds.
Mulching:
After planting, add a layer of mulch to help retain moisture, suppress weeds, and regulate soil temperature. Straw, wood chips, or shredded leaves are all excellent choices.
Key Takeaway: No-dig gardening is a simple and effective way to create a thriving salad garden in containers, promoting healthy soil and reducing the need for weeding.
Nurturing Your Salad Garden: Compost, Watering, and Pest Control
Once your no-dig container is established, it's time to nurture your salad garden and ensure it thrives.
Composting in Small Spaces:
Composting is a fantastic way to recycle kitchen scraps and create nutrient-rich soil amendments for your garden. Even if you live in an apartment, you can still compost!
- Vermicomposting: Worm composting is a great option for indoor composting. Worms break down food scraps into nutrient-rich castings that are excellent for your plants. You can purchase a worm bin online or build your own.
- Bokashi Composting: Bokashi composting is an anaerobic process that uses inoculated bran to ferment food scraps. It's another great option for small spaces, as it doesn't produce unpleasant odors.
- Kitchen Scrap Collection: Even if you don’t compost, you can still collect your kitchen scraps and use them as a nitrogen source in your no-dig layers. Simply bury them a few inches below the surface of the soil.

Watering Techniques:
Water deeply and less frequently to encourage strong root growth. Check the soil moisture regularly by sticking your finger an inch or two into the soil. If it feels dry, it's time to water. Use a watering can with a gentle rose head to avoid disturbing the soil.
Organic Pest Control:
Avoid using pesticides in your salad garden! Opt for natural pest control methods:
- Handpicking: Remove pests manually.
- Companion Planting: Use companion plants to deter pests.
- Neem Oil: A natural insecticide that can be used to control a variety of pests.
- Insecticidal Soap: Another natural insecticide that's effective against aphids, whiteflies, and other soft-bodied insects.
- Beneficial Insects: Attract ladybugs and lacewings to your garden. These beneficial insects prey on aphids and other pests.
Succession Planting:
To ensure a continuous harvest, plant seeds every few weeks. This is known as succession planting. By staggering your planting schedule, you'll have a steady supply of fresh salad greens throughout the growing season.
Key Takeaway: Proper composting, watering, and pest control are essential for maintaining a healthy and productive salad garden.
Harvesting and Enjoying Your Homegrown Salad
The moment you’ve been waiting for: time to reap the rewards of your efforts.
Harvesting Techniques:
Harvest your salad greens using the "cut and come again" method. Snip off the outer leaves, leaving the inner leaves to continue growing. This encourages new growth and extends your harvest period. Harvest in the morning for the best flavor.
Extending the Season:
To extend your growing season, consider using cold frames or row covers to protect your plants from frost. You can also plant cold-hardy varieties of salad greens.
Salad Recipes and Ideas:
Enjoy your homegrown salad greens in a variety of ways! Toss them with your favorite vinaigrette, add them to sandwiches or wraps, or use them as a base for a more elaborate salad. Don’t forget to add edible flowers for a touch of color and flavor!
Key Takeaway: Harvesting regularly, extending the season, and enjoying the fresh flavors of your homegrown salad are the ultimate rewards of your efforts.
From Porch to Plate: Savor the Flavor of Self-Sufficiency
Growing a salad garden in a small space is not only achievable, but also incredibly rewarding. It offers a connection to nature, a sense of self-sufficiency, and a delicious source of fresh, homegrown food. As summer approaches, now is the perfect time to plan your own porch-based salad oasis.
What's your biggest challenge when starting a garden? Share your thoughts and experiences in the comments below! And don't forget to subscribe to our newsletter for exclusive content and gardening tips!