Backyard Mushrooms: Turn Your Kitchen Waste into a Delicious Harvest
[ ,aspect=fit&q=75)]
How often do you toss out spent coffee grounds, cardboard boxes piling up ready for the recycling bin? We all do it, but what if I told you that these seemingly useless items could be transformed into a gourmet treat right in your own backyard? Growing your own edible mushrooms isn't just a fun DIY project; it's a sustainable way to reduce waste, put delicious, homegrown food on your table, and embrace the principles of farmhouse life. In this guide, I’ll show you how to easily and affordably cultivate your own mushrooms, transforming your kitchen waste into something truly wonderful. Get ready to unlock the hidden potential of your backyard and discover the magic of mushroom cultivation! Just remember, proper mushroom identification is CRUCIAL, only consume mushrooms that you have 100% positively identified as edible!
The Magic of Mycelium: Understanding the Basics
Before we dive into the practical steps, let's explore the fascinating world of mycelium. Think of mycelium as the root-like structure of the mushroom, a vast network of fine, thread-like filaments that grow underground or within a chosen substrate. This mycelial network is the vegetative part of the fungus, and it's responsible for absorbing nutrients and eventually producing the fruiting bodies we know as mushrooms.
The success of your mushroom cultivation depends heavily on providing the ideal conditions for mycelium growth. This typically includes a dark environment, consistent moisture, and temperatures specific to the species you're cultivating. Different types of mushrooms thrive on different substrates; some prefer wood chips, others grains, and, as we’ll explore today, oyster mushrooms are particularly fond of spent coffee grounds and cardboard. Maintaining sanitation is crucial to prevent contamination from competing molds or bacteria that can hinder mycelium growth.
It's also important to understand the different stages of mushroom growth: spores, spawn, and fruiting bodies. Spores are like the seeds of mushrooms, while spawn is a medium (usually grain or sawdust) that has been inoculated with mushroom spores and allowed to colonize with mycelium. We'll be using spawn in our method, as it provides a head start in the mushroom-growing process. The fruiting bodies, of course, are the mushrooms themselves – the delicious and nutritious result of all our efforts!
Gathering Your Resources: What You'll Need
The beauty of this method is that it utilizes readily available resources, making it an incredibly sustainable and budget-friendly project. Here's what you'll need:
Spent Coffee Grounds:
[
 ]
]Freshness is key when it comes to spent coffee grounds. They're relatively sterile due to the brewing process and are rich in nitrogen, making them an excellent substrate for oyster mushrooms. Ask your local coffee shop to save their grounds for you – they'll likely be happy to get rid of them! The grounds should be used as soon as possible after brewing to prevent contamination.
Cardboard:
Cardboard provides the necessary carbon component for the mushrooms to thrive. Opt for corrugated cardboard without colored inks, glossy finishes, or tape. These can contain harmful chemicals. Before using, soak the cardboard in water for a few hours until it's thoroughly saturated. This makes it easier for the mycelium to penetrate and colonize.
Oyster Mushroom Spawn:
[
 ]
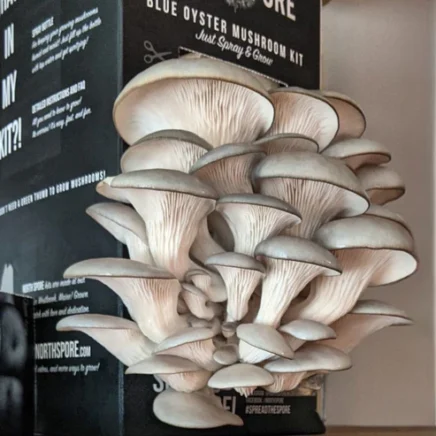
]Mushroom spawn is essentially a carrier medium that has been inoculated with mushroom mycelium. It's like a starter culture for your mushroom project. You can purchase oyster mushroom spawn from online retailers, local nurseries, or gardening supply stores. Ensure you're buying high-quality spawn from a reputable source for the best results. Many varieties of oyster mushrooms exist, make sure they are appropriate for your region.
Other Essentials:
- Gloves: To maintain hygiene and prevent contamination.
- Spray Bottle: To keep the substrate moist during incubation.
- Buckets or Containers: Choose food-grade plastic buckets or containers with lids to create your mushroom bed.
Step-by-Step: Building Your Mushroom Bed
Now comes the fun part – assembling your mushroom bed!
- Preparation: Tear the soaked cardboard into small pieces, roughly 1-2 inches in size. Ensure the coffee grounds are cool to the touch. Sanitize your chosen container with soap and water, and then wipe it down with rubbing alcohol to kill any potential contaminants.
- Layering the Bed: This is where the magic happens. In your container, create alternating layers of coffee grounds, cardboard, and oyster mushroom spawn. Start with a layer of cardboard at the bottom, followed by a layer of coffee grounds, and then sprinkle a layer of spawn. Repeat this layering process until the container is almost full, finishing with a layer of coffee grounds. Ensure each layer is lightly packed but not overly compressed. Gently mist each layer with water from your spray bottle as you go, ensuring the substrate is moist but not waterlogged.
- Incubation: Place the lid loosely on the container and transfer it to a dark, humid environment with a temperature range of 65-75°F (18-24°C). A basement, closet, or even a shaded area in your garage can work well. Cover the container with a damp cloth to help maintain humidity levels.
Patience and Observation: Caring for Your Mushroom Bed
During the incubation period, it's essential to monitor the progress of your mushroom bed.
- Monitoring Mycelium Growth: After a few days, you should start to see white, thread-like mycelium spreading throughout the coffee grounds and cardboard. This is a sign that the mycelium is actively colonizing the substrate.
- Maintaining Humidity Levels: Keep the substrate consistently moist by misting it with water every few days. Avoid overwatering, as this can lead to mold growth. The goal is to keep the substrate damp but not soggy.
- Troubleshooting Common Problems: Mold is a common issue in mushroom cultivation. If you notice any green, blue, or black mold, remove the affected area immediately to prevent it from spreading. Ensure proper ventilation and avoid overwatering to minimize the risk of mold growth. Pests are less common in this method, but if you notice any insects, you can use insecticidal soap to control them.
- When to Expect Fruiting: Depending on the environmental conditions and the quality of your spawn, you can expect to see tiny mushroom pins (baby mushrooms) forming within 2-3 weeks.
Harvesting and Enjoying Your Homegrown Mushrooms
Harvesting your own homegrown mushrooms is a truly rewarding experience.
- How to Harvest: When the mushroom caps have fully developed but are still slightly curled downwards, it's time to harvest. Gently twist or cut the mushrooms from the substrate. Avoid pulling them, as this can damage the mycelium.
- Storing Mushrooms: Store your harvested mushrooms in a paper bag in the refrigerator for up to a week. Avoid storing them in plastic bags, as this can cause them to become slimy.
- Cooking Suggestions: Oyster mushrooms have a delicate, slightly sweet flavor and a meaty texture. They're incredibly versatile and can be used in a variety of dishes. Try sautéing them with garlic and herbs, adding them to soups and stews, or using them as a topping for pizzas and salads. A simple sauté with butter, garlic, and a splash of soy sauce is a delicious and easy way to enjoy their unique flavor.
- Sustainability and Continuous Harvest: After harvesting, your mushroom bed will continue to produce mushrooms for several weeks. Simply keep the substrate moist and maintain the ideal environmental conditions. After a few harvests, the substrate will eventually be depleted of nutrients. At this point, you can compost the spent substrate and start a new mushroom bed.
A Fungal Future
Growing your own mushrooms is a simple, sustainable, and rewarding way to transform waste into a valuable resource. By utilizing readily available materials like spent coffee grounds and cardboard, you can reduce your environmental impact, put delicious, homegrown food on your table, and embrace the principles of sustainable home and cozy living. This fall, why not embark on your own mushroom-growing adventure? It's a fantastic way to connect with nature, reduce waste, and enjoy the fruits (or should I say fungi?) of your labor.
Ready to turn your kitchen waste into a culinary treasure? Share photos of your mushroom growing projects on social media using #BetterHomesHarvestMushrooms. Join our newsletter for more tips on sustainable gardening and homesteading and receive a free guide to seed starting as a thank you! Tell us in the comments: What are your biggest challenges with growing your own food?