Autumn's Sweet Secret: Pawpaw Bread, Mason Bee Houses, and the Magic of Sheet Mulch
As the summer sun begins to mellow and the first hints of autumn paint the landscape in hues of gold and amber, a treasure trove of flavors and aromas fills the air. Among these is the unique and elusive pawpaw, a fruit with a flavor like no other, evoking a tropical vacation in your own backyard. The air is thick with the sweet, almost floral scent of ripe pawpaws, while the industrious mason bees hum busily around the garden, preparing for their winter rest. Meanwhile, our sheet mulch beds are teeming with microbial life, quietly transforming fallen leaves and kitchen scraps into fertile soil. This recipe for Pawpaw Bread will make you see fall in a whole new light. But our dedication to the harvest extends beyond the kitchen. This week we are focusing on the smaller heroes of the garden: the Mason Bee, and a sheet of mulch that will work wonders for your soil. Welcome to the homestead.

The Pawpaw: America's Forgotten Fruit
The pawpaw ( Asimina triloba ) is a truly unique fruit, native to eastern North America. Unlike apples or peaches, the pawpaw boasts a custard-like texture, similar to a ripe avocado, and a flavor that's a delightful blend of banana, mango, and vanilla. It’s a taste of the tropics right here in the American heartland! However, this delicious fruit has a very short shelf life, typically only a few days once ripe, making it a rare and treasured find.
Identifying wild pawpaw trees isn't too difficult once you know what to look for. Their distinctive, large, oblong leaves, measuring 6-12 inches long, are a good starting point. In the spring, they produce drooping maroon-purple flowers. The fruit itself grows in clusters, typically 2-6 inches long, and transitions from green to yellow-brown as it ripens. Pawpaws often thrive in the understory of forests, seeking dappled sunlight.
When foraging for pawpaws, remember to practice responsible harvesting. Always leave at least half of the fruit for local wildlife, such as raccoons, opossums, and squirrels. Avoid stripping a single tree bare; pawpaws often grow in colonies known as pawpaw patches. Only take what you will realistically use and consider sharing your bounty with neighbors. This ensures the sustainability of this wonderful natural resource.
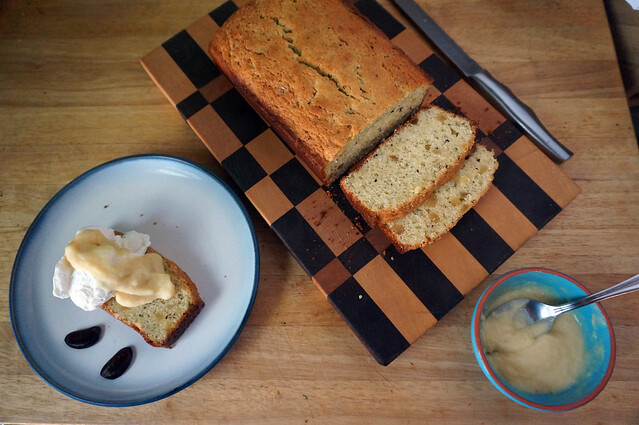
Pawpaw Bread: A Taste of the American Heartland
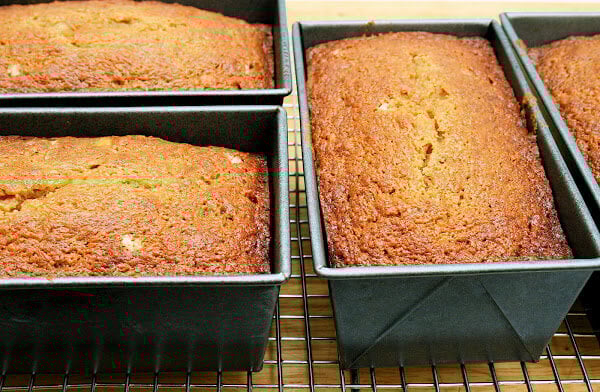
Now, for the main event: Pawpaw Bread! This recipe captures the unique flavor of pawpaws in a delicious and comforting loaf.
Ingredients:
- 1 cup ripe pawpaw pulp (from approximately 4-6 medium-sized pawpaws), mashed until smooth and creamy, showcasing its vibrant yellow-orange color. Ensure the pawpaws are very ripe and almost overripe for the best flavor and texture. Remove any seeds or skin before mashing.
- 2 cups all-purpose flour (or a blend of 1 cup all-purpose and 1 cup whole wheat for a heartier, nuttier texture). Sift the flour before measuring to avoid clumps.
- 1 teaspoon baking soda. Use fresh baking soda for optimal leavening.
- 1/2 teaspoon ground cinnamon (Saigon cinnamon for a warm, intense flavor).
- 1/4 teaspoon freshly grated nutmeg (for an aromatic touch).
- 1/4 teaspoon ground ginger (for a hint of spice).
- 1/2 teaspoon fine sea salt.
- 3/4 cup granulated sugar. Consider using brown sugar for a richer, molasses-like flavor.
- 1/2 cup unsalted butter, softened (European-style butter for a richer flavor). Ensure the butter is at room temperature for even creaming.
- 2 large eggs (free-range, from happy backyard hens).
- 1/2 cup buttermilk (or sour milk – add 1/2 tbsp white vinegar to milk & let stand for 5 mins).
- 1 teaspoon pure vanilla extract (for a classic flavor).
- Optional: 1/2 cup chopped toasted walnuts or pecans (for added flavor and crunch), 1/2 cup dark chocolate chips (70% cacao for a rich flavor).
Instructions:
- Preheat oven to 350°F (175°C). Grease and flour a 9x5 inch loaf pan (or line with parchment paper for easy removal).
- In a large bowl, whisk together the flour, baking soda, cinnamon, nutmeg, ginger, and salt.
- In a separate bowl, cream together the sugar and softened butter until light and fluffy (about 3-5 minutes using an electric mixer).
- Beat in the eggs one at a time, then stir in the mashed pawpaw pulp, buttermilk, and vanilla extract.
- Gradually add the wet ingredients to the dry ingredients, mixing until just combined. Be careful not to overmix. Overmixing will result in a tough bread. Fold in the nuts and chocolate chips, if desired.
- Pour the batter into the prepared loaf pan and bake for 50-60 minutes, or until a wooden skewer inserted into the center comes out clean with only a few moist crumbs clinging to it.
- Let cool in the pan for 10 minutes before transferring to a wire rack to cool completely. Slice and serve. Serve warm with a pat of butter or a dollop of whipped cream.
Variations:
Feel free to experiment with different warming spices like a pinch of cardamom or a bit of crystallized ginger. For added texture, try using toasted pecans or dark chocolate chunks. Enjoy!
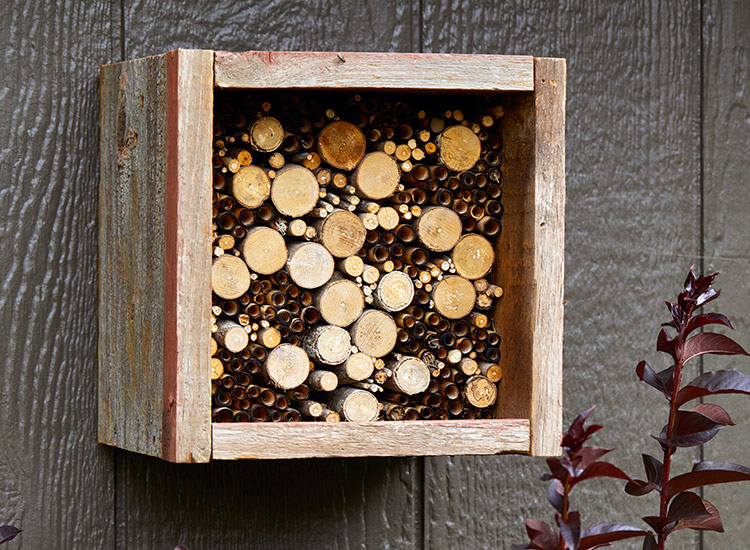
Building a Mason Bee House: A Haven for Pollinators

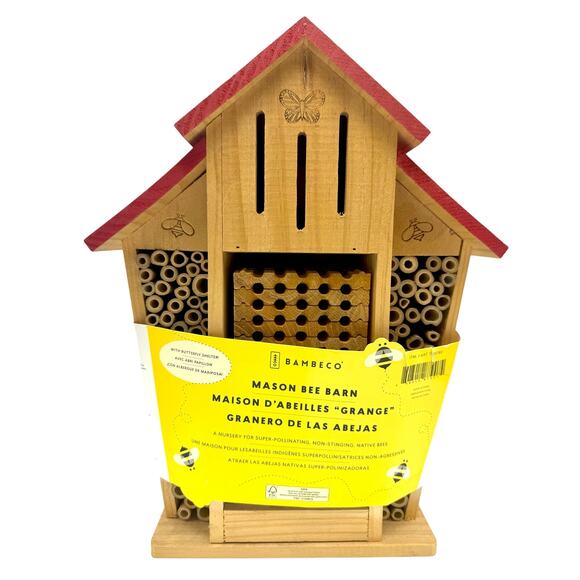
Mason bees are exceptional pollinators, even more efficient than honeybees in some cases! By providing them with a safe nesting habitat, you can significantly boost the pollination of your fruit trees, vegetable garden, and pawpaw patch, too. Building a mason bee house is a simple and rewarding project.
Materials List:
A few scraps of untreated cedar, redwood, or pine lumber (approximately 1" thick). 6-8mm diameter paper or cardboard tubes that the bees can nest in (available online or at garden centers). A drill with various sized drill bits. Wood screws or nails. A saw. Sandpaper. An overhang to protect them from the elements and lots of patience.
Instructions:
Start by cutting the lumber to fit your desired design. A simple box that is approximately 6" deep by 6" wide by 8" high is a good starting point. Sand all rough edges to prevent splinters. Next, bundle the nesting tubes tightly and insert them into the box, ensuring that the open ends are facing outwards. Secure the tubes with a piece of chicken wire or hardware cloth to prevent them from falling out. Attach a small overhanging roof (4-6 inches) to protect the tubes from rain. Mount the mason bee house securely on a south-facing wall or fence, where it will receive at least 6 hours of direct sunlight per day and be sheltered from strong winds and heavy rain. Place the house near a source of damp, clay-rich mud, such as a shallow dish filled with water and clay soil, as mason bees need mud to seal their nests. Clean the house annually after the bees have emerged in the spring to prevent the buildup of parasites and diseases.
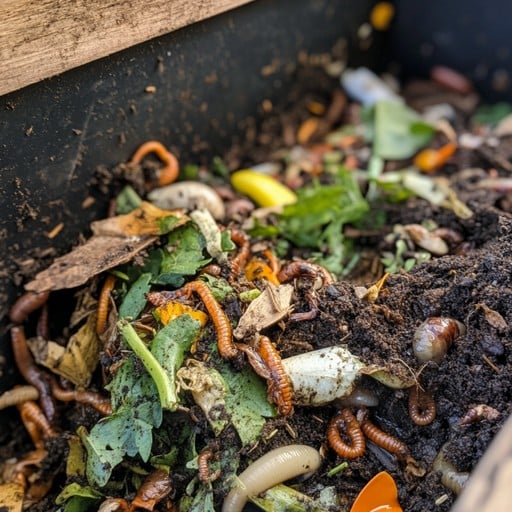
Sheet Mulching: Building Fertile Soil, Layer by Layer

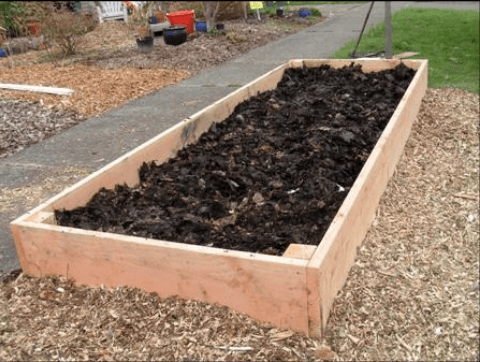
Sheet mulching, also known as lasagna gardening, is a fantastic way to build fertile soil, suppress weeds, and retain moisture. This method mimics the natural decomposition process, creating a thriving environment for your plants. It's particularly effective for dealing with persistent weeds like bindweed or quackgrass.
Instructions:
First, mow or cut down any existing vegetation in the area you want to sheet mulch as close to the ground as possible. Water the area thoroughly to encourage decomposition. Lay down a layer of overlapping cardboard or several layers of newspaper (at least 6-8 sheets thick), ensuring all edges overlap significantly to prevent weeds from growing through. Remove any tape or glossy paper from the cardboard. Wet the cardboard or newspaper thoroughly to help it stay in place and begin breaking down. Next, add a layer (2-4 inches thick) of nitrogen-rich 'green' materials, such as grass clippings (avoid clippings treated with herbicides), vegetable scraps, coffee grounds, or aged manure. Follow this with a layer (4-6 inches thick) of carbon-rich 'brown' materials, such as straw, shredded leaves, wood chips, or shredded newspaper. Wet each layer thoroughly as you build. Top the sheet mulch with a final layer (2-4 inches thick) of compost or well-rotted manure. This will provide a nutrient-rich planting medium for your plants. Wait at least a few weeks, or preferably several months, before planting in the sheet mulched area. This will give the materials time to decompose, improve the soil structure, and suppress weeds. Plant directly into the compost layer, ensuring the roots of your plants can reach the underlying soil.
Closing Reflection:
From the sweet, tropical-infused taste of homemade pawpaw bread to the diligent hum of mason bees buzzing around our flowering plants and the rich, fertile soil created by the magic of sheet mulching, our homestead stands as a vibrant testament to the extraordinary beauty and abundant gifts of the natural world. We wholeheartedly encourage you to embrace these sustainable practices in your own garden and kitchen, and to actively participate in creating your own thriving and resilient ecosystem. What are your favorite ways to celebrate the bountiful harvest season? What innovative strategies are you currently employing to promote biodiversity and enhance soil health on your homestead? Please share your unique stories, valuable tips, and inspiring insights with us in the comments section below! We eagerly await hearing from you!
Keywords: organic gardening, seasonal harvest, homegrown, compost, sustainable home, cozy living, backyard projects, farmhouse life, Pawpaw Bread, Mason Bee House, sheet mulching, pawpaws, native pollinators, lasagna gardening, permaculture, sustainable gardening, soil health, ecosystem, composting.