
Autumn's Essence: Butternut Squash Risotto, Hugelkultur, and Herb-Infused Vinegars
As a golden glow blankets the fields and the air turns crisp, a sense of groundedness washes over the homestead. The garden's bounty offers its final riches – the earthy sweetness of butternut squash, the fallen branches beckoning a new purpose, and the fragrant herbs waiting to be preserved. Today, we celebrate this autumn's essence by creating a creamy Butternut Squash Risotto, a comforting embrace in a bowl; by building a Hugelkultur Raised Bed, a testament to nature's cycle of decay and renewal; and by crafting vibrant Herb-Infused Vinegars, capturing the garden's flavors to brighten winter meals.

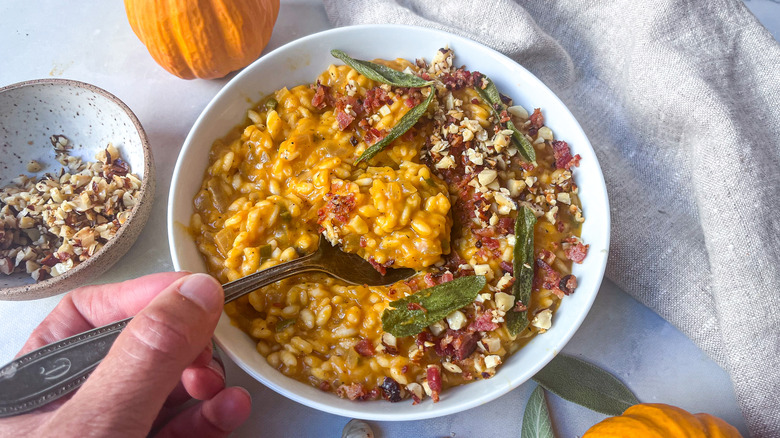
Butternut Squash Risotto with Sage and Brown Butter
This Butternut Squash Risotto is a celebration of fall flavors. The creamy texture, the nutty sweetness of the squash, the earthiness of the sage, and the richness of the brown butter all come together in perfect harmony. The best butternut squashes have a dull, hard rind and are heavy for their size. Envision a crisp autumn evening sitting on the porch, savoring each spoonful of this comforting dish.
Ingredients:
- 1 medium butternut squash (about 2 pounds), peeled, seeded, and cubed
- 6 cups vegetable broth, preferably homemade
- 4 tablespoons olive oil, divided
- 1 medium yellow onion, finely chopped
- 2 cloves garlic, minced
- 1 1/2 cups Arborio rice
- 1/2 cup dry white wine
- 1/4 cup grated Parmesan cheese, plus more for serving
- 1/4 cup butter, unsalted
- 1/4 cup fresh sage leaves, chopped
- Salt and pepper to taste
Instructions:
Preheat oven to 400°F (200°C). Toss butternut squash with 2 tablespoons olive oil, salt, and pepper. Roast for 25-30 minutes, or until tender and slightly caramelized. The goal is a slight caramelization with soft insides.
Meanwhile, heat vegetable broth in a saucepan and keep warm. Simmer, don't boil.
In a large pot or Dutch oven, heat remaining 2 tablespoons olive oil over medium heat. Add onion and cook until softened, about 5 minutes. Add garlic and cook for 1 minute more. Be careful not to burn the garlic.
Add Arborio rice and cook, stirring constantly, for 1-2 minutes, until rice is translucent. Imagine each grain covered in oil and ready to absorb the flavors.
Pour in white wine and cook, stirring, until absorbed. The aroma should fill your kitchen.
Begin adding warm broth, 1 cup at a time, stirring constantly until each cup is absorbed before adding the next. Continue until rice is creamy and al dente, about 20-25 minutes. The stirring releases the starches to give it the right consistency.
Stir in roasted butternut squash and Parmesan cheese. Season with salt and pepper to taste. Don't be shy with the parmesan!
In a small skillet, melt butter over medium heat. Cook until butter is browned and smells nutty, about 3-5 minutes. Watch carefully so it doesn't burn. Remove from heat and stir in sage.

- Serve risotto immediately, drizzled with brown butter sage sauce and topped with additional Parmesan cheese.
Building a Hugelkultur Raised Bed
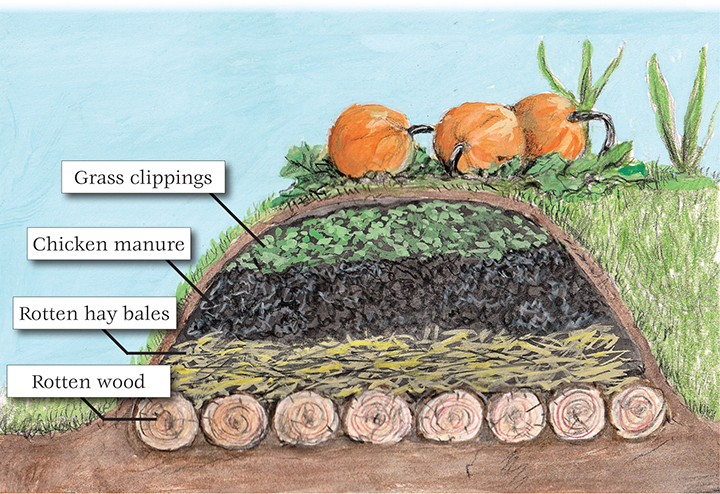
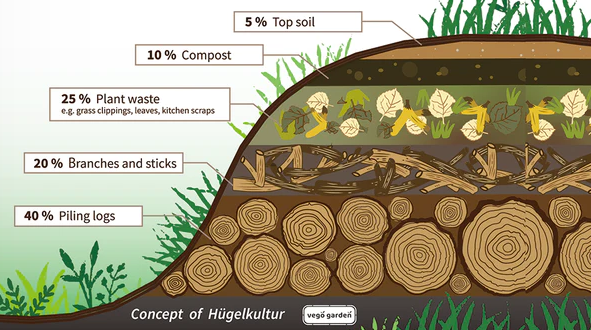
Hugelkultur (German for "hill culture") is a gardening technique that utilizes rotting wood to create fertile, water-retentive raised beds. The rotting wood acts like a sponge, holding water and releasing nutrients to the soil over time, reducing the need for watering and fertilization. This is a long-term project that will benefit your garden for years to come, improving soil structure and providing a rich growing environment.
Materials:
- Large logs and branches (rotting wood is ideal - think fallen oak or maple)
- Smaller branches and twigs (pine needles optional for acidity)
- Grass clippings, leaves, and other organic matter (avoid diseased plants)
- Compost (homemade is best!)
- Topsoil (screened for rocks)
- Shovel (a sturdy spade will do)
- Wheelbarrow (optional but recommended)
Instructions:
Choose a location for your Hugelkultur bed that receives ample sunlight (at least 6 hours a day). Consider the slope of the land for drainage.
Dig a shallow trench, about 1-2 feet deep, where the bed will be located. This helps retain moisture at the base.
Place the largest logs and branches in the trench, forming the base of the bed. Pack them tightly together.
Add smaller branches and twigs on top of the logs, filling in the gaps. This creates air pockets for decomposition.
Layer grass clippings, leaves, and other organic matter on top of the branches. Wet these layers down as you go.
Add a layer of compost on top of the organic matter. The richer the compost, the better.
Top with a layer of topsoil, creating a planting surface. Aim for a depth of at least 6 inches.
Water the bed thoroughly to help the materials settle. The bed will shrink over time as the wood decomposes.
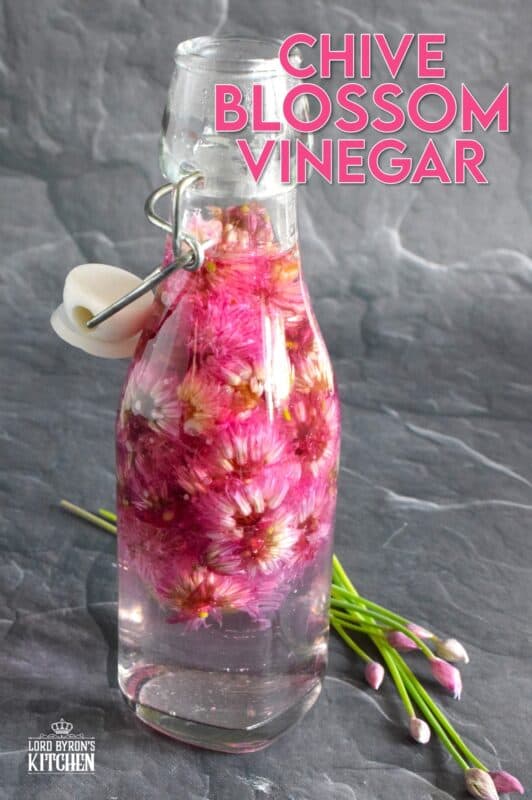
Crafting Herb-Infused Vinegars
Herb-infused vinegars are incredibly versatile. Use them to add a personal touch to salad dressings, marinades, or even homemade cleaning solutions. They also make thoughtful and unique gifts for friends and family. Capturing the flavors of your garden in this way ensures you can enjoy them throughout the winter months.
Materials:
- Fresh herbs (such as rosemary, thyme, basil, oregano – choose your favorites!)
- White wine vinegar or apple cider vinegar (organic recommended)
- Clean glass jars with lids (sterilized for longer shelf life)
Instructions:
Wash and dry fresh herbs thoroughly. Remove any damaged leaves.
Pack herbs loosely into clean glass jars. Don't overcrowd the jar.
Pour vinegar over herbs, making sure they are completely submerged. Press down gently to release any trapped air bubbles.
Seal jars tightly and store in a cool, dark place for 2-4 weeks. Shake gently every few days.
Strain vinegar through a cheesecloth-lined sieve. Discard the spent herbs.
Discard herbs and pour infused vinegar into clean bottles. Add a fresh sprig of herbs for decoration (optional).
Closing Reflection
As the season transitions, let us embrace the gifts of autumn – the comfort of warm food, the wisdom of natural cycles, and the creativity of preserving flavors. Whether you're savoring the creamy richness of Butternut Squash Risotto, building a foundation for future harvests with a Hugelkultur bed, or capturing the essence of your garden in herb-infused vinegars, may these activities deepen your connection to the land and nourish your soul. Share your own autumnal inspirations and homesteading adventures in the comments below! What are your favorite herbs to infuse? What are you growing this season? We can't wait to hear your story.
KEYWORDS: homesteading, self-sufficiency, seasonal living, butternut squash risotto, Hugelkultur, herb-infused vinegars, organic gardening, sustainable living, autumn harvest, homemade, comfort food.
SEO KEYWORDS:
Butternut Squash Recipes, Hugelkultur Gardening, Herb Infused Vinegar, Autumn Homesteading, Homemade Risotto Recipes, Raised Bed Gardening Ideas, DIY Herb Vinegars, Fall Harvest Recipes, Sustainable Gardening Practices, Butternut Squash Risotto Recipe, Butternut Squash Risotto Sage Brown Butter, How to Build Hugelkultur Raised Bed, Herb Infused Vinegar for Salad Dressing, Hugelkultur Raised Bed for Beginners, Best Herbs for Infusing Vinegar, Easy Butternut Squash Risotto Recipe, Hugelkultur Raised Bed Water Retention, DIY Herb Infused Vinegar Cleaning, Growing Vegetables with Hugelkultur, Homemade Herb Vinegar for Marinades, Seasonal Cooking, Permaculture, Soil Health, Garden Bed Design, Vinegar Infusion, Cooking with Fall Vegetables, Sustainable Agriculture, Fermented Foods, How do I make Butternut Squash Risotto?, What is Hugelkultur and how does it work?, What are the best herbs to infuse in vinegar?, How long does Hugelkultur last?, Can I use herb vinegar for cleaning?